46 KiB
WeeGUI
WeeGUI is a lightweight library for creating graphical user interfaces in 80 column text mode on the Apple IIe Enhanced, Apple IIc, and Apple IIgs families of computers. It supports both keyboard and mouse controls for your interface. It is designed to take minimal RAM (less than 7k), and can be used from assembly language or Applesoft BASIC programs under ProDOS. WeeGUI installs itself on the secondary hi-res page, using an area normally vacant in most text-based BASIC and assembly programs.
You can use WeeGUI as a full-blown user interface system, or as a simple drawing library for ASCII art. Use as much or as little of its features as you wish. WeeGUI tries not to enforce any particular structure or use-case on your program. It is intended to be so easy to use that you'll choose it over rolling your own menuing system for whatever application you're building. Whether you're building the next ProTERM, or just a quick-and-dirty interface for your Arduino project, WeeGUI can be your go-to library.
Demo
For a quick demo of what WeeGUI can do, install the disk image weegui.dsk in your emulator, or make a floppy disk from it and boot your real Apple II. On the disk, you'll find the WeeGUI library itself, an Applesoft demo program, and an assembly language demo program. Boot the disk, then try the following command:
]-basicdemo
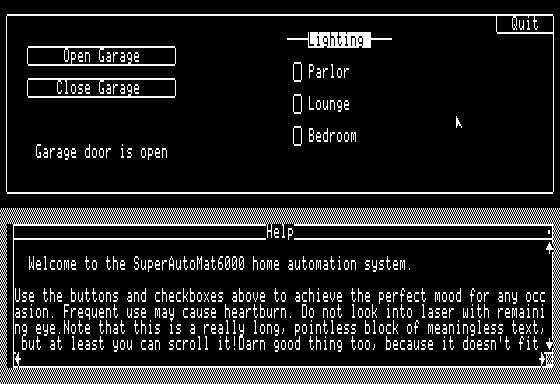
You'll be presented with a sample GUI for a fictional home automation system. This entire interface, including mouse and keyboard control, is just a handful of lines of Applesoft. You can navigate this demo using Tab and Return, or using your mouse. Mouse support works in the Virtual II emulator as well (assuming you have a mouse card assigned to one of the slots). If you have a physical Apple II, you can use either a standard Apple IIc mouse, an Apple IIe mouse with a mouse card in any slot, or the standard ADB mouse on your Apple IIgs.
Next, try this assembly language demo:
]-asmdemo
Since assembly is all about speed, this demo shows off some fast ASCII-art animation done with WeeGUI. Hit 'q' (lowercase) to quit the demo.
The source code of these two example programs can be found in Appendix C of this document.
Installation
####Applesoft
Place the WeeGUI library in the same ProDOS folder as your program. Then, at the top of your program, simply load it into memory as follows:
10 PRINT CHR$ (4)"BRUN WEEGUI"
That's it! WeeGUI will load itself into memory and it's ready for use.
####Assembly Language
When using assembly language, you can install WeeGUI by loading the WEEGUI library into memory from your program. The simplest way to do this is to invoke BRUN using the Applesoft input buffer, like this:
	ldx #0
	ldy #0
@0:	lda brunCmdLine,x
	beq @1
	sta $0200,y
	inx
	iny
	bra @0
@1:	jsr $be03

brunCmdLine:
	.byte "BRUN WEEGUI",$8d,0
If you load the library some other way, make sure you load it at the base address specified in the memory map below, and perform a JSR to that address in order to prepare the library for use.
You also need to include the file WeeGUI_MLI.s in your program. This is the WeeGUI Machine Language Interface, and it provides all the constants, entry points, etc that you'll need for WeeGUI.
####Memory Map
WeeGUI is about 7k in size, and lives on top of the second hires page. The assumption is that, if you're making an 80-column-text-based GUI program, you don't also need fancy hi-res page flipping animations. For an experimental version that lives primarily in the auxiliary memory bank, see Appendix A.
| $FFFF | |
| ... | |
| $9600-$BFFF | ProDOS |
| $5BC5-$95FF | Applesoft Program Space |
| $4000-$5BC4 | WeeGUI |
| $3FFF | End of Hi-Res Page 1 |
| ... | |
| $0000 |
Calling WeeGUI
###Applesoft
WeeGUI is accessed from Applesoft through ampersand extensions. For example, the HOME command clears the screen and can optionally draw a desktop background:
10 &HOME(1)
If the call requires parameters, you can make a C-style function call. For example, to select view #6, you would call:
10 &SEL(6)
The exact name of each API call is specified in the Applesoft portion of the API documentation below.
Also note that you can call WeeGUI interactively from the Applesoft prompt. No line numbers required! This is a great way to experiment with the API calls. Some calls may leave the cursor in an odd location, but you can still get the gist of things.
###Assembly Language
Note: All assembly language samples are written in the style of the ca65 assembler (which is also what WeeGUI is written in). However, the code is easily adaptable to your assembler of choice.
From assembly, a Machine Language Interface is provided, similar to ProDOS. WeeGUI is called by setting a function name in the X register, and calling the WeeGUI entry point. For example:
main:
	ldx #WGDesktop
	jsr WeeGUI
The constant WGDesktop is provided to your program by the WeeGUI_MLI.s file (part of the WeeGUI package). Be sure to include this file in your assembly language project. If a call requires parameters, these will be passed in a couple of ways, as shown below.
#####Register Passing:
Simple calls may use a register or two for parameters. For example, the call to select a view uses the accumulator (as specified in the API documentation):
lda #6				; This is our parameter
ldx #WGSelectView	; Followed by a typical WeeGUI call
jsr WeeGUI
Registers that you use to pass a parameter to WeeGUI may contain different values upon return.
#####Zero Page Passing:
For more complex calls, there are 4 reserved parameter-passing locations in the zeropage. These are named PARAM0-PARAM3, and are specified in WeeGUI_MLI.s. These locations are unused by Applesoft or ProDOS. You can use them in your own programs, so long as they aren't disrupted while inside a WeeGUI call.
For example, the call to create a view uses the zero page to pass a pointer (as specified in the API documentation):
lda #<addr			; 'addr' is a 16-bit pointer we'd like to pass in
sta PARAM0			; PARAMn are reserved zeropage locations
lda #>addr
sta PARAM1
ldx #WGCreateView	; Now we can make our typical WeeGUI call
jsr WeeGUI
See the section Callbacks, below, for more information on how 16-bit values are passed in to WeeGUI.
Program Structure for WeeGUI
Graphical user interfaces generally have a concept of a run loop. This is important because the program flow is driven asynchronously by the user's actions. Compare this to command-line programs, which enforce flow with specific moments of being blocked waiting for input. Most GUI libraries impose this run loop structure on your program. WeeGUI does not. Rather, it provides tools for you to set up a run loop if you wish, or you may simply call into WeeGUI in whatever way is most useful for your program. However, for a properly structured GUI program, you should build a run loop using the techniques described below.
###Assembly Language
A typical assembly language run loop simply waits for keypresses and responds to them.
runLoop:
	lda $C000
	bpl runLoop
	sta $C010

	; Respond to keys as needed

	bra runLoop
If you want to support the mouse, WeeGUI has you covered. You just need to add one piece to your run loop:
runLoop:
	ldx #WGPendingViewAction
	jsr WeeGUI

	lda $C000
	bpl runLoop
	sta $C010

	; Respond to keys as needed

	bra runLoop
Note the call to WGPendingViewAction on each pass through the loop. For the mouse, WeeGUI will make note of actions taken by the user, but won't act until you say so. It is up to your program to call WGPendingViewAction periodically to allow WeeGUI to handle these events.
WeeGUI calls are relatively free of side effects. Most calls will clobber the BASL and BASH values in the zeropage (typically used by text rendering in Applesoft and other programs). Unless otherwise noted, all registers except parameters passed in can be assumed to be preserved by all API calls, and the system can be assumed to be in the same state you left it when you made the WeeGUI call.
The API documentation below indicates which registers and/or PARAM locations are used for parameter passing in each call, and what the value of the X register should be (in terms of constants supplied by WeeGUI_MLI.s)
###Applesoft
Normally, Applesoft is not intended to be used in a run-loop style of programming. To use a run-loop, there needs to be a non-blocking form of user-input. WeeGUI provides this for you with the &GET function. Calling &GET will retrieve keyboard input if any is pending, and store it in the variable you provide. If no keypresses are pending, execution proceeds to the next line.
Similar to the Assembly Language run loop, your Applesoft program also needs to allow WeeGUI to process mouse events that the user is creating outside your program's control. This is done with the &PDACT (pending action) function.
Here's a sample Applesoft run loop using these techniques:
1  PRINT  CHR$ (4)"brun weegui"
70 REM Run Loop
80  &PDACT
90  &GET(A%)
99 REM 113 is the ASCII code for 'q' (to quit)
100  IF A% = 113 THEN GOTO 1000
110  GOTO 80
1000 &EXIT
You can omit &PDACT if you have no desire to support the mouse.
Callbacks
User interface elements (such as buttons and checkboxes) can have an action callback attached to them. This is a piece of your code that is called by WeeGUI any time that interface element needs to take action. This may occur when the user clicks with the mouse, or when they hit a hotkey on the keyboard, for example.
In Applesoft, callbacks are simply a line-number. WeeGUI will perform a GOSUB to the line number you provide, and expects it to end with a RETURN.
In assembly language, callbacks are a 16-bit address (a function pointer, of sorts) that you provide. WeeGUI will perform a JSR to the address you provide, and it is expected that your callback will end with an RTS. 16-bit pointers are always provided with the least significant byte first, just like any other 16-bit value on the Apple II.
Mouse Control
Adding mouse support to your WeeGUI program is very easy. The mouse is enabled and disabled using API calls. Once enabled, the mouse is processed automatically for you (including rendering the pointer as needed). When the user clicks on an interactive GUI element, WeeGUI will invoke a callback in your program, using the methods detailed above, under Callbacks.
As explained earlier, these callbacks are performed (if needed) when you invoke WGPendingViewAction from assembly language, or &PDACT from Applesoft. Make sure to perform this call frequently inside your run loop.
Here's sample code for setting up a button that can be clicked, and providing the callback for that button, in both languages.
####Assembly Language
	; Create the button. This is done by passing a pointer to a parameter block
	lda #<MyButton
	sta PARAM0
	lda #>MyButton
	sta PARAM1
	ldx #WGCreateButton
	jsr WeeGUI

	...

myCallback:
	; Do stuff when button is clicked
	rts


	...

MyButton:
	.byte 2,35,10,15		; Position and size of button
	.addr myCallback		; Pointer to callback when clicked
	.addr MyTitle			; Pointer to null-terminated title

MyTitle:
	.byte "Okay",0
####Applesoft
10 REM Create Button with given position and size.
20 REM Note line-number (1000) provided for callback
30  &BUTTN(2,35,10,15,1000,"Okay")

...

1000 PRINT "Button Clicked"
1010 RETURN
Character Types
A quick note on use of characters and strings in WeeGUI. The Apple II ROM tends to want the high bit set when otherwise-normal ASCII character values are provided. Similarly, characters given to programs by the ROM often have the high bit set. WeeGUI refers to this as the "Apple" format for characters. Normal "ASCII" format refers to characters whereby the high bit is not used in this artificial fashion. Unless otherwise specified, you can assume WeeGUI expects normal ASCII characters.
Coordinate Systems
Since WeeGUI operates on the 80 column text screen, the global coordinate system ranges from 0-79 horizontally, and 0-23 vertically. When specifying the location of a window, for example, you will use this global coordinate system.
Each View (see below) also has its own coordinate space, starting with (0,0) in the upper left. This coordinate space is the size of the content region of the view, so it may be larger than the view itself. When a view scrolls, the local coordinate system moves, such that (0,0) in view space may map to a different point in global space. Of course, view content is also clipped, so if the view is scrolled, the (0,0) will not actually be visible.
Views
The basic "unit" of WeeGUI operations is the View. Your program can have up to 16 views at one time, and views are identified with a 4-bit ID number. Buttons and checkboxes are also views, and require their own view ID. So, for example, if you have four buttons, you have room for twelve other views of any type.
A View is a rectangle inside which content is displayed. Content exists in a special coordinate system local to the view it is displayed in. This content can be larger than the view is onscreen. When drawn, content is clipped to the edges of the view. Content can also be scrolled in any direction, thus creating a larger virtual space that the view shows a small piece of at any one time.
Many API calls rely on the concept of a "selected" view. One view at a time can be "selected", and subsequent view-related operations will apply to that view. There is no visual effect to "selecting" a view. It's simply a way to tell WeeGUI which view you are currently interested in.

The above diagram shows how the two coordinate systems (global and local) relate to each other. Note that the content area of a view (shown in light blue) is larger than what is shown. The content is clipped to the red box, and can be scrolled as needed.
View Styles
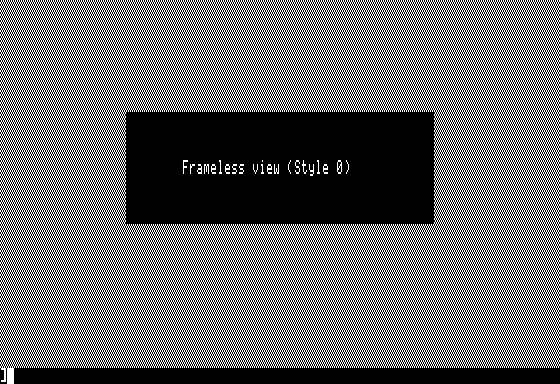
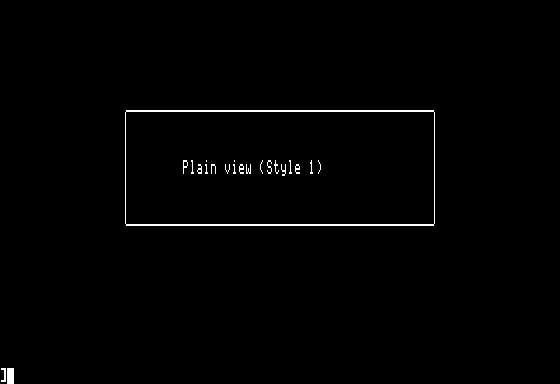
Views in WeeGUI can be drawn frameless, or with two different kinds of frame. Below are samples of each frame, shown against whichever background shows it the best (black or desktop).
 |
 |
 |
IMPORTANT: The visual frame around a view is drawn outside the bounds of the view. This means you need to allow room around your views. Don't attempt to place a view in columns 0 or 79, or in rows 0 or 23. In order to maximize rendering speed, WeeGUI takes only minimal precautions to prevent rendering outside the visible screen area. Rendering outside the screen area will almost certainly cause crashes and other Very Bad Things™ on your Apple II. The exception to this is frameless views (style 0). These can be used right up to the edges of the screen.
Because view frames are rendered with Mousetext characters, views have limits on how close they can be placed together, and overlapping views may not always look perfect. WeeGUI views are drawn with a modern display-list rendering strategy, which means it combines information about all views to make the result look as good as possible within the constraints of the Apple II character set. For example, you can have Plain views that are separated by only one row, because there is a "double-horizontal-line" character in Mousetext that WeeGUI can use to render horizontal borders close together. However, no such character exists for verticals, thus adjacent views must be separated by at least two columns. You'll need to experiment a bit to get a sense of what will render well and what won't.
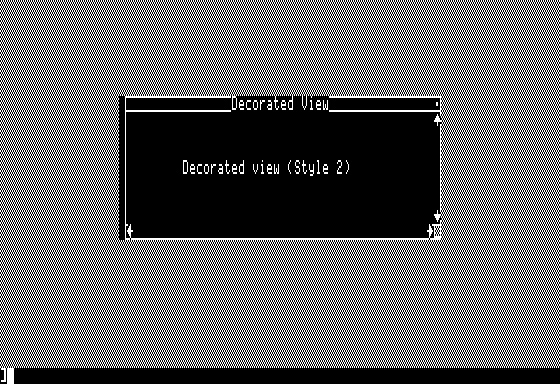
###Decorated Views
Decorated views have some special properties associated with them. First of all, the scroll arrows that you see are automatically detected for mouse clicking, and WeeGUI will scroll the view for you. Naturally, this requires your application to redraw the view in response. To facilitate this, the View Action (normally used by things like buttons) will be called for the decorated view when scrolling has taken place. You can use this callback to redraw the contents of your view. If you are also including your own scrolling method via keyboard, it is convenient to share this same subroutine for redrawing in response to keyboard scrolling. See the BASICDEMO sample code in Appendix C for an example of this, and see the Callbacks section above for information on view action callbacks.
Cursors
WeeGUI has multiple cursors. There is always a global cursor, which maps to the Apple II's normal cursor. You will very rarely need to know about or use this cursor. Each View also has its own local cursor, which moves in that View's coordinate space. These local view cursors are independent of each other, and are the ones you will use for most operations.
Focus
In order to support keyboard control of GUIs, WeeGUI includes the concept of "view focus". The currently "focused" view will be visibly highlighted in some way to the user, and taking "action" will affect the currently selected view. It's up to your program to provide a way to shift focus (such as with the Tab key). Your program also specifies when the currently focused view should take action (usually via Return, Space, or similar keypress). WeeGUI handles rendering the highlighted element in a distinct way. Your program only needs to specify when to shift focus.
There is also a construct called the focus chain. This is an implied list of views, and of which can become the focused one. Any time you request the "next" or "previous" focus view, WeeGUI finds the next (or previous) view in the chain which is eligible for focus. This focus chain is created in the order you create your views. Views that cannot receive focus are automatically left out of the chain. As you add and remove views, WeeGUI updates the focus chain for you.
Focusing is not relevant to mouse control, since the user can take action on any view at any time.
WeeGUI API Reference
The following is a complete list of the Application Program Interface calls you can make. Both languages are shown when available, but not all API calls have both an Applesoft and assembly version.
For assembly, each call indicates which registers and/or PARAM locations are used for parameter passing, and what the value of the X register should be (in terms of constants supplied by WeeGUI_MLI.s)
Applesoft calls are sometimes shown over multiple lines for visual clarity, but of course they need to be all on one line in practice.
View Routines
These routines are used for creating, modifying, and working with views.
####WGCreateView Creates a new WeeGUI view. Up to 16 are allowed in one program. If a view is created with the same ID as a previous view, the previous view is destroyed and replaced with the new one. Views are not shown when created. Call WGPaintView to display it.
| Assembly | Applesoft |
|---|---|
X: WGCreateView PARAM0: Pointer to configuration block (LSB) PARAM1: Pointer to configuration block (MSB) | &WINDW( View ID, Style (see View Styles, above), Left edge, Top edge, View width, View height, Content width, Content height) |
####WGCreateCheckbox Creates a new WeeGUI checkbox view. This is a specialized version of WGCreateView, and its parameters are similar.
| Assembly | Applesoft |
|---|---|
X: WGCreateCheckbox PARAM0: Pointer to configuration block (LSB) PARAM1: Pointer to configuration block (MSB) | &CHKBX( View ID, X position, Y position, "Label") |
####WGCreateRadio Creates a new WeeGUI radio button view. This is a specialized version of WGCreateView, and its parameters are similar.
Radio buttons act as a group; selecting one radio button deselects all other radio buttons. In WeeGUI, all radio buttons function as a single group. If you need multiple radio groups, rethink your design until you realize you don't need that.
| Assembly | Applesoft |
|---|---|
X: WGCreateRadio PARAM0: Pointer to configuration block (LSB) PARAM1: Pointer to configuration block (MSB) | &RADIO( View ID, X position, Y position, "Label") |
####WGCreateProgress Creates a new WeeGUI progress bar view. This is a specialized version of WGCreateView, and its parameters are similar.
| Assembly | Applesoft |
|---|---|
X: WGCreateProgress PARAM0: Pointer to configuration block (LSB) PARAM1: Pointer to configuration block (MSB) | &PROG( View ID, Left edge, Top edge, Width) |
####WGCreateButton Creates a new WeeGUI button view. This is a specialized version of WGCreateView, and its parameters are similar.
| Assembly | Applesoft |
|---|---|
X: WGCreateButton PARAM0: Pointer to configuration block (LSB) PARAM1: Pointer to configuration block (MSB) | &BUTTN( View ID, Left edge, Top edge, Width, Line number for click callback, "Label") |
####WGDeleteView Deletes the selected view. The view is erased from the screen, and the ID is now available for use by a new view.
| Assembly | Applesoft |
|---|---|
X: WGDeleteView | &KILL |
####WGSelectView Selects a view. Subsequent view-related operations will apply to this view. Does not affect visual appearance of view.
| Assembly | Applesoft |
|---|---|
X: WGSelectView A: View ID | &SEL(View ID) |
####WGGetSel Returns the ID of the currently selected view in the Applesoft integer variable you specify. Assembly programs can access the global variable WG_SELECTVIEW directly.
| Assembly | Applesoft |
|---|---|
| Not available | & GTSEL(A%) |
####WGPendingViewAction Processes any pending view actions that the user has initiated with the mouse. This should be called once each time through your run loop. If no mouse actions are pending, this call will do nothing, and quietly return to your program. If you do not wish to support the mouse, you do not need to call this.
| Assembly | Applesoft |
|---|---|
X: WGPendingViewAction | &PDACT |
####WGPendingClick Returns the currently pending click, if any. This is a way to peek into the state of the mouse event system, to see if the user is trying to do something with the pointer. Most programs shouldn't need this, but you can use it to do your own low-level click handling if you wish.
| Assembly | Applesoft |
|---|---|
X: WGPendingClick | Not available |
####WGClearPendingClick Clear the currently pending click, if any. Most programs shouldn't need this, but you can use it to do your own low-level click handling if you wish.
| Assembly | Applesoft |
|---|---|
X: WGClearPendingClick | Not available |
####WGViewFocus Focus is shifted to the currently selected view. This will highlight the view visually, as needed, and any affected views are redrawn as needed.
| Assembly | Applesoft |
|---|---|
X: WGViewFocus | &FOC |
####WGViewUnfocus The currently focused view becomes unfocused. Views are redrawn as needed.
| Assembly | Applesoft |
|---|---|
X: WGViewUnfocus | Not available |
####WGViewFocusNext Focus is shifted to the next view in the focus chain, wrapping around to the first one if needed.
| Assembly | Applesoft |
|---|---|
X: WGViewFocusNext | &FOCN |
####WGViewFocusPrev Focus is shifted to the previous view in the focus chain, wrapping around to the last one if needed.
| Assembly | Applesoft |
|---|---|
X: WGViewFocusPrev | &FOCP |
####WGViewFocusAction Action is taken on the currently focused view. If the view is a checkbox, that checkbox will be toggled. If the view is a button, the button will be clicked. Any callback attached to the view will be invoked.
| Assembly | Applesoft |
|---|---|
X: WGViewFocusAction | &ACT |
####WGPaintView Draws (or redraws) the currently selected view.
| Assembly | Applesoft |
|---|---|
X: WGPaintView | &PNT |
####WGViewPaintAll Redraws all views. This is useful if the screen becomes corrupted, or you need to erase it for any reason.
| Assembly | Applesoft |
|---|---|
X: WGViewPaintAll | &PNTA |
####WGEraseViewContents Erases the content area of the selected view. The frame is not touched.
| Assembly | Applesoft |
|---|---|
X: WGEraseViewContents | &ERASE(0) |
####WGEraseView Erases the content area and frame of the selected view.
| Assembly | Applesoft |
|---|---|
X: WGEraseView | &ERASE(1) |
####WGViewSetTitle Changes the title of the selected view. Titles are only visible in the "decorated" style of view border. In Applesoft, the view is automatically redrawn to reflect the change. In assembly, you must call WGPaintView manually to see the change.
| Assembly | Applesoft |
|---|---|
X: WGViewSetTitle PARAM0: Pointer to null-terminated string (LSB) PARAM1: Pointer to null-terminated string (MSB) | &TITLE("title")
|
####WGViewSetAction Changes the action callback of the selected view.
| Assembly | Applesoft |
|---|---|
X: WGViewSetAction PARAM0: Function pointer (LSB) PARAM1: Function pointer (MSB) | &STACT(line number) |
####WGViewFromPoint Returns the innermost view that contains the given point (in the lower nybble). For fancy views, the upper nybble of the result indicates which window feature was found:
| Upper nybble | Window feature |
|---|---|
| 0000 | Content region |
| 0001 | Scroll arrow up |
| 0010 | Scroll arrow down |
| 0011 | Scroll arrow left |
| 0100 | Scroll arrow right |
| Assembly | Applesoft |
|---|---|
X: WGViewFromPoint PARAM0: X position to test PARAM1: Y position to test Returns in A: View ID (or <0 if no match) | Not available |
####WGSetState Sets the currently selected view's value. For progress bar views, this is the progress value. For checkboxes and radio buttons, 1 is checked and 0 is unchecked.
| Assembly | Applesoft |
|---|---|
X: WGSetState PARAM0: new value | &SETV(value) |
####WGGetState Gets the currently selected view's value. For progress bar views, this is the progress value. For checkboxes and radio buttons, 1 is checked and 0 is unchecked.
| Assembly | Applesoft |
|---|---|
X: WGGetState On exit, the value is in PARAM0 | Not available |
####WGViewSetRawTitle Sets the currently selected view's title to be rendered in raw bytes (or not). This allows some advanced tricks with using Mousetext and mixed inversion in view titles.
| Assembly | Applesoft |
|---|---|
X: WGSetRawTitle PARAM0: 0 or 1 | &STRW(0 or 1) |
Cursor Routines
These routines are used for manipulating the various cursors in WeeGUI. As explained above, each view has its own local cursor, which is what you will normally interact with. The system global cursor is generally reserved for use by WeeGUI.
####WGSetCursor Changes the position of the local cursor in the currently selected view.
| Assembly | Applesoft |
|---|---|
X: WGSetCursor PARAM0: New X position PARAM1: New Y position | &CURSR(x,y) |
####WGSetGlobalCursor Changes the position of the global system cursor. Most programs should not normally need to do this, and it may have unpredictable effects on WeeGUI or Applesoft's visual appearance.
| Assembly | Applesoft |
|---|---|
X: WGSetGlobalCursor PARAM0: New X position PARAM1: New Y position | Not available |
####WGSyncGlobalCursor Synchronizes the global system cursor to the currently selected view's local cursor. If you modify the global cursor, you can call this to reset it to where WeeGUI expects it to be. Most programs should not need to use this, and results may be unpredictable.
| Assembly | Applesoft |
|---|---|
X: WGSyncGlobalCursor | Not available |
Scrolling Routines
These routines are used for scrolling view contents and working with scrollable views.
####WGScrollX Scrolls the currently selected view's contents to the specified horizontal position.
| Assembly | Applesoft |
|---|---|
X: WGScrollX A: New X scroll position | Not available (see WGScroll) |
####WGScrollY Scrolls the currently selected view's contents to the specified vertical position.
| Assembly | Applesoft |
|---|---|
X: WGScrollY A: New Y scroll position | Not available (see WGScroll) |
####WGScroll Scrolls the currently selected view's contents to the specified vertical and horizontal position.
| Assembly | Applesoft |
|---|---|
| Not available | &SCR(X position, Y position) |
####WGScrollXBy Scrolls the currently selected view's contents by a specified delta horizontally (positive or negative).
| Assembly | Applesoft |
|---|---|
X: WGScrollXBy A: Offset to apply to X scroll position | Not available (see WGScrollBy) |
####WGScrollYBy Scrolls the currently selected view's contents by a specified delta vertically (positive or negative).
| Assembly | Applesoft |
|---|---|
X: WGScrollYBy A: Offset to apply to Y scroll position | Not available |
####WGScrollBy Scrolls the currently selected view's contents by a specified delta (positive or negative).
| Assembly | Applesoft |
|---|---|
| Not available | &SCRBY(X offset, Y offset) |
####WGViewWidth Changes the content width of the currently selected view.
| Assembly | Applesoft |
|---|---|
| A: New content width for the view | Not available |
####WGViewHeight Changes the content width of the currently selected view.
| Assembly | Applesoft |
|---|---|
| A: New content height for the view | Not available |
Drawing Routines
All drawing routines (except WGPrint) operate in the global coordinate space (not in local view space). You can use these drawing routines by themselves for pseudo-graphical rendering effects in your programs, or in conjunction with higher level calls for creating and using GUI elements.
####WGClearScreen Clears the screen to black. Unlike Applesoft HOME, this version always clears to black, regardless of the INVERSE setting, and the global cursor is left at the bottom instead of the top.
| Assembly | Applesoft |
|---|---|
X: WGClearScreen | &HOME(0) |
####WGDesktop Paints a desktop background on the screen.
| Assembly | Applesoft |
|---|---|
X: WGDesktop | &HOME(1) |
####WGPlot Plots a single character. For Applesoft, you supply the Apple ROM value of the character, and all character sets are supported with no mode changing required. This means you can directly plot inverse lowercase, or MouseText characters, for example. For a complete list of the values of every character in the Apple IIe Enchanced set, see Appendix B.
| Assembly | Applesoft |
|---|---|
X: WGPlot A: Character to plot (Apple format) | &PLOT(X position Y position, character) |
####WGPrint Prints a string into the current view, at the local cursor position. The text is wrapped to the view's content width, and clipped to the visible view boundaries.
| Assembly | Applesoft |
|---|---|
X: WGPrint PARAM0: Pointer to null-terminated string (LSB) PARAM1: Pointer to null-terminated string (MSB) Overflow: If set, characters are printed raw, with no high bit manipulation. Only works in NORMAL mode. | &PRINT("string")
|
####WGStrokeRect Draws the outline of a rectangle. The rectangle is drawn one pixel outside the region you specify. So, do not attempt to stroke a rectangle in row 0, row 23, column 0, or column 79. You may overwrite screen holes and cause system malfunctions.
| Assembly | Applesoft |
|---|---|
X: WGStrokeRect PARAM0: Left edge PARAM1: Top edge PARAM2: Width PARAM3: Height | &DRAW(left,top,width,height) |
####WGStrokeRoundRect Draws the outline of a "round" rectangle, with left and right edges curved instead of straight. The rectangle is drawn one pixel outside the region you specify. So, do not attempt to stroke a rectangle in row 0, row 23, column 0, or column 79. You may overwrite screen holes and cause system malfunctions.
| Assembly | Applesoft |
|---|---|
X: WGStrokeRoundRect PARAM0: Left edge PARAM1: Top edge PARAM2: Width PARAM3: Height | &DRAW(left,top,width,height) |
####WGFillRect Fills a rectangle with a given character
| Assembly | Applesoft |
|---|---|
X: WGFillRect PARAM0: Left edge PARAM1: Top edge PARAM2: Width PARAM3: Height Y: Character to fill with (Apple format) | &FILL(left,top,width,height,character) |
####WGFancyRect Draws the outline of a decorated GUI-style window, with scrollbars and title bar. Similar to WGStrokeRect, the drawing occurs outside the rectangle you specify, so do not attempt to draw a decorated rect in row 0, row 23, column 0, or column 79.
| Assembly | Applesoft |
|---|---|
X: WGFancyRect PARAM0: Left edge PARAM1: Top edge PARAM2: Width PARAM3: Height | Not available |
Mouse & Keyboard Routines
Various useful routines for working with the mouse and keyboard.
####WGEnableMouse Enables the mouse. Call this once at the start of your program to begin using the mouse. Calling this sets up the interrupt mechanisms needed to manage the mouse. If you start the mouse with this call, it's very important to call WGDisableMouse (below) when your program quits.
| Assembly | Applesoft |
|---|---|
X: WGEnableMouse | Not available (see WGMouse) |
####WGDisableMouse Disables the mouse. Call this when quitting your program, if you called WGEnableMouse. This is very important, as the interrupt mechanisms created for the mouse must be dismantled, otherwise the Apple II will be left in an unsafe state.
| Assembly | Applesoft |
|---|---|
X: WGDisableMouse | Not available (see WGMouse) |
####WGMouse Enables or disables the mouse. Passing a '1' is equivalent to calling WGEnableMouse (above). Passing a '0' is equivalent to calling WGDisableMouse (above). The same caveats and warnings apply.
| Assembly | Applesoft |
|---|---|
| Not available | &MOUSE(1 to enable or 0 to disable) |
####WGGet A non-blocking version of Applesoft's GET. This allows you to easily create run-loops for GUI programming in Applesoft. The key read is returned in the Applesoft integer variable you specify. If no keypress is pending, the value will be zero.
| Assembly | Applesoft |
|---|---|
| Not available | &GET(A%) |
Miscellaneous Routines
Other stuff you might need.
####WGExit Cleans up and shuts down WeeGUI. If you want your application to return cleanly to Applesoft when it's done, you must call this. Otherwise you may get ProDOS complaining it is out of buffers, or other strange behaviour.
| Assembly | Applesoft |
|---|---|
X: WGExit | &EXIT |
####WGReset Deallocate all WeeGUI views and strings. This is called automatically during WeeGUI startup, but you can call it yourself at any time if you want to "start over" with no views. This does not clear the screen or repaint anything.
| Assembly | Applesoft |
|---|---|
X: WGReset | Not available |
####WGResetView Deletes the selected view but does not erase or repaint anything. The ID is now available for use by a new view.
| Assembly | Applesoft |
|---|---|
X: WGResetView | Not available |
Appendix A: AUXMEM Branch
For those really advanced users who want to get the most out of WeeGUI, there's an experimental branch with some more sophisticated options. Most significantly, almost all of the code in this version lives at the top of AUX memory (the other 64k your IIe/c came with). That means virtually all of main memory (and most of AUX memory) is free for your programs to use. The only thing in main memory is a small dispatcher, which lives in everyone's favorite memory hole at $300. Also, this version separates out the mouse code as a separate driver program which can be loaded or not, as needed, saving further memory. If loaded, the mouse driver lives at the top of main memory, just under ProDOS. Interrupt code can not run from AUX memory, so this compromise is necessary.
This branch sacrifices the Applesoft API however, because it is not possible for code running from AUX memory to access Applesoft programs and variables, as is required for the API to work.
The AUXMEM branch is experimental, and not currently supported. If you're interested in using it or playing with it, feel free to clone it and play around. I'm happy to answer questions about it, as well, although I can't necessarily provide full technical support.
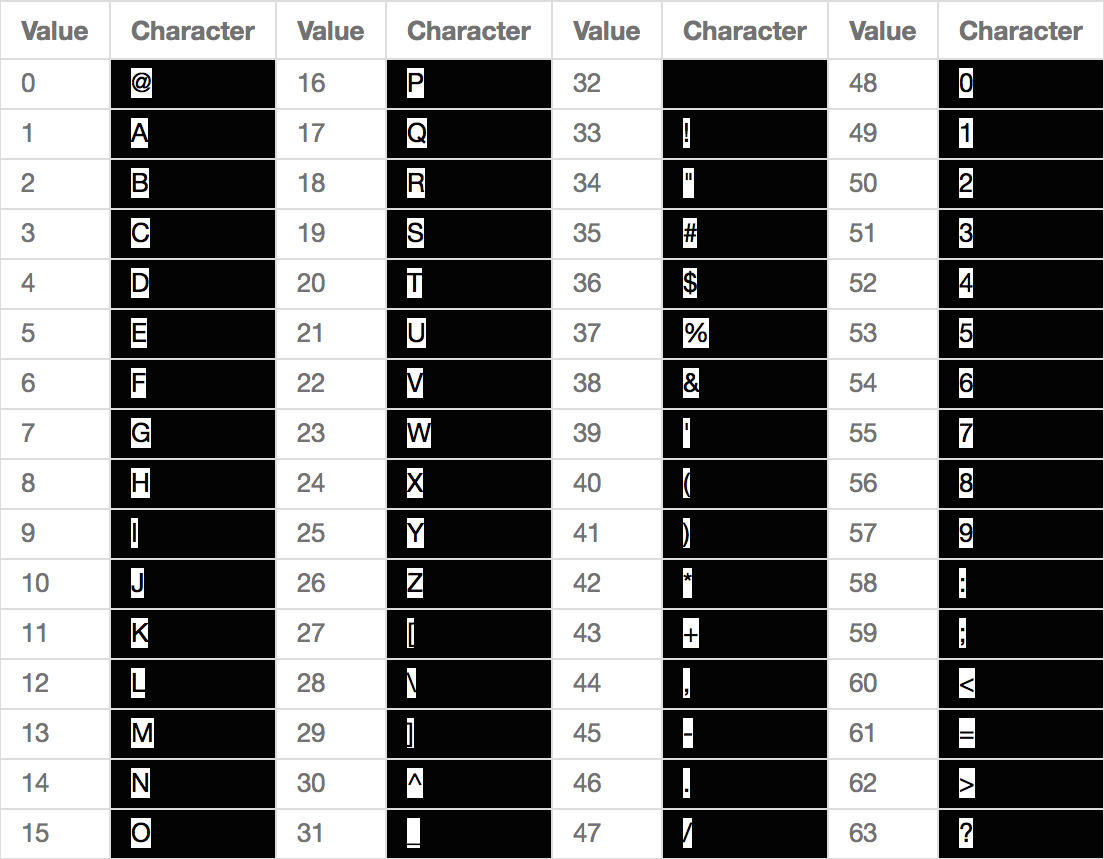
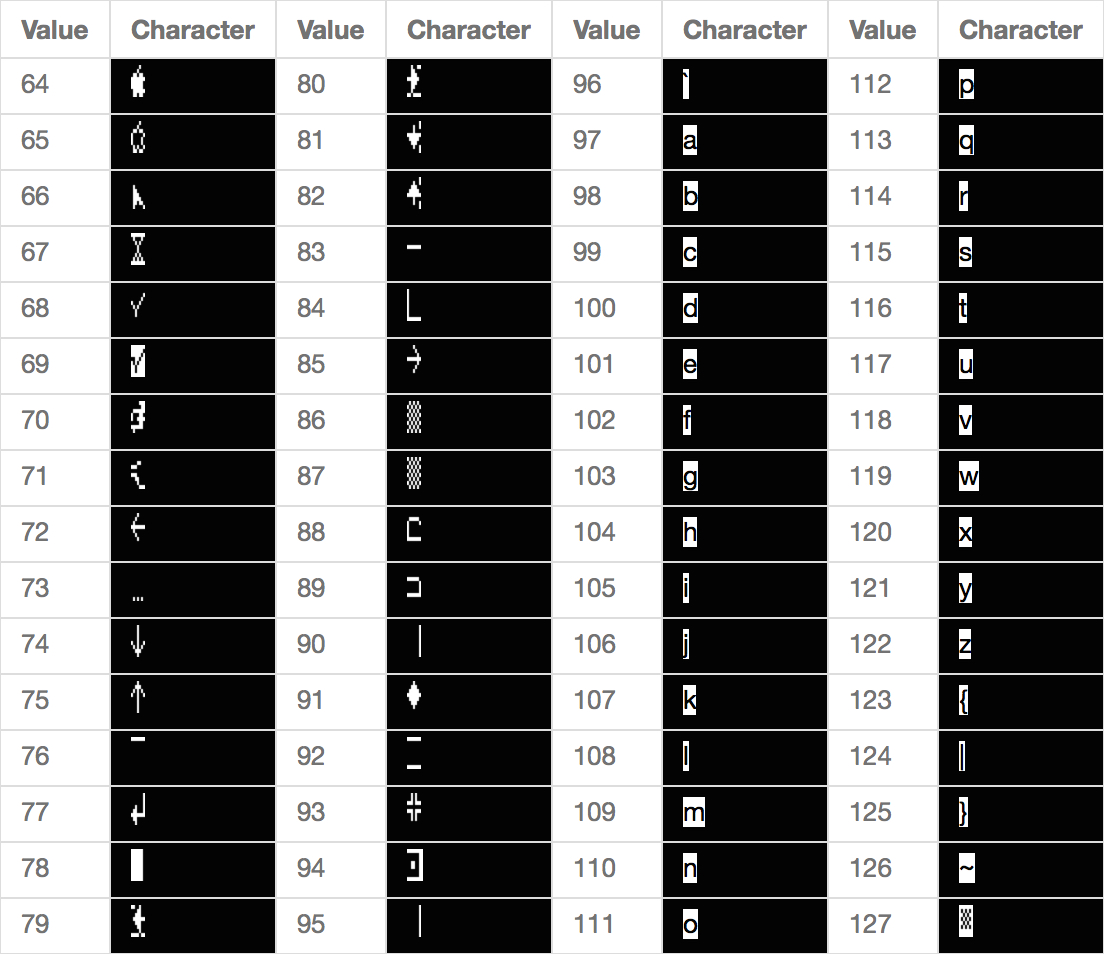
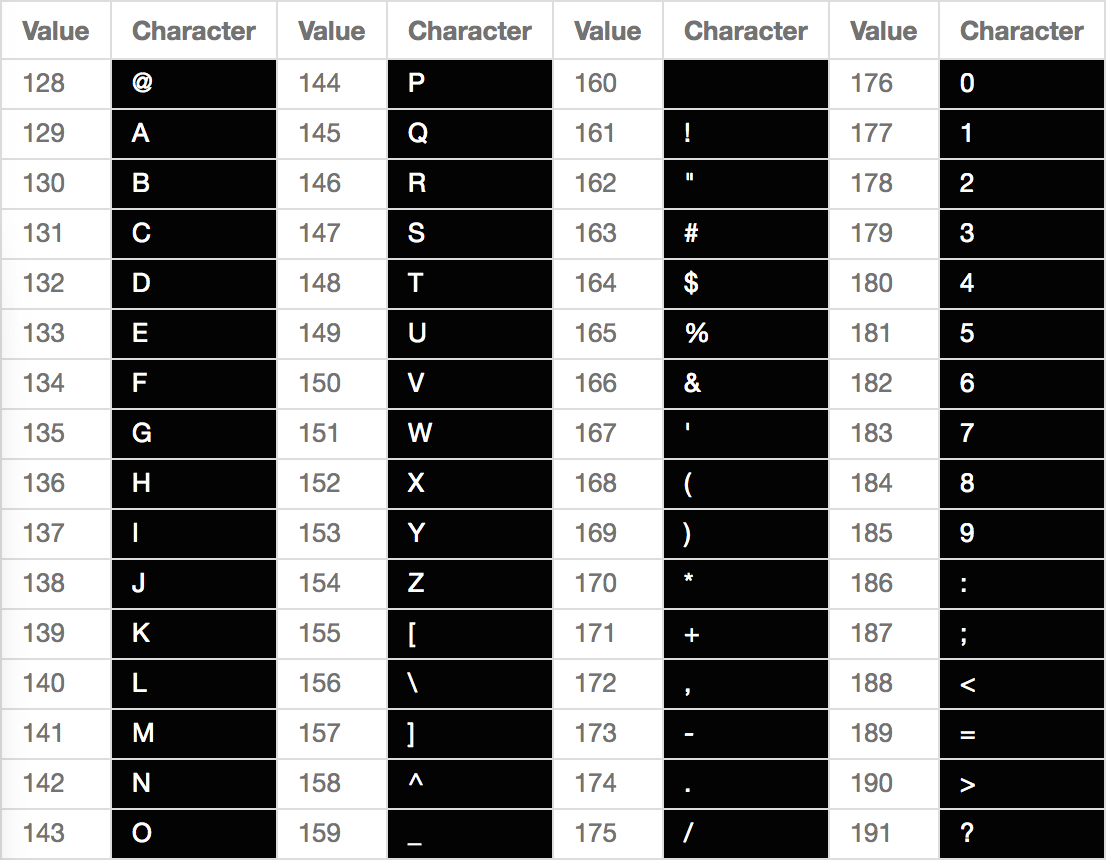
Appendix B: Apple Character Set
Below are complete listings of the Apple //e Enchanced (and Apple //c) ROM character set. The characters are shown as they appear on a black video screen. In other words, "normal" is white text on a black background. These values can be passed directly into WGPlot (&PLOT in Applesoft) to draw any character directly to the screen. No need to mess with inverse mode and escape characters!
Note: The tables below are images, because GitHub's flavor of Markdown rendering doesn't support any form of coloring text or backgrounds in tables. It's safe to assume you're viewing this in GitHub's viewer, so I've screen-captured the tables from a local program that does render all mixed HTML/Markdown properly.

Appendix C: Sample Code
Here is the source code to the BASICDEMO program, included in the WeeGUI disk image. It shows how a few simple lines of code can create a complex, sophisticated interface, thanks to WeeGUI.
 1  PRINT  CHR$ (4)"brun weegui"
 10  & HOME(1)
 20  & WINDW(0,2,2,15,76,7,76,40)
 21  & TITLE("Help")
 22  & STACT(2500)
 30  GOSUB 2500
 40  & FILL(0,0,80,13,160)
 50  & WINDW(1,1,1,1,78,11,78,11)
 60  & BUTTN(2,4,3,21,4000,"Open Garage")
 70  & BUTTN(3,4,5,21,4100,"Close Garage")
 75  & SEL(1)
 80  & CURSR(40,1)
 85  &  PRINT (83): &  PRINT (83): &  PRINT (83)
 90  INVERSE : &  PRINT (" Lighting "): NORMAL
 95  &  PRINT (83): &  PRINT (83): &  PRINT (83)
 100  & CHKBX(4,42,4,"Parlor")
 110  & CHKBX(5,42,6,"Lounge")
 120  & CHKBX(6,42,8,"Bedroom")
 130  GOSUB 4000
 140  & BUTTN(7,71,1,8,10000,"Quit")
 198  & SEL(0)
 199  & MOUSE(1)
 200  REM  RUN LOOP
 210  & PDACT
 220  &  GET (A%)
 230  IF A% = 113 GOTO 10000
 240  IF A% = 11 THEN  & SCRBY(0,1): GOSUB 2500
 250  IF A% = 10 THEN  & SCRBY(0, - 1): GOSUB 2500
 260  IF A% = 27 THEN  & FOCP
 270  IF A% = 9 THEN  & FOCN
 280  IF A% = 13 THEN  & ACT
 300  GOTO 200
 2500  & SEL(0)
 2510  & ERASE
 2520  & CURSR(2,1)
 3000  &  PRINT ("Welcome to the SuperAutoMat6000 home automation system.")
 3005  & CURSR(0,3)
 3010  &  PRINT ("Use the buttons and checkboxes above to achieve the per
	 fect mood for any occasion. Frequent use may cause heartburn. Do not
	  look into laser with remaining eye.")
 3015  &  PRINT (" Note that this is a really long, pointless block of me
	 aningless text, but at least you can scroll it!")
 3017  &  PRINT (" Darn good thing too, because it doesn't fit in the all
	 otted space here.")
 3019  & CURSR(8,7)
 3020  &  PRINT ("(c)2015 OmniCorp. All rights reserved.")
 3050  RETURN
 4000  & SEL(1)
 4010  & CURSR(4,8)
 4020  &  PRINT ("Garage door is open  ")
 4030  RETURN
 4100  & SEL(1)
 4110  & CURSR(4,8)
 4120  &  PRINT ("Garage door is closed")
 4130  RETURN
 10000  & MOUSE(0)
 10010  & EXIT
 10020  HOME
Here's the source code to the assembly language demo, which shows off the speed of WeeGUI's rendering. This code is also synchronized to the vertical blank, for the smoothest possible animation
.include "WeeGUI_MLI.s"


.org $6000

INBUF			= $0200
DOSCMD			= $be03
KBD				= $c000
KBDSTRB			= $c010


main:

	; BRUN the GUI library
	ldx #0
	ldy #0
@0:	lda brunCmdLine,x
	beq @1
	sta INBUF,y
	inx
	iny
	bra @0
@1:	jsr DOSCMD


;;;;;;;;;;;;;;;;;;;;;;;;;;;;;;;;;;;;;;;;;;;;;;;;;;;;;;;;;;;;;;;;
; Show off rendering speed with some snazzy rectangle painting
;
	; Stack:
	; Curr X
	; Curr Y
	; Curr Width
	; Curr Height

	ldx #WGClearScreen
	jsr WeeGUI

animateRects:
	lda	#38			; Initialize
	pha
	lda #11
	pha
	lda #2
	pha
	lda #2
	pha

animateRectsEvenLoop:
@0:	lda $C019		; Sync to VBL
	bmi @0

	ldx #WGClearScreen
	jsr WeeGUI

	tsx
	inx
	lda	$0100,x		; Load Height, then modify
	sta	PARAM3
	inc
	inc
	sta	$0100,x
	cmp	#25
	bcs	animateRects

	inx				; Load Width, then modify
	lda	$0100,x
	sta PARAM2
	inc
	inc
	inc
	inc
	inc
	inc
	sta	$0100,x

	inx				; Load Y, then modify
	lda	$0100,x
	sta	PARAM1
	dec
	sta	$0100,x

	inx				; Load X, then modify
	lda	$0100,x
	sta	PARAM0
	dec
	dec
	dec
	sta	$0100,x

	ldy	#64
	ldx	#WGFillRect
	jsr WeeGUI
	ldx #WGStrokeRect
	jsr WeeGUI

	jsr delayShort
	jsr delayShort
	jsr delayShort
	jsr checkKbd

	bra animateRectsEvenLoop


delayShort:		; ~1/30 sec
	pha
	phx
	phy

	ldy		#$06	; Loop a bit
delayShortOuter:
	ldx		#$ff
delayShortInner:
	nop
	nop
	nop
	nop
	nop
	nop
	nop
	dex
	bne		delayShortInner
	dey
	bne		delayShortOuter

	ply
	plx
	pla
	rts

checkKbd:
	lda KBD
	bpl checkKbdDone
	sta KBDSTRB

	cmp #241		; 'q' with high bit set
	bne	checkKbdDone

	ldx #WGExit
	jsr WeeGUI
	pla		; Pull our own frame off the stack...
	pla
	pla
	pla
	pla		; ...four local variables + return address...
	pla
	rts		; ...so we can quit to ProDOS from here

checkKbdDone:
	rts

;;;;;;;;;;;;;;;;;;;;;;;;;;;;;;;;;;;;;;;;;;;;;;;;;;;;;;;;;;;;;;

brunCmdLine:
	.byte "BRUN weegui",$8d,0