31 KiB
Apple II Email Suite
![]()
Emai//er is an email and usenet news software package for the Apple //e Enhanced or Apple IIgs. An Uthernet-II ethernet card is required for sending and receiving messages.
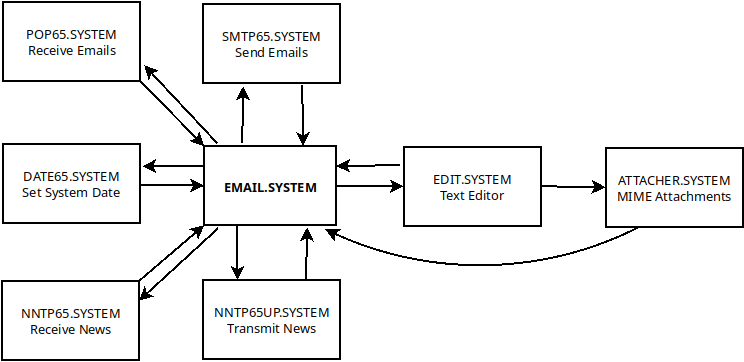
Emai//er is implemented as a number of ProDOS executables, each of which performs one distinct function. EMAIL.SYSTEM provides the main user interface, and invokes the other executables as needed. EMAIL.SYSTEM is automatically reloaded when the helper program completes its function.
EMAIL.SYSTEMis a simple user interface for reading and managing email. It works together withPOP65andSMTP65.EDIT.SYSTEMis a full screen editor, used for composing email and news messages. It may also be used as a general purpose ProDOS text file editor.POP65.SYSTEMis a Post Office Protocol version 3 (POP3) client for the Apple II with Uthernet-II card. This is used to retrieving incoming email messages.SMTP65.SYSTEMis a Simple Mail Transport Protocol (SMTP) client for the Apple II with Uthernet-II card. This is used for sending outgoing email messages.NNTP65.SYSTEMis a Network News Transport Protocol (NNTP) client for the Apple II with Uthernet-II card. This is used to retrieving Usenet news messages.NNTP65UP.SYSTEMis a Network News Transport Protocol (NNTP) client for the Apple II with Uthernet-II card. This is used for transmitting outgoing Usenet news messages.ATTACHER.SYSTEMis used for creating multi-part MIME messages with attached files.REBUILD.SYSTEMis a utility for rebuilding mailbox databases, should they become corrupted. This can also be used for bulk import of messages.DATE65.SYSTEMis a Network Time Protocol (NTP) client which can be used for setting the system time and date if you do not have a real time clock.
Overview
The software has been designed to be modular, which allows new protocols to be added later for handling incoming and outgoing mail. POP3 was selected as the email download/ingest protocol because it is simple and there are many available server implementations. SMTP was chosen as the outgoing protocol due to its almost universal adoption for this purpose. Once again, there are many server-side implementations to choose from. It may be possible, for example, to add an NNTP module to allow reading and posting of Usenet articles.
One problem faced by any retrocomputing project of this type is that Transport Layer Security (TLS) is endemic on today's Internet. While this is great for security, the encryption algorithms are not feasible to implement on a 6502-based system. In order to bridge the plain text world of the Apple II to today's encrypted Internet, I have set up a Raspberry Pi using several common open source packages as a gateway. The Raspberry Pi uses Fetchmail to download messages from Gmail's servers using the IMAPS protocol (with TLS) and hands them off to Postfix, which is used at the system mailer (MTA) on the Pi. I use Dovecot as a POP3 server to offer a plain text connection to the POP65.SYSTEM application on the Apple II. For outgoing messages, I configured Postfix to accept plain text SMTP connections from SMTP65.SYSTEM on the Apple II and to relay the messages to Gmail's servers using secure SMTPS. The configuration of the Raspberry Pi (which was originally set up as a gateway for SAM2 email under GSOS on the Apple IIgs) is documented here.
A few design principles that I have tried to apply:
- Simplicity This software runs on the Apple //e and currently fits within 64KB of RAM (although I may use the 64KB of aux memory for future enhancements.) It is important that it be as simple and small as possible. The code is written in C using cc65, which allows more rapid evolution when compared to writing in assembly language, at the expense of larger code which uses more memory.
- Modularity Where it makes sense to split the functionality into separate modules it makes sense to do so in order to make the best use of available memory.
- Speed The software should make the most of the limited hardware of the Apple //e in order to allow speedy browsing of emails without needing much processor or disk activity.
- Avoidance of Limits I tried to avoid the imposition of arbitrary limits to message length or the number of messages in a folder.
- Veracity The software should never modify or discard information. Incoming emails are saved to disk verbatim, including all headers. The system hides the headers when displaying the emails, but they are available for inspection or further processing. The only change that is made to incoming messages is to convert the CR+LF line endings to Apple II CR-only line endings.
POP65.SYSTEM and SMTP65.SYSTEM are based on Oliver Schmitd's excellent IP65 TCP/IP framework (in particular they follow the design of WGET65.SYSTEM.) Without IP65, this software would not have been possible.
System Setup and Configuration
Configuration File
The system configuration file is called EMAIL.CFG. It is a straightforward ProDOS text file, with one parameter per line. You may edit this file using the provided editor, EDIT.SYSTEM (or any other ProDOS text editor). When editing the file be careful not to add or delete any lines - this file has no grammar and the lines must appear in the expected order.
To edit the file using EDIT.SYSTEM:
- Run
EDIT.SYSTEMusing Bitsy Bye or your usual ProDOS launcher. - Press Open Apple-O to open a file, then enter
EMAIL.CFGat the prompt, followed by return. - Editing is fairly intuitive. Use the arrow keys to move around and type to insert text. Open Apple-Delete deletes to the right.
- When you are satisfied, save the file using Open Apple-S.
- Quit the editor using Open Apple-Q.
All three of the mail programs POP65.SYSTEM, EMAIL.SYSTEM and SMTP65.SYSTEM share this configuration file.
Here is an example config file (with passwords replaced with **** for obvious reasons):
192.168.10.2:110
pi
******
NODELETE
192.168.10.2:25
apple2.local
/IP65
/H1/EMAIL
bobbi.8bit@gmail.com
The lines are as follows, in order:
- IP address of the POP3 server for receiving new mail, optionally followed by a colon and then the TCP port number. If the colon and port number are omitted, port 110 is the default.
- Username to use when connecting to POP3.
- Password for POP3 connection (in plaintext).
- If this string is exactly
DELETEthen messages will be deleted from the POP3 server after downloading. Otherwise they are left on the server.DELETEis the normal setting, butNODELETE(or any other nonsense value) can be helpful for debugging, allowing the same messages to be downloaded from the POP3 server again and again. - IP address of the SMTP server for sending outgoing mail, optionally followed by a colon and then the TCP portnumber. If the colon and port number are omitted, port 25 is the default.
- Domain name that is passed to the SMTP server on connection. The way my SMTP server (Postfix) is configured, it doesn't seem to care about this.
- ProDOS path of the directory where the email executables are installed.
- ProDOS path to the root of the email folder tree. Mailboxes will be created and managed under this root path.
- Your email address. Used as the sender's address in outgoing messages.
Creating Directories
To get started, you will need to create the following directories:
- The email root directory (
/H1/DOCUMENTS/EMAILin the example config) - The
SPOOLdirectory, used by POP65, within the email root directory. This will be/H1/DOCUMENTS/EMAIL/SPOOLfor our example configuration. - The
INBOXdirectory, used by POP65, within the email root directory. This will be/H1/DOCUMENTS/EMAIL/INBOXfor our example configuration. - The
OUTBOXdirectory, used by SMTP65, within the email root directory. This will be/H1/DOCUMENTS/EMAIL/OUTBOXfor our example configuration. - The
ATTACHMENTSdirectory, used by EMAIL for storing downloaded MIME attachments, within the email root directory. This will be/H1/DOCUMENTS/EMAIL/ATTACHMENTSfor our example configuration.
You can create these directories in ProDOS BASIC.SYSTEM as follows:
] CREATE /H1/DOCUMENTS/EMAIL
] CREATE /H1/DOCUMENTS/EMAIL/SPOOL
] CREATE /H1/DOCUMENTS/EMAIL/INBOX
] CREATE /H1/DOCUMENTS/EMAIL/OUTBOX
] CREATE /H1/DOCUMENTS/EMAIL/ATTACHMENTS
You will also want to create a couple of mailboxes such as RECEIVED and SENT. If you do not create a SENT mailbox then SMTP65 will be unable to complete the sending of messages and will give an error. To create these mailboxes, run EMAIL.SYSTEM and press N for N)ew mailbox. At the prompt, enter the name of the mailbox to be created: RECEIVED, and press return. Repeat this to create the SENT mailbox.
These are the minimum mailboxes you need to get started. You may create more mailboxes to organize your mail at any time.
First Run of POP65.SYSTEM
The first time POP65.SYSTEM runs and downloads mail messages it will populate the INBOX. However the INBOX directory needs to have been created already (as described above.)
Note: If you try to run EMAIL.SYSTEM before the POP65.SYSTEM has initialized the INBOX, an error will be reported about a missing file.
Once you have correctly configured EMAIL.CFG with the correct POP3 server, username and password, start POP65.SYSTEM using Bitsy Bye or your favourite ProDOS launcher. It should connect to your POP3 server, download any messages in your email inbox and copy them to your INBOX.
Once messages have been downloaded and the INBOX initialized, you may run EMAIL.SYSTEM to browse and read the new messages.
Mailboxes
Each mailbox consists of the following:
- A directory under the email root, and within this directory
- Email messages are stored on per file, in plain Apple II text files (with CR line endings) named
EMAIL.nnwherennis an integer value - A text file called
NEXT.EMAIL. This file initially contains the number 1. It is used when naming the individualEMAIL.nnfiles, and is incremented by one each time. If messages are added to a mailbox and nothing is ever deleted they will be sequentially numberedEMAIL.1,EMAIL.2, etc. - A binary file called
EMAIL.DB. This file contains essential information about each email message in a quickly accessed format. This allows the user interface to show the email summary without having to open and read each individual email file. This file is initially empty and a fixed size record is added for each email message.
The easiest way to create additional mailboxes is using the N)ew command in EMAIL.SYSTEM.
POP65.SYSTEM knows how to initialize INBOX but the directory must have been created first.
Note that SPOOL is not a mailbox, just a directory. OUTBOX is also not a 'proper' mailbox - it has NEXT.EMAIL but not EMAIL.DB.
If the EMAIL.DB file for a mailbox gets corrupted, it will no longer possible to browse the summary and read the messages in EMAIL.SYSTEM. The utility REBUILD.SYSTEM can be used to rebuild the EMAIL.DB and NEXT.EMAIL files for an existing mailbox (see below.)
POP65.SYSTEM
POP65 is a Post Office Protocol v3 (POP3) client for the Apple II. It requires an Uthernet-II ethernet card and will not work with other interfaces without modification, because it uses the W5100 hardware TCP/IP stack. POP65 is used to download new email messages from a POP3 email server. (I use Dovecot on the Raspberry Pi as my POP3 server, but other POP3 servers should work too.)
Before running POP65.SYSTEM for the first time, be sure you have created the email root directory and the SPOOL directory, as described above. POP3 will initialize the INBOX mailbox, creating NEXT.EMAIL and EMAIL.DB files if they do not exist.
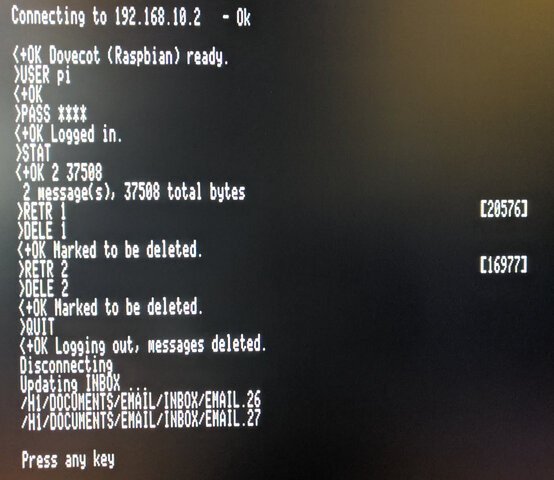
POP65 runs without any user interaction and performs the following tasks:
- Detect Uthernet-II
- Obtain IP address using DHCP
- Connect to POP3 server using parameters from first three lines of
EMAIL.CFG. (USERandPASScommands) - Enquire how many email messages are waiting. (
STATcommand) - Download each email in turn (
RETRcommand) and store it in theSPOOLdirectory. - If configured to delete messages on the POP3 server, messages are deleted after successful download (
DELEcommand) - Once all messages have been downloaded, disconnect from the POP3 server (
QUITcommand) - Scan each downloaded message in the
SPOOLdirectory and import the message intoINBOX:- Read
INBOX/NEXT.EMAILto find out the next number in sequence and allocate that for the new message. - Copy the message from
SPOOLtoINBOX/EMAIL.nn(wherennis the next sequence number) while scanning it for the following information:- Sender (
From:) header - Recipient (
To:) header - Date and time (
Date:) header - Subject (
Subject:) header - Offset in bytes to start of message body
- Sender (
- Store all of the information obtained from scanning the message in
INBOX/EMAIL.DB. - Update
INBOX/EMAIL.nn, incrementing the number by one. - Iterate until all messages in
SPOOLare ingested intoINBOX.
- Read
EMAIL.SYSTEM
EMAIL is a simple mail user agent for reading and managing email.
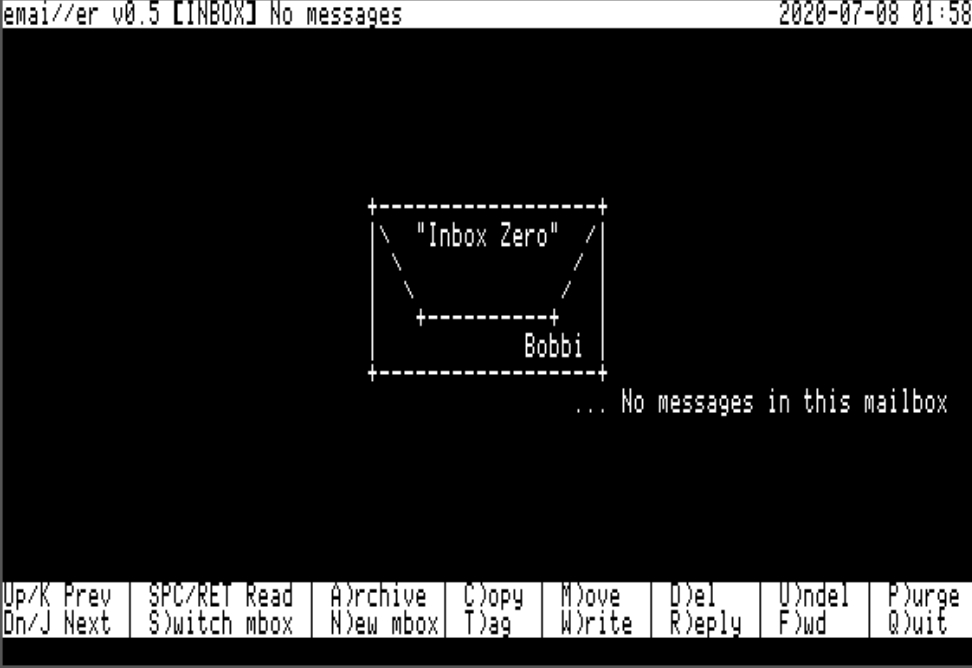
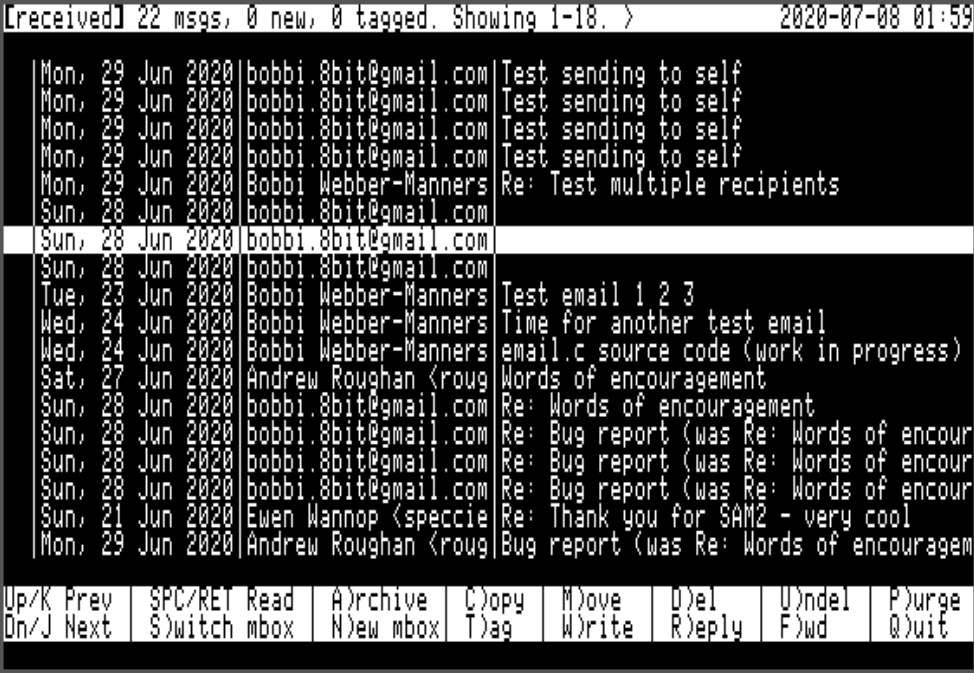
When the EMAIL application is started it will show the INBOX in the summary screen. This shows the following important information for each message:
- Tag - Shows
Tif the message is tagged. - Read/Unread/Deleted - Shows
*if the message is new (unread). ShowsDif the message is marked to be deleted. - From, Date and Subject headers
18 messages may be shown on the summary screen. If the mailbox has more than 18 messages there will be multiple screens.
Main menu commands:
- Up arrow /
K- Move the selection to the previous message. If this is the first message on the summary screen but this is not the first page, then load the previous page of messages and select the last item. - Down arrow /
J- Move the selection to the next message. If this is the last message on the summary screen but there are further messages on subsequent pages, then load the next page of messages and select the first item. SPC/RET- View the currently selected message in the message pager.E)ditor- Open the currently selected message inEDIT.SYSTEM.S)witchmbox - Switch to viewing a different mailbox. PressSthen enter the name of the mailbox to switch to at the prompt. The mailbox must already exist or an error message will be shown. You may enter.as a shortcut to switch back toINBOX.N)ew mbox- Create a new mailbox. Press 'N' then enter the name of the mailbox to be created. It will be created as a directory within the email root directory andNEXT.EMAILandEMAIL.DBfiles will be created for the new mailbox.C)opy- Copy message(s) to another mailbox. If no messages are tagged (see below) then the copy operation will apply to the current message only. If messages are tagged then the copy operation will apply to the tagged messages.M)ove- Move message(s) to another mailbox. If no messages are tagged (see below) then the move operation will apply to the current message only. If messages are tagged then the copy operation will apply to the tagged messages. Moving a message involves two steps - first the message is copied to the destination mailbox and then it is marked as deleted in the source mailbox.A)rchive- This is a shortcut for moving messages to theRECEIVEDmailbox.D)el- Mark message as deleted.U)ndel- Remove deleted mark from a message.P)urge- Purge deleted messages from the mailbox. This command iterates through all the messages marked for deletion and removes their files from the mailbox. A newEMAIL.DBis created, compacting any 'holes' where files have been deleted.T)ag- Toggle tag on message for collectiveC)opy,M)oveandA)rchiveoperations. Moves to the next message automatically to allow rapid tagging of messages.W)rite- Prepare a new blank outgoing email and place it inOUTBOXready for editing.R)eply- Prepare a reply to the selected email and place it inOUTBOXready for editing.F)orward- Prepare a forwarded copy of the selected email and place it inOUTBOXready for editing.<- Switch the order of the email summary to show the most recently added messages first. The indicator in the status bar will change to>to indicate the order.>- Switch the order of the email summary to show the most recently added messages last. The indicator in the status bar will change to<to indicate the order.Open Apple+D- RunDATE65.SYSTEMto set the system date using NTP (if you don't have a real time clock.)Open Apple+E- Edit message inEDIT.SYSTEM. FromEDIT.SYSTEMOpen Apple-Qwill return you toEMAIL.SYSTEM.Open Apple+R- Retreive messages from email server. This runsPOP65.SYSTEM, which in turn will return you to theEMAIL.SYSTEMmain menu.Open Apple+S- Send outbox messages to email server. This runsSMTP65.SYSTEM, which in turn will return you to theEMAIL.SYSTEMmain menu.Q)uit- Quit from the EMAIL user interface.
By using the Open Apple+R command to retrieve messages and the Open Apple-S command to transmit messages to the server, it is possible to retreive, review, respond, compose and transmit messages all without leaving the EMAIL.SYSTEM environment.
Plain Text View T)op
Headers View H)drs
MIME View M)IME
Mail Pager
Pressing space or return will open the currently-selected message in the mail pager. The mail pager provides a comfortable interface for reading email, allowing rapid forwards and backwards paging through the email body. This is done by saving the formatted email text to a SCROLLBACK file in the email root directory.
Below the message text, a menu bar is shown with the following options:
SPACE continue reading- Pressing space advances through the file a screen at a time. This option is not available when at the end of the file.B)ack- Page back one screen.T)op- Go back to the top of the message.H)drs- Show message headers.M)IME- Decode MIME message (see below).Q)uit- Return to the email summary screen.
There are three separate viewing modes:
- Plain text view (no headers) - This is the default view, and may be accessed by hitting the
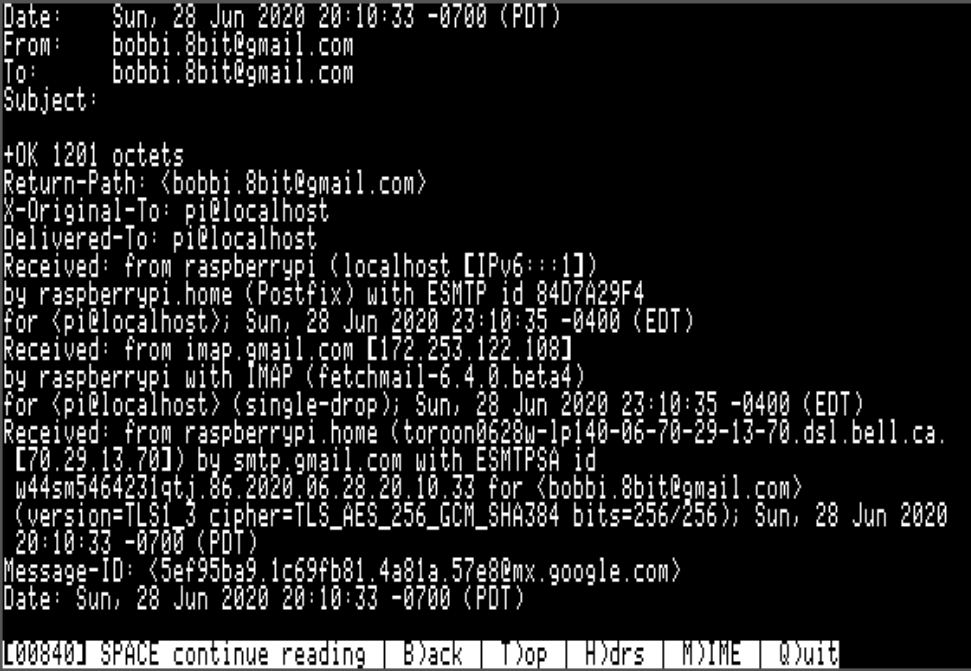
T)opkey. It shows the raw email text, starting immediately after the headers. - Plain text view (with headers) - This mode is accessed using the
H)drsoption. It shows the raw email text, starting from the very beginning. Be aware that on today's Internet, most messages have 4KB or more of headers. These are all preserved in EMAIL, but hidden from the user by default. - MIME view - This mode is entered using the
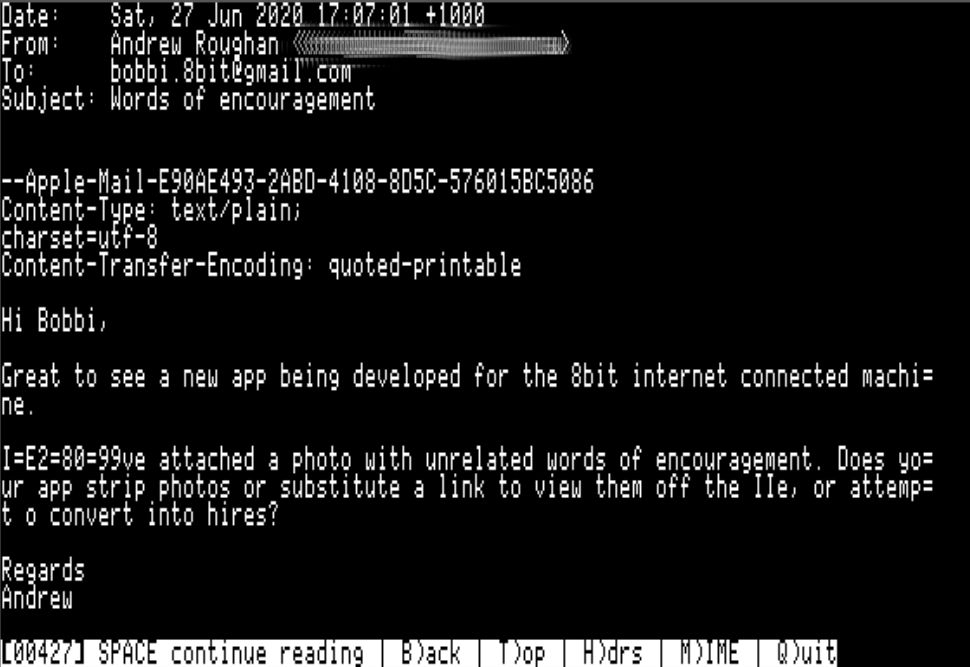
M)IMEoption. Many email providers encode even simple text-only messages in a MIME envelope (using Quoted-Printable encoding). Although these messages are readable in the plain text views, they are far more pleasant to read in MIME view.
Long lines are word-wrapped at 80 columns in all three views.
MIME Support
EMAIL is able to decode messages encoded with the Multipurpose Internet Mail Extensions (MIME). This allows email bodies which are encoded as anything other than plain text email to be extracted and formatted for the screen, and also provides support for extracting and saving to disk email attachments.
EMAIL can also compose MIME messages with attached files, using ATTACHER.SYSTEM as a helper application.
Encodings
MIME allows a number of message encodings, and EMAIL supports all those that make sense (everything except 8bit and Binary).
- 7bit
- Quoted-printable
- Base64
Quoted-printable encoding is commonly used for email bodies where the majority of the characters are US ASCII, with a few UTF-8 chars here and there. Base64 is most often used for encoding binary files. However it is possible (although unusual) to encode a binary attachment in Quoted-printable or to use Base64 for encoding ASCII text. The important point is that the encoding is independent of the deposition (ie: whether the object is to be shown inline or offered as an attachment to download.
Inline Rendering
All email body text (which could be non-MIME text, or text/plain content represented in one of the encodings described above is filtered to remove non-ASCII characters and word-wrapped to fit the 80 column screen.
Unicode UTF-8 characters are not supported and will either be omitted or displayed as a couple of garbage characters. It is not feasible to (fully) support UTF-8 on an 8 bit system, unfortunately.
EMAIL will not display objects of type text/html but will instead show a placeholder, so the user is aware the HTML was omitted.
Attachments
Objects of any other type will be treated as attachments and offered for download.
Any object which has a MIME filename= field, regardless of type, will be treated as an attachment and offered for download.
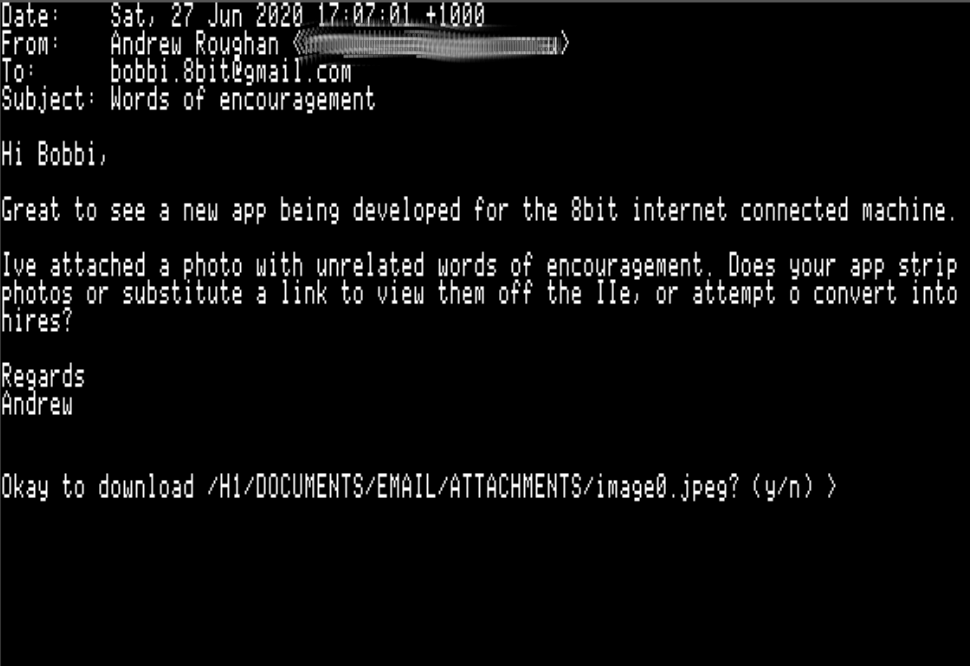
When an attachment is encountered, while reading an email in M)IME mode, the following prompt will be shown:
Okay to download /H1/DOCUMENTS/EMAIL/ATTACHMENTS/filename.typ? (y/n) >
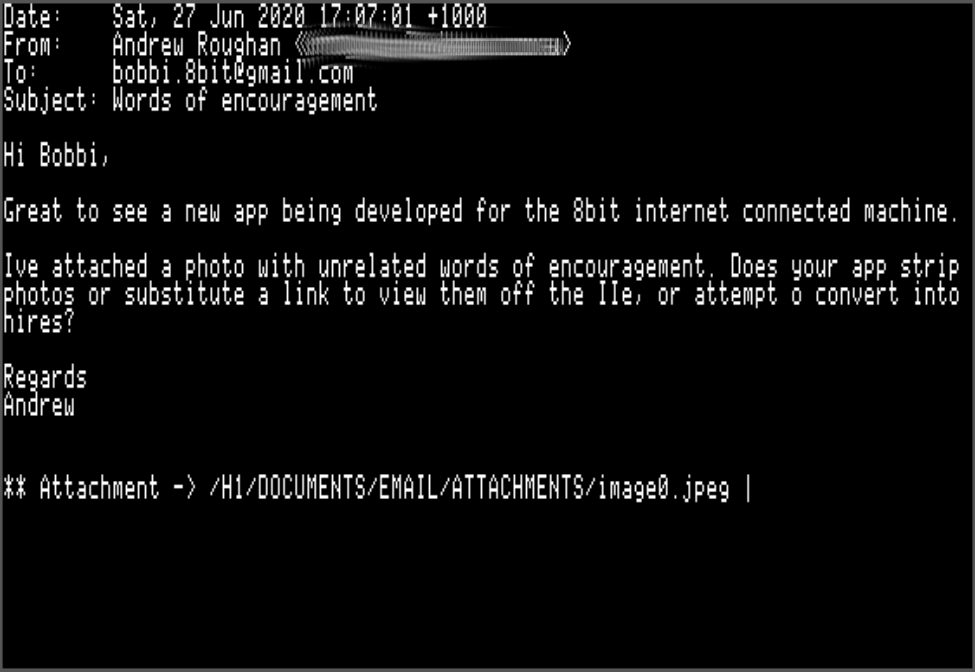
If you respond in the affirmative, the attachment will be decoded (usually from Base64) and saved to the filename indicated. If you are unable to download attachments, be sure the ATTACHMENTS directory exists and is writable.
If you enter n, the attachment will be skipped. Due to the large size of some attachments, even skipping over them may take several seconds.
A progress spinner is shown in either case.
Tagging of Messages
It is possible to manually tag or untag messages using the T)ag key in the summary screen. Collective operations such as C)opy or M)ove may then be performed on the tagged messages.
Each time the T)ag key is pressed, the current message will be tagged and the selection moved down. This allows large numbers of message to be tagged or untagged rapidly.
Deletion of Messages
Deletion of messages in EMAIL is a two step process. First a message must be marked as deleted using the D)el function. This will be shown as a D in the first column on the summary screen.
A message which is marked as deleted may be unmarked by selecting it and pressing U)ndel.
All messages with the deleted D flag may be permanently deleted from disk by using the P)urge function. Use this with care, since deleted messages may not be easily recovered.
New Message Status
When messages are first received they are marked as new, which is shown with an asterix * in the first column on the summary screen. When they are read this status will be cleared.
Persistence of Message State
The message state is persisted in the EMAIL.DB file:
- New or already read
- Deleted flag
- Tag
Sending of Messages
The EMAIL system currently includes a basic screen editor for message composition. This editor is currently under development and may be a little rough. It is also possible to use an external editor of your choice for composing emails. The advantage to this is you can choose whichever editor you prefer, provided it can handle plain Apple II text files. I find the editor which is built into the Proterm 3.1 communications program to be quite satisfactory for this purpose.
Sending of an email message is a three step process:
- Use the
W)rite,R)eplyorF)wdfunctions in EMAIL to create an email template file and store it inOUTBOX. - The system will display the full pathname of the template file created. And prompt
Open in editor - sure? (y/n) - If you enter 'y',
EMAIL.SYSTEMwill loadEDIT.SYSTEM, the integrated editor, passing the filename of the template file as a parameter, so the file is automatically opened for editing. - You may edit the file in
EDIT.SYSTEMusing the editing keys shown below. The editor's keys are based upon Apple's Appleworks word processor, so if you are familiar with that package you should feel at home. PressOpen Apple-Sto save the file to disk andOpen Apple-Qto return toEMAIL.SYSTEM. - Upon exit,
EDIT.SYSTEMwill promptAdd attachments - Sure? (y/n). If you enter 'n' thenEDIT.SYSTEMwill simply reloadEMAIL.SYSTEM. If you enter 'y', thenEDIT.SYSTEMwill instead loadATTACHER.SYSTEM, which allows you to add one or more file attachments to the email message. Once the attachments have been added,ATTACHER.SYSTEMwill reloadEMAIL.SYSTEM.ATTACHER.SYSTEMis discussed in more detail below. - Once you are back in the
EMAIL.SYSTEMUI, you can choose to send the messages inOUTBOXto your mail server at any time. To do this, pressOpen Apple-Sat theEMAIL.SYSTEMmain menu. This will startSMTP65.SYSTEM, which sends each message to the SMTP server and moves it to theSENTmailbox. - If you answer
nto theOpen in editor - sure? (y/n)prompt:- The template file will simply be placed in the
OUTBOXwhere you can use your favourite text editor to add the email body. You may also modify theTo:,cc:,Subject:orDate:headers. - Once you are satisfied with your edits and have saved the file, run
SMTP65.SYSTEMto send the file to your mail server and copy it to theSENTmailbox.
- The template file will simply be placed in the
There are three ways to write an email:
W)ritestarts a blank email. You will be prompted for the recipient, cc and subject line. The date is automatically filled in. Note that you may leave the cc entry blank, if no carbon copies are to be sent.R)eplycreates a reply to the selected email, with the email included inline. You will be prompted for the cc only (you can leave this blank).F)wdforwards the selected email. You will be prompted for the recipient and cc (you can leave the cc blank, if desired.)
However you create your template email, take note of the filename which is displayed in the status line. The file will be created in the OUTBOX directory (/H1/DOCUMENTS/EMAIL/OUTBOX with our example settings.)
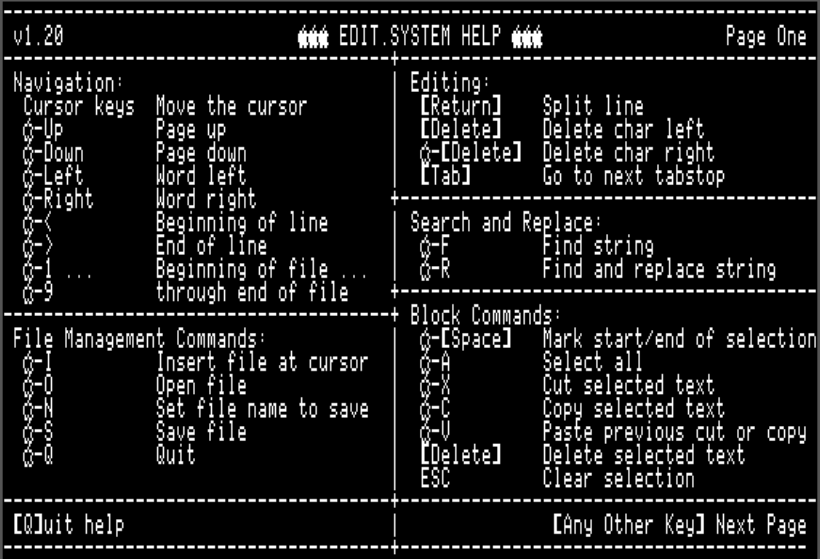
EDIT.SYSTEM
EDIT.SYSTEM is a simple full-screen editor. It uses Apple //e auxiliary memory to store the text buffer, allowing files up to 46KB to be edited. The command keys are similar to the popular AppleWorks word processor.
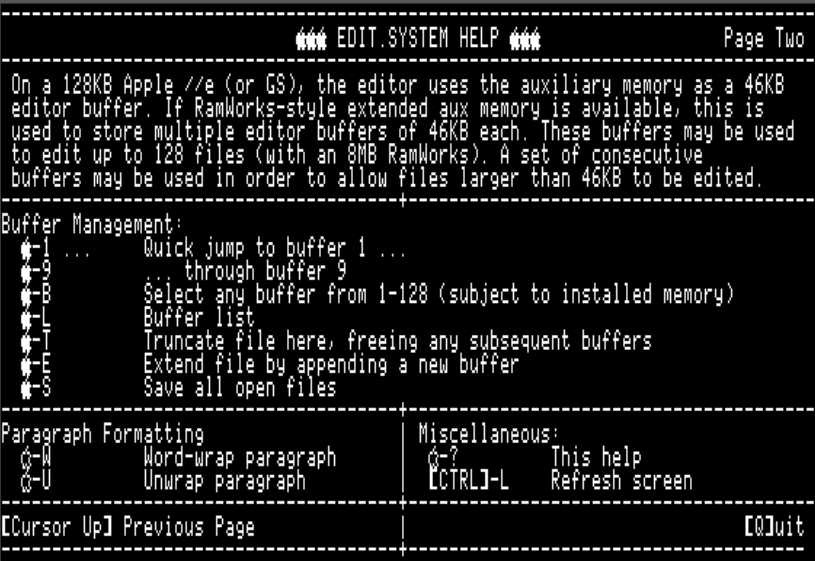
If RamWorks-style memory expansion is available, EDIT.SYSTEM can use it as additional editor buffers. For each 64KB bank of RamWorks expansion, an additional 46KB buffer will be allocated. With an 8MB RamWorks card, 128 buffers are available. EDIT.SYSTEM is able to support editing of large files (>46KB) by splitting them across more than one buffer.
ATTACHER.SYSTEM
ATTACHER.SYSTEM is used for attaching files to outgoing email messages. This program is started automatically by EDIT.SYSTEM and is not normally invoked directly.
When EDIT.SYSTEM invokes ATTACHER.SYSTEM, the following operations occur:
- The outgoing email message is loaded from
OUTBOXand copied to a temporary file. While copying, additional email headers are appended to indicate that this is a MIME multi-part message. - A
plain/textMIME section header is added to the email body (which becomes the first section in the multi-part MIME document.) ATTACHER.SYSTEMprompts the user to enter the filename of a file to be attached. This may be an unqualified filename (which will look in the directory the emai//er software is installed in), or a fully-qualified ProDOS pathname, such as/H1/PATH/TO/MY/FILE.BIN.- For each filename, the file is loaded from disk and encoded using Base64. A MIME section is created in the outgoing email and the Base64-encoded file data is appended.
- After all the desired files have been added, enter an empty line to finish adding files.
ATTACHER.SYSTEMwill terminate the MIME document, erase the original email file fromOUTBOXand rename the temporary file to replace the original.ATTACHER.SYSTEMwill reloadEMAIL.SYSTEMonce it is done.
SMTP65.SYSTEM
SMTP65 is a Simple Mail Transport Protocol (SMTP65) client for the Apple II. It requires an Uthernet-II ethernet card and will not work with other interfaces without modification, because it uses the W5100 hardware TCP/IP stack. POP65 is used to send outgoing email messages to an SMTP email server. (I use Postfix on the Raspberry Pi as my SMTP server, but other SMTP servers should work too.)
Before running SMTP65 for the first time, be sure to have created the SENT mailbox. This must be a 'proper' mailbox, not just a directory. You may create a mailbox using the N)ew command in EMAIL.SYSTEM.
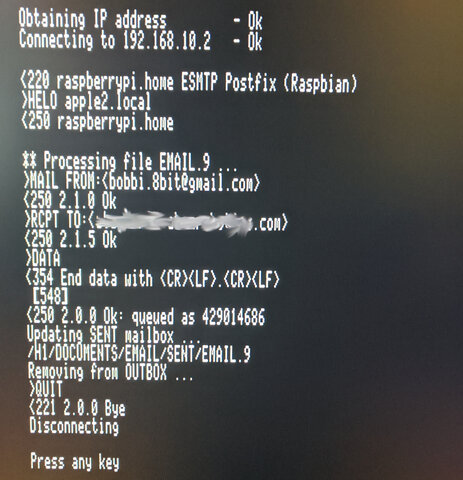
SMTP65 runs without any user interaction and performs the following tasks:
- Detect Uthernet-II
- Obtain IP address using DHCP
- Connect to SMTP server using parameters from lines 5 and 6 of
EMAIL.CFG. (HELOcommand) - Iterate through each message in the
OUTBOXmailbox (which is/H1/DOCUMENTS/EMAIL/OUTBOXwith our sample configuration)- Scan each message looking for the following headers:
To:From:cc:
- Notify the SMTP server of our email address (from
EMAIL.CFG). (MAIL FROM:command) - Notify the SMTP server of each recipient listed in
To:andFrom:headers (RCPT TO:command) - Send the email body to the SMTP sender. (
DATAcommand) - If the message was successfully sent, copy it to the
SENTmailbox. - Remove the sent message from
OUTBOX. - Iterate until all messages in
OUTBOXhave been sent, and copied toSENT. Rejected messages are left inOUTBOXwhere they may be edited and retransmitted.
- Scan each message looking for the following headers:
REBUILD.SYSTEM
REBUILD is a utility for converting a folder of email messages (text files named EMAIL.nnn where nnn is an integer) into a mailbox. It will erase any existing EMAIL.DB and NEXT.EMAIL files, parse the message files and create new EMAIL.DB and NEXT.EMAIL files. This tool may be used for bulk import of messages or for recreating the EMAIL.DB file for a mailbox which has become corrupted.
REBUILD simply prompts for the path of the directory to process.
If you use this tool for bulk import, be sure that all the EMAIL.nnn files are in Apple II text format with carriage return line endings (not MS-DOS or UNIX style.)