72 KiB
A2osX Shell Developers Guide
Updated February 12, 2020
One of the most significant parts of A2osX is its shell which can perform both interactive and scripted tasks. Using the interactive part of the shell, you can perform many common and complex tasks using both built-in (native or internal to shell) and external (BIN or executable) commands. Internal commands include CD (change directory), MD (make directory), PWD, DATE, etc. External commands include CP (copy), RM (remove), CAT (display file contents), TELNET, etc. It is even possible to create and execute short scripts right on the interactive command line (these are run once and not saved like true scripts) such as:
for file in `ls -c CT*`; cat ${file}; next
In this example, the system will generate a list of files found in the current directory which match the CT* wild card and perform the CAT operation on each. The semicolons act as line separators allowing you to type in multiple commands, or short scripts on a single line.
This Developers Guide will cover the basic operation of the interactive shell, the internal shell commands and creation of complex scripts that can be run by the shell. For information on external commands consult the A2osX Command Guide.
About the A2osX Shell (SH)
The default A2osX Shell ./bin/sh is an external command program like many others included with A2osX. It is probably the most complex and capable, as suggested by its size compared to other commands (7K vs 1K for telnet). It is the primary tool for interacting with the A2osX system. The sh shell is based loosely on
the Linux BASH shell, to the extent possible on an 8-bit machine. Alternative shells are planned for the future and will be announced as they become available.
As the primary mechanism for working with A2osX, the shell (sh) is launched automatically when you log into A2osX. In the case where no ./etc/passwd file is present, A2osX automatically logs you in as the root user. When a user login occurs and sh is launched, it looks for a file called profile in the users HOME directory and if found, executes that script. The information below on writing scripts applies to PROFILE script files.
Interacting with the Shell
To interact with the A2osX shell, you type commands at the prompt, which ends with a $ character. The prompt usually includes your current working directory such as /fullboot/root/$. You can change the prompt by changing the $PS1 variable (see below). At the $ prompt you can enter any of the valid internal shell commands, an external program file name or a script file name. For external programs and scripts, A2osX will search in the directories specified in the $PATH variable and then in the current directory.
Special Keys
While entering commands at the A2osX shell prompt, you can use the following special keys to edit the command line:
| Key | Usage |
|---|---|
| DELETE | Deletes character to left of cursor and moves cursor/rest of line to the left |
| Control-C | Erases entire command line |
| Control-D | Exits Shell and if the top most Shell logs you out of your session |
| Control-Z | Deletes character under the cursor |
| Up Arrow | Displays previous command from history. Multiple Up Arrows scrolls progressively through history |
| Down Arrow | Displays next command from history. Multiple Down Arrows scrolls progressively through history |
| Left Arrow | Moves cursor to the left to edit current command |
| Right Arrow | Moves cursor to the right to edit current command |
In addition to the editing keys above, you can use the following special keys while running scripts or executing commands:
| Key | Usage |
|---|---|
| Control-C | Interrupts running command or script |
| Open Apple-0 | Switches you to the console display |
| Open Apple-1 to 4 | Switches you to Virtual Terminals 1 through 4 if so configured |
Internal Commands
The A2osX Shell contains an advanced set of internal commands. Several of these commands are typically used interactively (at the $ prompt) while others are typically used in scripts. Technically all of these commands can be used both interactively or in scripts, though many really only show their power in scripts you develop or run.
Whether in scripts or typed in at the interactive Shell prompt ($), most commands support, or even require, one or more <arguments> and/or <options>. Commands typically use <values> as their <arguments> and <switches> as their <options>, however in some cases you may use <expressions> or <conditions>. A full command line may be in the form of
command <switch> <value> <switch> argument argument   or
command [ <condition> ]
where in the first nomenclature a command performs an action with or on the objects passed as <arguments>, modifying its behavior (the action it performs) based on <switches> if present. For example in the case of ls -l /myvol the command is ls, the option or switch is -l and the argument (target of the operation) is /myvol, which in this case the command would print a long listing of the root directory for the ProDOS volume named /myvol. The second nomenclature is used with the logic/control commands if and while where a <condition> is evaluated and the result is processed by the command to effect program flow.
A note on command line structure for internal and external commands: When passing a command a series of arguments, you must include a space between each argument. In addition, if a command has an option that requires an argument, there must also be a space between the option and its argument. For example, when using the READ command which has the -S -P and -N options, the -P and -N options both require an argument so the full use of the command would be
read -s -n 3 -p "My Prompt" avar. Do not use -n3 as you might in Linux or DOS as you will generate a Syntax Error and the command will fail to execute. Also note, for many commands the order of the arguments is important (i.e.cp sourcefile destfile, the order is critical), however the order of options is not.read -s -n 3 -p "MyPrompt" avaris the same asread -p "MyPrompt" avar -s -n 3as well asread -s avar -n 3 -p "MyPrompt". What is critical here is that you must have a number immediately after -n and a string after -p which will be the prompt.
Arguments
As briefly discussed above, almost all commands take and most even require an argument which affects the command's behavior. For example the sleep command requires that you pass it an argument that indicates the amount of time to SLEEP. Arguments come in many forms; each of these is discussed here.
<conditions>
The shell features a lot of built-in checks and comparisons called <conditions> throughout this guide. This particular form of an argument is used exclusively by the if and while commands where the <condition> is evaluated and result is used to control program flow with in the defined if-else-fi or while-loop block. All conditions must be enclosed with in brackets []. In addition to the capabilities found in the extensive list of checks and comparisons listed below, conditional execution can be enhanced by negating with an ! in front of a condition and/or compounding with AND and OR between two or more conditions. The following scripts show examples of the possible conditions you can use while writing your own scripts.
Note: The examples below make use of the ; directive which allows you to put multiple statements on one line. So for example
if [ condition ] ; echo result ; else ; echo message ; fi
Is the same as
if [ condition ]
	echo result
else
	echo message
fi
The single line notation allows these sample scripts to be significantly shorter; their operation is not affected. Also note, you are not limited to a single command line between the IF/ELSE/FI statements. See the documentation of the IF command for more information.
The shell includes several "checks" that can be used to easily determine if certain <conditions> are true or false. The format of a check is [ -CHECK <value> ] where -CHECK is one -d (is a directory), -e (is a directory or a file), -f (is a file), -i (is an integer), -n (is a null), -x (is a defined function) or -z (is not null) and where <value> is a variable or literal on which to perform the check. This script demonstrates the usage of these "Check" Conditions.
#!/bin/sh
#
#   if [ -CHECK <value> ] Examples
#
#	Echo "Found" if their is a subdirectory TEST in the current directory
#	If TEST is not present, or is present but a file, this Check would fail
if [ -d TEST ] ; echo "Found" ; fi
#	If -d using a variable
set fname = "TEST" ; if [ -d $fname ] ; echo "Found" ; fi
#	Echo "Found" if a file or a subdirectory named TEST is in the current directory
if [ -e TEST ] ; echo "Found" ; fi
#	Echo "Found" if the file profile is in the top most directory of the volume MYVOL
#   IF profile were a directory name and not a file, this Check would fail
If [ -f /myvol/profile ] ; echo "Found" ; fi
#	Echo "true" if the <value> is an Integer
set abc = 123 ; if [ -i $abc ] ; echo "true" ; fi ;		# would echo true
set abc = "hello" ; if [ -i $abc ] ; echo "true" ; fi ;		# false no echo
if [ -i 123.456 ] ; echo "true" ; else ; echo "false" ; fi ;	# echo false
#	Note the next two -n and -z are in affect opposites of each other ![ -n ] = [ -z ]
#	Echo "true" if the variable is not empty (non-null)
set abc = "hello" ; if [ -n $abc ] ; echo "true" ; fi ;		# true
#	Echo "true" if a function named MYFUNC has been defined
#	See the section on functions for more information on this check
if [ -x MYFUNC ] ; echo "true" ; fi ;				# False
#	Echo "true" if the variable is empty/does not exist (null)
set abc =  ; if [ -z $abc ] ; echo "true" ; fi ;		# true
set abc = "hello" ; if [ -z $abc ] ; echo "true" ; fi ;		# false
In case you are wondering why there appears to be extra semicolons (;) in the lines above, unlike other languages (i.e. C, BASH, VB) you cannot put a comment on the same line as a command. A comment must start with pound (#) at the start of a line. Remember from the note above, that the semicolon allows you to concatenate multiple lines onto one, but they are treated as separate lines. Here, that allows a comment to appear on the same line as executable statements, but to the shell its treated as its only line that starts with a #.
This script demonstrates the usage of the various String evaluation Conditions. They are equals (=), not equals (!=), less than (.<), less than or equal (<=), greater than (.>) and greater than or equal (>=).
#!/bin/sh
#
#   if [ string <comparator> string ] <conditions> Examples
#
set a = "abc"
set b = "def"
if [ $a  = $b ] ; echo hi ; else ; echo bye ; fi ;		# false - bye
if [ $a != $b ] ; echo hi ; else ; echo bye ; fi ;		# true  - hi
if [ $a .< $b ] ; echo hi ; else ; echo bye ; fi ;		# true  - hi
if [ $a <= $b ] ; echo hi ; else ; echo bye ; fi ;		# true  - hi
if [ $a .> $b ] ; echo hi ; else ; echo bye ; fi ;		# false - bye
if [ $a >= $b ] ; echo hi ; else ; echo bye ; fi ;		# false - bye
Note if you set A = 123 and B = "def" and do those tests you will get an error on some of the tests since one of the variables is an integer and both variables should be strings.
This script demonstrates the usage of the various Integer evaluation Conditions. They are equals (-eq), not equals (-ne), less than (-lt), less than or equal (-le), greater than (-gt) and greater than or equal (-ge).
#!/bin/sh
#
#   if [ int32 <comparator> int32 ] <conditions> Examples
#
set a = 123
set b = 456
if [ $a -eq  $b ] ; echo hi ; else ; echo bye ; fi ;		# false - bye
if [ $a -ne  $b ] ; echo hi ; else ; echo bye ; fi ;		# true  - hi
if [ $a -lt  $b ] ; echo hi ; else ; echo bye ; fi ;		# true  - hi
if [ $a -le  $b ] ; echo hi ; else ; echo bye ; fi ;		# true  - hi
if [ $a -gt  $b ] ; echo hi ; else ; echo bye ; fi ;		# false - bye
if [ $a -ge  $b ] ; echo hi ; else ; echo bye ; fi ;		# false - bye
Note if you set A = 123 and B = "Hello" and do those tests you will get an error since one of the variables is string and both variables must be integers.
To help simplify scripts in some cases, you can modify any of the above <conditions> by preceding it with an exclamation (!) or NOT symbol. For instance you might have a script that creates a temporary file that normally would be stored in ${ROOT}tmp/. Before attempting to create a file in this directory you might check to see if it exists and if not create it. This script would do that:
#!/bin/sh
#
#   Check for TMP and create if missing
#
if [ -d ${ROOT}/tmp ]
else
	md ${ROOT}/tmp
fi
Notice that the work being done here is in the else block, or when the check fails. You may find it better to use the NOT (!) modifier and write the script this way:
#!/bin/sh
#
#   Check for TMP and create if missing
#
if ![ -d ${ROOT}/tmp ]
	md ${ROOT}/tmp
fi
You can further extend <conditions> by building complex evaluations that consist of multiple check or comparison <conditions> joined by and and/or or. The following are examples using and and or.
#!/bin/sh
#
#   if <conditions> with and and or examples
#
set a = 123
set b = 456
# With and you can test 2 or more things at once
if [ $a -eq 123 ] and [ $b -eq 456 ]
	echo hi
else
	echo bye
fi	 ;		# true  - hi
# Test that 3 conditions are all true
if [ $a -eq 123 ] and [ $b -eq 456 ] and [ $c = "your name" ]
	echo hi
else
	echo bye
fi	 ;		# false - bye  (because 3rd condition not met)
# With or you can test if either condition is met
if [ $a -eq 123 ] or [ $b -eq 456 ]
	echo hi
else
	echo bye
fi	 ;		# true  - hi
if [ $a -eq 999 ] or [ $b -eq 456 ]
	echo hi
else
	echo bye
fi	 ;		# true  - hi	(2nd condition is met)
When using multiple of these joiners with a single command such as if, care should be made in the structuring of your <condition> statements. The shell processes command lines linearly from left to right and is very binary in nature. Consider first a math example of set A = 1 + 2 * 3 - 4 * 8 + 2 / 2, the result placed into A is 42 (process the calculations like a calculator would, one at a time, there is no precedence). When evaluating a set of <conditions>, the shell processes them one at a time the same way and when it encounters an and or an or it evaluates the current "state" to determine if it should return a result or continue to evaluate the conditions on the line. Let us say you have 4 conditions, A, B, C and D (each one represents something like [ -d adir ]), and you are doing something like if A and B or B and D. The Shell will determine a result for A (for example that [ -d adir]) and then it sees "AND", at that moment if A is false all processing ends there because it does not matter what else is on the command line (The if fails). Now assume A and B are both true and it gets to that OR, again processing stops be cause there is already a true case on one side of the OR (The IF succeeds). As you can see, its easy to predict the behavior of constructs like IF A and B and C and D (all must be true) as well as IF A or B or C (any one need be true), but complex IF A or B and C or D and E need to be tested that they perform as you imagined. Once mastered though, you will see that when structured correctly you can perform very complex <condition> sets. Say you wanted to do IF ( A and B ) or C, realizing there is no actual groupings (parens) in conditions, if you simply structure your if as IF C OR A AND B, it will have the effect you wanted. There is an example of complex compound conditions that you can run and even modify to test different patterns/structures of complex conditions. It can be found at ANDORTESTS.
<expression>
The A2osX shell contains an expression evaluator that can perform simple integer math operations using the + - * / and mod operators. Expressions are a form of an argument used by only a handful of commands, most notably set (to store the result of the expression into a variable) and case/switch.
#!/bin/sh
#
#   Shell Expressions Example
#
set a = 123
set b = 10
set c = a + b		# 133
set c = a - b		# 113
set c = a * b		# 1230
set c = a / b		# 12
set c = a mod b		# 3
set c = 100 * 2 / 4 + 2 / 13 * 4 	# 16
<op>
<Op> are operators, the simple integer math functions that can be performed in the shell. They are a special kind of argument used only in <Expressions>, see above. The valid <Ops> are + (addition) - (subtraction) * (multiplication) / (division) and mod. See the script above in the <expression> section for examples of <ops>.
<switch>
A switch (not to be confused with the shell command switch, see below) is a special type of argument to internal and external commands that changes the behavior of that command. For instance, the standard echo command ends its output with a carriage return (ASCII 13), adding the -n switch to echo (i.e. echo -n "hello") will cause echo to omit the CR. All switches begin with hyphen (-) and are immediately followed by a valid single character (in the case of echo -n is the only valid switch) and then a space (or carriage return if the end of the line). There should be no space between the hyphen (-) and the switch character, and if the switch itself requires an argument, then the switch must be followed by a space and then the argument for that switch (see the read command for an example). Please make sure you read the note at the start of this section regarding command line structure and the ordering of arguments, in particular with switches that themselves require arguments.
<value>
Values are the simplest form of arguments, usually a string or an integer, which may be presented literally or in the form of a variable.
Please note, that the shell does string substitution when processing <values>. This is done when the shell finds a variable within the string (a set of characters that begin with a $). For example if you had a variable called $BOOTVOL that is set to "/MYVOL/" and you passed a command the <value> "${BOOTVOL}AFILE", it would get expanded to "/MYVOL/AFILE". Notice the use of braces {} surrounding the variable name, they are needed here otherwise the SHELL would look for the variable $BOOTVOLAFILE. See the script below for the ECHO command for more examples of values that contain variables. Also look at the section on the SET command and the section below on Variables.
AND
[ <expression> ] and [ <expression> ]...
The and reserved word is used to join 2 or more conditions together to create complex logic statements. See <condition> section above for more information on and and examples of its usage. In addition, look at ANDORDEMO, a complete script using and and or.
BREAK
break
The break command is used to exit or end a block of statements that were optionally executed for a particular case as part of a switch script block. See the switch command below for more information and example of using break.
CALL
call function [ <argument> ]...
The call command is used to execute a previously defined and loaded function. When calling a function with the call command, you may pass one or more arguments which can then be used by the function during execution. See the function command below for more information on creating and calling functions including examples.
CASE
case <expression>
The case command is used at the start of a block of statements to be optionally executed based on the evaluation of <expression> as part of a switch script block. See the switch command below for more information and example of using case.
CD
cd <value>
The cd command is used to change the current working directory. You must supply the cd command a valid relative or absolute path. Examples of relative paths include subdir1 (a sub-directory in the current directory), ../subdir2 (a sub-directory in the parent of the current directory), and subdir1/subdir3 ( a sub-directory in the sub-directory subdir1 of the current directory). An absolute path always begins with a / and includes the volume name of the disk drive to which change the current working directory such as /MYVOL1/var/logs (the sub-directory logs in the directory var on the disk with a volume label of MYVOL1). You can use the pwd command to display the current working directory if your prompt ($) does not automatically display it on the command line (the default, set in your PROFILE). The current working directory is used by the shell to look for scripts not located in one of the directories specified by $PATH or as the directory for reading and writing files when no path is provided by a command. For example, if you execute the ls command without arguments, ls assumes to list the files in the current working directory. Similarly, if you specify a file without a path, for example the command echo Hello > outfile, shell will place the file outfile in the current working directory. See the related popd and pushd commands.
DATE
date [ <expression> ]
The date command outputs the current date and time. A supported clock card is needed to return accurate DATE and TIME values. date accepts an optional <expression> that should be a string that can contain any text as well as the following format options:
- %a : Abbreviated weekday name : Thu
- %A : Full weekday name : Thursday
- %b : Abbreviated month name : Aug
- %B : Full month name : August
- %d : Day of the month, zero-padded (01-31)
- %H : Hour in 24h format (00-23) 14
- %I : Hour in 12h format (01-12) 02
- %m : Month as a decimal number (01-12) 08
- %M : Minute (00-59) 55
- %p : AM or PM designation PM
- %S : Second (00-61) 02
- %w : Weekday as a decimal number with Sunday as 0 (0-6)
- %y : Year, last two digits (00-99)
- %Y : Year four digits 2001
The following script highlights sample <expressions> you can pass the DATE command.
#!/bin/sh
#
#   date Command Examples
#
date						' Wednesday, November 20 2019 22:53:00
date "Time: %I:%M %p"		' Time: 10:53 PM
date "Today is %A %B %d %Y"	' Today is Wednesday November 20 2019
date "%b-%d-%y"				' Nov-20-19
DEFAULT
default
The default commands is used to select the block of commands to execute for the Default Case for the switch command. Structured appropriately, the commands after the default keyword are executed when no other CASE was valid. See the section on case and switch for more information and complete examples for creating your own switch execution blocks.
ECHO
echo [-e] [-n] <value>...
The echo command optional switch -e causes echo to process escape \ caracters. The echo command is used to print to an output device, by default the screen. The echo command optional switch -n causes echo to suppress output of the carriage return that normally occurs. Technically the format of the echo command is echo [-n] [<value> ...]. This means that the echo command can be followed by the optional switch -n and one or more optional <values>. In the case of echo, it is these <values> that are output by the command. Here, values are separated by spaces, so you can do ECHO $A HELLO $B and echo will output the value stored in the variable A and then the world HELLO and then the value stored in B. Please see <values> for more information on how values are processed, especially in the handling of variables ($VAR) contained in a <value>. A word about values, command lines and spaces: echo Hello World is not the same as echo "Hello World". In the first case echo treats Hello and World as separate values and in the second, "Hello World" as one value. Since echo takes multiple values, you might not notice the difference, but in the case of if [ $A = "Hello World" ] if you omitted the quotes you would get a syntax error because the = operator only accepts one value on each side. In addition, when not enclosed in quotes, extra spaces are removed so echo Hello World would be output as Hello World as echo would treat Hello and World as values and output value space value.
supported escaped chars : \a,\b,\e,\f,\n,\r,\t,\v,\\,\',\",\?
In addition to the usual variable substitution that occurs with <values> (see <value> above), the echo command performs some special character substitutions while sending output to the screen or terminal. If placed inside a value like a string, echo will automatically substitute a backspace for the sequence \b, substitute an escape for \e, clear the screen for \f, send a newline for \n, send a \ for \\ and send a % for \%. The \e (escape) code is useful for sending VT100 escape sequences to the screen/terminal (see the VT100 example script). The \\ and \% are necessary to send those chars to the screen since normally those characters are interpreted as special command line arguments. There is also special \xHH and \OOO options, that will send explicitly the char represented by the HEX value HH or OCT value OOO to the output device (screen or file).
#!/bin/sh
#
#   echo Command Examples
#
echo Hello    World		'Hello World	#Note SH treats as 2 <values>
echo "Hello    World"   	'Hello    World
echo \f				'Clears Screen
echo "\fHello"			'Clears Screen puts Hello on first line
echo "\n\nHello'		'Sends to Carraige Returns then Hello to output
set A$ = HELLO
echo A$				'HELLO
echo "$A, How are you?"		'HELLO, How are you?
echo "$AB, fine!"		', fine!		#Note AB is not defined
echo "${A}B, fine!"		'HELLOB, fine!	#Brackets ensure A substitution
echo "123\b\b456"		'1456			#two backspaces (\b) over the 23
echo -N "\xFF\xFF" > afile	'Create file called afile and put exactly the
				'bytes Hex FF and Hex FF into it.
Consult the subsection below on Advanced Display Techniques for more examples of using echo and additional VT100 escape sequences that can be used to control the display of output.
Advanced Display Techniques
A2osX provides advanced screen handling capabilities for the Apple console (keyboard/screen) as well as terminals connected directly (via Super Serial Cards) or remotely (via Telnet using a supported network card and the telnetd server daemon). These features are based on the VT100 Terminal definition and scripts you develop can pass VT100 codes (via the echo command) to enhance the appearance of your scripts. In addition to VT100 codes, echo has been augmented with some short codes to perform the more common and to help display special characters. The examples below will help you understand what is possible with echo. For a fuller listing of the available VT100 Terminal Codes, consult the A2osX Terminal Codes Guide.
#!/bin/sh
#	ECHO / Advanced Display Techniques Examples
#	Note codes are CASE SENSITVE.  \F is not the same as \f
#   Clear the Screen (\f)
echo \f
#   Clear the Screen and Display text in the top left corner
echo "\fThis line will appear on the first line of your Apple"
#	ECHO on a line byself will create a blank line (moving the cursor down one line)
#	Multiple ECHOs in a row, will skip multiple lines.  The \n shortcode makes this easier.
#	This example is the same as ECHO; ECHO; ECHO "HELLO"; ECHO; ECHO; ECHO "WORLD"
echo "\n\nHELLO\n\nWORLD"
#	Backspace shortcode \b moves the cursor one space to the left.
#	This example would print ABEF on the screen.  The two \b overwrite the CD.
echo "ABCD\b\bEF"
#	Turn Inverse on: \e[7m		off: \e[0m
#	This example displays HELLO INVERSE WORLD with the word INVERSE in inverse.
echo "HELLO \e[7mINVERSE\e[0m WORLD"
#	Print a backslash (\).  Since \ is a special character, you need a way to print it.
echo "\\"
#	Print a percent (%).  Since % is a special character, you need a way to print it.
echo "\%"
#	Supress Newline (-N).  ECHO -N allows you to print multiple things on the same line
#	This code segment will print ONE TWO THREE all on one line.
echo -N ONE
echo -N TWO
echo -N THREE
#	Move cursor to beginning of current line (\r)
#	This example will print WORLD HELLO, note spaces.
echo "      HELLO\rWORLD"
#	Scroll Screen Down 1 Line (\eM)
echo \eM
#	Scroll the Screen Up 1 Line (\eD)
echo \eD
#	Clear Screen VT100 Code alternative, same as \f (\ec)
echo \ec
#	Move cursor to [x,y] \e[x;yH
#	Move cursor to row 5 and col 15 and print I AM HERE
echo "\e[05;15HI AM HERE"
#	Move to home position [0,0] (\e[H)
echo \e[H
#	Clear from cursor to end of line (\e[K)
echo \e[K
#	Clear from cursor to beginning of line (\e[1K)
echo \e[1K
#	Clear line (\e[2K)
echo \e[2K
#	Clear line 15
echo \e[15;01H\e[2K
In addition to the special codes above that can used to manage all displays (both the console and remotely connected users), there are additional codes that have great affect on VT-100 terminals and emulators such as putty. Only the reverse video option works on an Apple II console/screen.
#!/bin/sh
# ECHO / VT100 Terminal Character Codes
# Note codes are CASE SENSITVE. \F is not the same as \f
# Turn BOLD on: \e[1m off: \e[0m
# This example displays HELLO BOLD WORLD with the word BOLD in bold.
echo "HELLO \e[1mBOLD\e[0m WORLD"
# Turn low intensity on: \e[2m off: \e[0m
# This example displays HELLO low WORLD with the word low in low intesity.
echo "HELLO \e[2mlow\e[0m WORLD"
# Turn underline on: \e[4m off: \e[0m
# This example displays HELLO underline WORLD with the underline underlined.
echo "HELLO \e[4mlow\e[0m WORLD"
# Turn blinking on: \e[5m off: \e[0m
# This example displays HELLO blinking WORLD with the blinking blinking.
echo "HELLO \e[5mblinking\e[0m WORLD"
# Turn Inverse on: \e[7m off: \e[0m
# This example displays HELLO INVERSE WORLD with the word INVERSE in inverse.
echo "HELLO \e[7mINVERSE\e[0m WORLD"
# Turn Invisible on: \e[8m off: \e[0m
# This example displays HELLO Invisible WORLD with the word Invisible is not displayed (blank spaces).
echo "HELLO \e[8mInvisible\e[0m WORLD"
# Change Character Color: \e[COLOR;COLORm
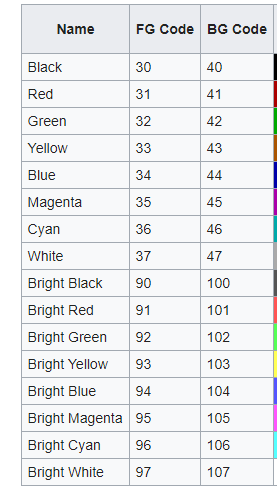
# This example displays HELLO COLOR WORLD with the word COLOR in Bright Yellow on a Dark Blue Background.
echo "HELLO \e[7mINVERSE\e[0m WORLD"
As you can see \e[0m turns off all character attributes. It is like a reset. The following table shows color codes that can be used with VT-100 emulators like PuTTY.
ELSE
else
The else command is used to add an optional branch to an if block. See the if command below for more information and examples of using else as part of if program blocks.
END
end
The end command is used at the end of a switch script block. See the switch command below for more information and example of using end as part of switch.
EXIT
exit [int32]
The exit command is used to immediately end the processing of a script or function. exit accepts an optional argument that sets the return code ($?) which may be checked by a calling script. If no argument is provided the return code is set to 0 (No Error). The following script demonstrating the use of the exit command used with a function and can be found at EXAMPLES.
#!/bin/sh
#
#   exit Command Examples
#
# This example shows the use of EXIT from a function with a return code
#
function divide
{
	if ![ -i $1 ] and ![ -i $2 ]
		# Error vars not integers
		exit 3
	fi
	if [ $2 -eq 0 ]
		# Error Zero Divisor
		exit 7
	fi
	set $3 = $1 / $2
}
read -p "\nEnter a number: " $A
read -p "\nAnother number: " $B
call divide $A $B C
switch $?
	case 0
		echo "\n$A divided by $B is $C\n"
		break
	case 3
		echo "\nError: Input not Integers\n"
		break
	case 7
		echo "\nError: Divide by Zero Prohibitied\n"
		break
end
Besides the exit command, the example above also demonstrates how to check that input is a number rather then a string (-i), using newlines (\n) to properly format the screen (the read command leaves the cursor on the line of input), and passing a variable name to a function (this is a clever way to get return values from commands). This example also demonstrates the use of the switch, case, break and end commands.
FI
fi
The fi command is used at the end of an if script block. See the if command below for more information and example of using fi as part of if.
FOR
for <var> = "constant string of space separated words"
for <var> = <string var>
for <var> in (file)
for <var> in `command`
The for command is used as a special kind of loop, where a set of instructions is repeated and the variable is set from a supplied list. This list can be a constant string of space separated words or numbers like "ABC DEF ghi jkl" or "1 2 345 545" or it can be a string variable itself made up of space separated words. In addition there are two special versions of for where is set by reading lines from a file using the (filename) notation and where* * is set by the output of a command using back ticks to enclose the command such as ` ls -c F* ` notice here that the -c option is used with ls to force one returned file name per line (see ls).
#!/bin/sh
#
#   for Command Examples
#
# This example shows the use of various for command blocks
#
# for example 1: for with static string list
#
# the following would output the 5 names on 5 lines
for name in "Alex Bert Dan Fred Mike Tom"
	echo $name
next
#
# for example 2: for with list in variable
set names = "Alex Bert Dan Fred Mike Tom"
for name in $names
	echo $name
next
#
# for example 3: for with list in stored in a file
# here, for reads the file names and sets the variable name to each line read
for name in (names)
	echo $name
next
#
# for example 4: for with list from simple command
# this scriptlet copies the files in the current directory to the disk /backup
for name in `ls`
	cp $name /backup
next
#
# for example 5: for with complex command
# this scriptlet reports of the total number of disk blocks used by all online volumes
set total = 0
for used in `ls -l / | cut -m 34 -n 39`
	set total = $total + $used
next
echo "Total File System Used Blocks: ${total}"
FUNCTION
function function_name
{
	<body>
}
The FUNCTION command is used to define a function that can be called one or more times by your scripts. Functions can reduce the overall amount of code in a script, can make scripts more readable, and in some cases reduce main memory usage. You can even have functions call themselves providing for a level of recursion, but note that each call takes room on the stack, about 7 bytes and there is only 128 bytes, so do so with care.
A note about the shell, memory usage and functions. When you execute a script, it gets loaded into main memory. If this script gets contains functions, when the shell encounters the definition for the functions it copies them to aux memory. This might seem redundant/wasteful, but there is a key optimization you can make here that will both reduce main memory use and aide in script development. Instead of putting your function definitions at the top of your script (lets call it myscript), put them in a separate file (lets call it myfuncs) and then in myscript you dot call myfuncs (. myfuncs). With this construct, myscript will be smaller, taking less main memory, then when it runs, it will temporarily load myfuncs which loads the functions into aux and then it will free the main memory the script myfuncs was using but the functions will still be available. Using this method you can actually load a great deal of program logic into aux memory with little impact on main memory. And yes you can load multiple function files by simply calling them one after another in your script, and myfuncs could even call other scripts of functions to load. If at some point in your program you no longer need the functions that have been loaded you can use the set -f command to clear aux mem of ALL functions that have been loaded. Also note, that if your script calls other scripts, any function already defined is NOT available to the called scripted unless it is called with a dot (.) to run the new script in the current environment.
The following script demonstrating the use of the function command can be found at EXAMPLES.
#!/bin/sh
#
#   exit Command Examples
#
# This example shows the use of EXIT from a function with a return code
#
function divide
{
	if ![ -i $1 ] and ![ -i $2 ]
		# Error vars not integers
		exit 3
	fi
	if [ $2 -eq 0 ]
		# Error Zero Divisor
		exit 7
	fi
	set $3 = $1 / $2
}
read -p "\nEnter a number: " $A
read -p "\nAnother number: " $B
call divide $A $B C
switch $?
	case 0
		echo "\n$A divided by $B is $C\n"
		break
	case 3
		echo "\nError: Input not Integers\n"
		break
	case 7
		echo "\nError: Divide by Zero Prohibitied\n"
		break
end
IF
if [ <expression> ]...
	<body>
else
	<body>
fi
The IF command is used to control execution in your scripts by optionally processing blocks of code represented by . The if command processes **s and if true will process the of commands following if and if not, will process the following the else statement. See the many examples above (and throughout this document) on the section about for how you can use if.
LOOP
loop
The LOOP command is used at the end of a WHILE script block. See the WHILE command below for more information and example of using LOOP as part of WHILE.
MD
md <value>
The MD command is used to create directories on volumes. It will take either a full or relative path. It does not create multiple path levels, so all intermediate paths in must exist. For example if you execute the command md /myvol/adir/notherdir/newdir then the volume /myvol must exist and it must already contain a directory called adir with a subdirectory called noherdir into which the command will place the new subdirectory newdir. If adir or notherdir do not already exist then an error will be thrown.
NOHUP
nohup <value> [&]
The NOHUP shell command is a special directive that tells the shell to launch the command or script provided in as if it was requested by the system itself, with a parent process ID of 0. This command is largely used to launch daemon processes such as the telnet server (telnetd) or web server (httpd). When combined with the background flag (&) this allows you to launch these daemons and then if you log off they stay running and "owned" by the system.
OR
[ <expression> ] OR [ <expression> ]...
The OR reserved word is used to join 2 or more conditions together to create complex logic statements. See <condition> section above for more information on OR and examples of its usage. In addition, look at ANDORTESTS, a complete script using OR.
PAUSE
pause
The PAUSE commands halts the execution of a script until the user presses the return key.
POPD
popd
The POPD command is used to restore previously saved working directory. Multiple popd commands may be used until all saved working directories have been restored.
PUSHD
pushd [ <value> ]
The PUSHD command is used to temporarily switch to another directory, saving a copy of the current working directory, allowing you to return easily with the popd command. When execute pushd for example pushd /vol2/datadir/files and your current working directory is /vol1/home/user1, the shell will save /vol1/home/user1 and then perform a cd to /vol2/datadir/files. When you are done working in that new directly, you simply execute popd and you are returned back to /vol1/home/user1.
PWD
pwd
The PWD command prints the current working directory. You can change the working directory with the cd or popd commands.
RD
rd <value>
Remove the empty directory specified by <value> which may be either a relative directory name such as ThisDir or ../SomeDir/ThisDir or it can be a full path name such as /MyVol/SomeDir/ThisDir. The directory specified must be empty or an error will be thrown. To remove a non-empty directory (and all the files and sub directories contained within) you can use the rm command with the -r switch. See the rm command for more information.
READ
read [ -s ] [ -p <value> ] [ -n int32 ] <variable>
The READ command allows you to accept input from the user which can be used or evaluated in other commands. For instance you can use the READ command to get the name of a file to copy, ask the user for confirmation (Proceed?) and evaluate their response with an IF command, etc. READ has several powerful options including: Prompt, Suppress and NumChars. In all cases you must specify a variable in which to place the results of the READ command.
#!/bin/sh
#READ Command Examples
#    Get Input from User and Store in Variable $A
read A
#    Display a prompt, Get Input and Store in $A
read -p "Enter your name: " A
#    Display a prompt, Get Suppressed Input and Store in $A
#    The suppress option will keep any input from appearing but you can
#    edit normally and $A will be correct.
read -s -p "Enter your name: " A
#    Display a prompt, Get Input limited to 8 characters and Store in $A
read -n 1 -p "Enter your name: " A
#    Display a prompt, Get Input limited to 1 characters and Store in $A
#	 Special case of -N option.  As soon as the user types any character
#    input will be ended and the single character will be stored in $A.
#	 The user does NOT need to press return to accept the input.
read -n 1 -p "Proceed (Y/N): " A
#    Get Input limited to 1 key press and Store the ASCII value of the key in $A
#	 Special case of -N option.  As soon as the user types any key, input will
#    be ended and the single key code will be stored in $A as an Integer.
#	 This can be used to capture/process special keys like TAB, Arrows and DEL.
#	 In this special case of READ, the character pressed is NOT echoed.
read -n 0 A
REN
ren <value> <value>
The REN command allows you to rename a single file, directory or Volume. It does not support wild cards. While ren and mv may seem similar, they are very different commands and you should use each for its intended purpose. In the case of ren, it changes the name of an item (Vol, Dir, File) in place; the item itself is not changed. For those familiar with ProDOS file systems, ren changes the entry of an item in the CATALOG. mv on the other hand actually copies files (and removes the original) to move them. Obviously ren is more efficient at renaming an item in its current location, whereas mv could be used to change the location of a file (move it from one directory or even volume to another). Yes you can use mv myfile newfile to do the same thing as ren myfile newfile, but since a copy must occur, it will be slower and you will have to have sufficient disk space free to make this copy.
#!/bin/sh
#ren Command Examples
#    rename a Volume
#	 Note How you need to use a full volume name as the Original Name and
#	 the new name must not be proceeded by a slash (/).  The following
#	 will rename the volume /MYVOL to NEWVOL.
ren /MYVOL NEWVOL
#    rename a Directory in the current working directory ($PWD)
ren ADIR NEWDIR
#    rename a Directory in another relative directory
#	 In this example, the directory ADIR in SUBDIR will be renamed.
#	 Notice that the new name does not contain a path.
ren SUBDIR/ADIR NEWDIR
#    rename a Directory using a full path
#	 This example renames the dir MYDIR found in /FULLBOOT/TMP to YOURDIR.
ren /FULLBOOT/TMP/MYDIR YOURDIR
#	 rename File Examples
#	 rename a file in the current directory
ren MYFILE NEWFILENAME
#	 REName a file in a relative (the parent) directory
ren ../MYFILE NEWFILENAME
#	 rename a file using a full path
ren /FULLBOOT/TMP/MYFILE NEWFILENAME
SET
set <switch>
set variable = <value>
set variable = <expression>
set variable =
The SET command is used to set or clear the value of variables as well as to set or clear flags that change the behavior of the shell (SH) especially when running scripts.
Variables
The most simplistic form of set is SET var = value such as set myVar = 6, where the shell will create a new variable called myVar and in this case make it an Integer (32-bit) and set its value to 6.
As seen throughout this guide, scripts are very useful for automating many repetitive tasks. To get the most out of scripts, you are likely going to want input from the user or gather existing data stored in your file system and then use this to control program flow. To do this, you are likely going to want to use variables to store and process the data your script relies on. This section will provide you with the information you need to get the most out of your own, as well as system provided, variables.
All variables have names can be any length, but longer is not better as longer names consume additional memory. They are case sensitive so AVAR, Avar, aVar, and avar are actually 4 different variables. There are only two kinds of variables internally, strings and integers. A string can be up to 255 characters long and an integer can hold a value in the range of −2,147,483,648 to 2,147,483,647. If you add to or subtract from integers that eceed this range your result wraps around the range, so if you add 1 to 2,147,483,647 you will get −2,147,483,648. Similarly if you form a string with more then 255 characters, then the first 255 characters are lost and the remainder placed in the variable. For example, if you concatenate 3 strings of 100 chars the resulting string will be the last 45 chars of the 3rd original string.
When working on strings, the proper way to concatenate two strings, say Var1 and Var2 into Var3 is with the syntax set Var3 = $Var1$Var2 . Notice the lack of space here. If you use the addition (+) with these vars you will get an error because they are not integers.
Special Variables
In addition to the variables you create, there are a number of predefined variables that you can use in scripts. Several of these are set by LOGIN when a user logs on to A2osX. These include $BOOT, $DRV, $LIB, $PATH, $ROOT and $TERM.
The $BOOT variable holds the full path of the ProDOS PREFIX when you started A2osX (-A2OSX.SYSTEM). The $ROOT variable contains the same full path.
Note, while your PREFIX could be set to /MyVol/Adir and you can launch A2OSX.SYSTEM from another directory (i.e. -/MyVol/OtherDir/A2OSX.SYSTEM), A2osX will not fully load because it will look for support files in sub directories of PREFIX. See the A2osX User Guide for more information on starting A2osX.
The $DRV variable holds the full path A2osX can find hardware driver files for A2osX such as the driver for a Super Serial Card (SSC). LOGIN automatically sets this variable to ${BOOT}DRV/, which means it will look for drivers in the DRV sub directory found in the full path $BOOT is set to. If you have made your own drivers and store them in a different location, you could change or add to this variable. It is used like the standard $PATH variable where multiple directories can be listed (and searched) by separating them with a colon (:). So for example you could SET $DRV = ${BOOT}DRV/:/MYVOL/DRIVERS/ and when INSDRV attempts to install a driver name you specify it will first look for the driver file in the DRV sub directory of $BOOT and then look in the /MYVOL/DRIVERS/ directory. Note that these paths must end with a slash (/) as shell looks for files by appending a file name to these search paths.
The $GECOS variable holds the Full Name (string) of the current user. This variable is set by LOGIN and cannot be changed by the user. Its value is taken from the ./etc/passwd file as set by the useradd command.
The $GID variable holds the group id (integer) of the current user. This variable is set by LOGIN and cannot be changed by the user. Its value is taken from the ./etc/passwd file as set by the useradd command.
The $HOME variable holds the full path of the logged in users HOME directory, the place where their personal files are stored. This variable is set by LOGIN and its value is taken from the ./etc/passwd file as set by useradd.
The $LIB variable holds the full path A2osX can find Library files for A2osX such as LIBCRYPT. LOGIN automatically sets this variable to ${BOOT}LIB/, which means it will look for libraries in the LIB sub directory found in the full path $BOOT is set to. If you have made your own libraries and store them in a different location, you could change or add to this variable. It is used like the standard $PATH variable where multiple directories can be listed (and searched) by separating them with a colon (:). So for example you could SET $LIB = ${BOOT}LIB/:/MYVOL/LIBRARY/ and when your program attempts to load a library you specify it will first look for the library file in the LIB sub directory of $BOOT and then look in the /MYVOL/LIBRARY/ directory. Note that these paths must end with a slash (/) as shell looks for files by appending a file name to these search paths.
The $LOGNAME variable holds the login id (string) of the current user. This variable is set by LOGIN and cannot be changed by the user. Its value is taken from the ./etc/passwd file as set by the useradd command.
The $PATH variable holds the full paths the shell used to find external command or script files such as LS or TELNET. LOGIN automatically sets this variable to ${BOOT}SBIN/:${BOOT}BIN/, which means it will look for commands/scripts in the SBIN and BIN sub directories found in the full path $BOOT is set to. Shell will also look in the current working directory ($PWD) after looking at the directories listed in $PATH. If you have a directory with your your own commands and scripts, you can change or add to this variable. Just like the standard $PATH variable in linux, multiple directories can be listed (and searched) by separating them with a colon (:). Note that these paths must end with a slash (/) as shell looks for files by appending a file name to these search paths.
The $PS1 variable holds optional text to display as part of the interactive shell prompt. This variable is usually set in a user's PROFILE script and by default is set to '$PWD'.
Note the single quotes surrounding $PWD. If you look in you will see the full command is SET PS1 = '$PWD'. Normally when you set one variable to include another, for example SET PS1 = $PWD, PS1 would get set to the value of $PWD as it is at the time it was set. Meaning that as the user changes directories, the users prompt would never change. By surrounding $PWD with single quotes, you are telling the shell to set PS1 not to the value of PWD, but to the variable itself (think pointer in C as a opposed to data). In this way, every time the shell goes to display the prompt, it displays the current value stored in $PWD.
The $PWD variable holds the current working directory used by shell. This variable is maintained by the shell and cannot be changed directory by the user (SET $PWD = anything will be ignored). It is updated through the use of CD and PUSHD. You can ECHO $PWD, however the internal shell command PWD does the same thing and is shorter to type.
The $SHELL variable holds the full path for the Shell process of the logged in user, the shell being run currently. This variable is set by LOGIN and its value is taken from the ./etc/passwd file as set by useradd.
The $TERM variable holds the name of the type of terminal codes used for screen handling and programming. This is always set to vt100 as that is the only terminal type A2osX supports.
The $UID variable holds the user id (integer) of the current user. This variable is set by LOGIN and cannot be changed by the user. Its value is taken from the ./etc/passwd file as set by the useradd command.
In addition to the variables defined above, there are a set of special variables updated by the shell that are particularly useful with scripts. These variables are all a single character following the dollar sign ($).
The $0 variable holds current commands full path. In the case of scripts this would be the full path of the script (its file name preceded by the full path of the directory in which it is stored (i.e. /MyVol/usr/share/examples/ExampleScript).
The variables $1 through $9 hold the values of the first 9 arguments passed to a script or function. If less then 9 arguments are passed the unused variables will be null. If more then ten arguments are passed, you can use the SHIFT command to access the additional arguments. See the SHIFT command for more information.
The $* variable is a string containing all the arguments passed to the script or function. Since this is just a concatenation (space separated) of all the arguments, its usefulness is largely limited to debugging (i.e. ECHO $ >> debuglog*).
The $# variable is an integer holding the total number of arguments pass to the script or function. This variable can be used by a loop to process the passed arguments. See the SHIFT command below for an example script using the $# variable.
The **?** variable is an integer holding the return or exit code of the last executed command, function or script. Scripts and functions can set the return code using the **EXIT** command (i.e. **EXIT 144** to set ? to 144).
The $@ variable is an integer that holds the Process ID (PID) of the parent process that called this script. If a script is run from the prompt ($), then the PID would be of the /BIN/SH process running for the current user. If a script is run by another script, then the PID would be of the calling script (except if called with the . then the called script is actually running in the same process as the calling script).
The $$ variable is an integer that holds the Process ID of the currently running process (PID), which is this scripts PID.
The !** variable is an integer that holds the Process ID (PID) of the last Child process created by the currently running process (this scripts PID). Note internal shell commands such as ECHO or DATE do not create new processes, but external commands and running other scripts do. So, if a script performs a **CP afile bfile**, then examining **! right after the command would give you the PID for the process that was run.
Note, you can list the currently running processes and their IDs (PIDs), their parent PIDs and their child PID number using the PS command. You can stop a running process by its PID by using the KILL command. Running a command by using the NOHUP internal command (see NOHUP above) causes the command to be run with a parent PID of 0 (the system). Consult the Command Guide for more information on the PS and KILL commands.
Shell Flags
There are a number of flags, or settings, for the shell that affect its behavior. While these may be set interactively at the prompt ($), they have the most impact on scripts. These flags/settings are: -C (Control-C break mode), -E (Error printing mode), -F ( Function Clear), and -X (Debug Mode).
Control-C Break Mode
This mode, set by the -C flag option of SET, allows you to change the shells behavior when a user presses Control-C (Break Key) while executing scripts. Normally, when a script is running, the shell will stop execution of the script when the user presses Control-C (Break). If Break Mode is set, then this will not occur. This mode can be useful in scripts where it is important that the entire script is processed. For example, if you modified a user's PROFILE file to always execute a particular application when the user logged in, then by putting SET -C at the top of the PROFILE script, you can ensure that the user cannot exit the PROFILE script before the application is run.
Error Printing Mode
This mode, set by the -E flag option of SET, allows you to change the shells behavior while executing scripts. Normally the shell only outputs when it encounters a specific output command like ECHO or runs an external command (i.e. LS) that creates its out output. It does not output to the screen the script itself during execution.
Clear Functions
SET -F is really more of a command, then a setting, and in this case, SET -F instructs the shell to forget or clear all functions from memory previously defined by FUNCTION commands. Please see the FUNCTION section for more information on creating, using and clearing functions in the shell.
Debug Mode
This mode, set by the -X flag option of SET, allows you to change the shells behavior while executing scripts. Normally the shell only outputs when it encounters a specific output command like ECHO or runs an external command (i.e. LS) that creates its own output. It does not output to the screen the script itself during execution. The -X changes this behavior. When Debug Mode is set, the shell with echo to the screen each command line in a script as it is being executed. These lines are proceeded by a > symbol to denote it is part of debug output. If you are trying to debug a script, you can place one or more SET -X commands in your script to turn debug output on and off.
A clever trick for using SET -X for short scripts. At the prompt ($), type SET -X to turn on Debug mode. Then, run your script by using the dot calling convention (. myscript). This will run the script in the current environment (the one with Debug Mode set). Remember, that when you run a script normally (myscript), no dot then space then script name, the shell creates an all new environment to run that script and all modes/flags/settings are set to their defaults (off).
SHIFT
shift [int32]
The SHIFT command is used to remove the first argument ($1) and reorder the remaining arguments in the command line. The SHIFT command is most useful when a script is passed more then nine (9) arguments and you need to process each one individually. Since there are only special variables (see Variables above) for the first nine ($1 through $9), to process the data in arguments past nine, you first save off the early arguments then use SHIFT to be able to process the later arguments. The SHIFT commands takes an optional argument which determines which arguments gets removed, so for examples SHIFT 2 would remove the 2nd argument, moving arguments 3 and greater to the left.
The following script accesses and displays every argument passed to it, regardless of the number.
#!/bin/sh
set numArgs = $#
while [ $numArgs -GT 0 ]
	echo $1
	shift
	set numArgs = $numArgs - 1
loop
SLEEP
sleep int32
The SLEEP command is used to pause the execution of a script for 1/10th of a second. A2osX does a reasonably good job of determining processor speed (in Mhz) at start up so that SLEEP 100 is a consistent 10 seconds across systems, however note, that with emulators running at artificial speeds these calculations can be affected. Plan accordingly.
SWITCH
switch <expression>
	case <expression>
		<body>
		[break]
	...
	[default
		<body>]
end
The SWITCH statement is used at the start of a multiway program flow control block statement. The switch statement is really a different form of the if statement that is a significant improvement over using if with many nested else ; if blocks. switch provides an easy way to dispatch execution to different parts of code based on the value of the expression. Switch is a control statement that allows a value to change control of execution.
A full switch control block begins with switch and concludes with an end. In between, it contains one or more case blocks and may contain an optional default block. When the shell encounters a switch statement, it firsts evaluates the passed on the switch command line and then uses that result to pass to any case statements that are evaluated. When the shell encounters a case statement it will then evaluate the found there and compare it to the result it had from switch and if they match, it will execute the code block following that case statement. If the two values do not match, the shell will skip to the next case statement, a default statement if one exists, or the end statement. When a case block is executed, the shell will run all the commands until encounters a break or the end statement. On a break, the shell immediately skips all other commands until it finds the terminating end command. If a case block does not end with a break, then the shell will continue executing command lines, including those found in other case blocks. When the shell reaches the default block, either because no case block was executed, or one was but no break was found, then the code in the default block is executed.
#!/bin/sh
#
#   switch Command Example
#
# This example shows the use of SWITCH, CASE, BREAK, DEFAULT and END
#
read -p "\nEnter a number: " A
read -p "\nAnother number: " B
set val = $A + $B
switch $val
	echo "\nStart of Switch"
	case 0
		echo "Your Total is ZERO"
		break
	case $A
		echo "Input B was Zero"
		break
	case $B
		echo "Input A was Zero"
		break
	default
		echo "Both Inputs were Non Zero"
end
WHILE
while <condition>
	<body>
loop
The WHILE-LOOP command block is used to repeat a set of commands while a condition is true. For example, the following script accesses and displays every argument passed to it, regardless of the number. Note, that if no arguments are passed to the script then the would be false on even the first pass so the while loop would not run even once.
#!/bin/sh
set numArgs = $#
while [ $numArgs -GT 0 ]
	echo $1
	shift
	set numArgs = $numArgs - 1
loop
Redirection
Redirection describes the process of sending a data or other information to an alternate location. In A2osX, redirection allows sending data intended for one location such as standard output (the screen) to another (a file). The following redirection directives are available in the A2osX shell.
| Directive | Use | Example | Explanation |
|---|---|---|---|
| < | StdIn | MyScript < MyFile |
Runs script MyScript and any read commands would take input from the file MyFile |
| > | StdOut | MyScript > MyFile |
Runs script MyScript and any output of MyScript is placed in the file MyFile |
| >> | Append StdOut | MyScript >> MyFile |
Runs script MyScript and any output of MyScript is appended to the file MyFile |
| 1> | MyScript 1> MyFile |
Runs script MyScript and any output of MyScript is placed in the file MyFile | |
| 1>> | Working | MyScript 1>> MyFile |
|
| 2> | Working | StdErr | MyScript 2> MyFile |
| 2>> | StdErr with Append | MyScript 2>> MyFile |
Runs script MyScript and errors generated by MyScript would be appended to the file MyFile |
Piping
A pipe is a mechanism for inter-process communication using message passing. A pipeline is a set of processes chained together by their standard streams, so that the output text of each process (stdout) is passed directly as input (stdin) to the next one. The second process is started as the first process is still executing, and they are executed concurrently. The A2osX shell fully supports piping with the use of the pipe character | (the vertical bar).
# pipe the output of cmd1 to cmd2
$ cmd1 | cmd2
# list all files in the current directory recursively and pipe the output to more so output can be paged.
ls -R | more
Environment
The shell maintains an environment that includes a set of variables defined by the login program, your user initialization files (profile) and your programs or scripts. When a new script is run the shell with make a copy of the current environment and then run that script. When the script finishes executing the shell deletes that environment (freeing the memory it uses). This means any variables it creates, or existing ones that are changed are removed and the previous values are returned (as you put back to the original environment from which the copy was made. If instead, you call your script by preceding it with a . (dot or period), the shell will run that new script in the current environment. This means any changes to vars or new vars created are retained when the script exits.
# call myscript using the current environment
. myscript
Processes
A2osX allows you to start a program and run it in the background by adding a space and ampersand ( &) to the end of the command line. Often this option is used in conjunction with the nohup command, see nohup for more information.
# execute a program or script in the background
myprogram &
Writing Scripts
Some quick tips on writing scripts:
- Be careful with variable names as names are case sensitive. MyVar and myvar are not the same variable.
- Add comments to explain important script behaviors and variable usage, but not comments do consume memory when a script is running.
- Put functions in libraries and load them using the dot (.) calling convention, this frees main memory.
- If you have a complex application built on script that calls many other scripts with dot (.), make sure to release unneeded variables from memory by using
set myvar =which will null the variable, removing it from the working environment.
Getting and Validating Input
One of the challenges when writing scripts is gathering input from the user and validating that input before performing a series of operations that would be affected by missing or invalid data. For example, suppose you wrote a script that prompted a user to enter in an IP address which will be passed to the ping command. You might want to gather the input as the 4 separate octets that make up an IP address and make sure each is a valid integer in the range of 1 to 255. The A2osX shell provides a robust set of commands you can use to craft such a script with extensive error checking. For instance the read command (see above) has options to limit input to just 3 characters (the max an IP octet can be), in this case read -n 3 IP1 would accomplish this. Next you might want to validate that the user did not press return without typing anything (a null) by using either the if [ -z var ] (is null) or if [ -n var ] (not null) checks. Then using the if [ -i var ] check you could make sure the user entered an integer. Once you know you have an integer, you can check to see if it is in an acceptable range by using the compound if [ $IP1 -gt 0 ] and [ $IP1 -lt 256 ].
Note, it may seem expedient to just do that last compound if to check the range of the input. If you do that, should the user enter nothing (just press return) or enter a string (i.e. ABC) then when the script executes this if command the shell will throw and error and stop execution of your script. This is because if checks like -gt can only handle integers and the integer check -i cannot handle nulls.
The following example demonstrates the complete validation concept outlined above. You could enhance this example further by putting the input and error checking in a while loop to continue prompting the user for a valid octet until one was entered in the proper range. In addition, you could put such a routine in a function so that you could have the same set of code executed for all 4 octets.
#!/bin/sh
#
#	Demo of Getting and Validating Input
#
echo \f 				; # Clear screen
echo "\n\n Enter Octet: "
read -n 3 IP1
if [ -z $IP1 ]
	echo "\n\nNothing entered"
else
	if ![ -i $IP1 ]		; # Note the use of ! to negate IF
		echo "\n\nNon-numeric characters entered"
	else
		if [ $IP1 -gt 0 ] AND [ $IP1 -lt 256 ]
			echo "\n\nValid Octet Entered"
		else
			echo "\n\nNumber out of range"
		fi
	fi
fi
Line Separator
<command> ; <command> ; <command> ; ...
The shell supports a line separator, the semicolon (;), that can be used to concatenate one or more lines on to a single line. Many of the examples in this guide make use of this ; directive which allows you to put multiple statements on one line. For example
if [ condition ] ; echo result ; else ; echo message ; fi
Is the same as
if [ condition ]
	echo result
else
	echo message
fi
As far as the shell is concerned, it processes both syntax as a series of individual command lines. For this guide, the ; is used to make these sample scripts shorter to display. In writing your own scripts, it may be easier to read and understand scripts that use the longer syntax. The real benefit of the ; line separator is on the interactive command line ($ prompt) where you can type in a mini-script at the prompt. This is especially useful with command loops using FOR or WHILE.
Comments
#!/bin/sh
#
#  This is a comment.
    #  This is a another comment.
#LastComment
echo Hello ; # Comment after command using semi-colon
You add comments to your scripts by placing a pound sign (#) at the start of the line of your script. The # must be the first non-space character on the line, for the entire line to be treated as a comment. As shown in the sample scripts throughout this guide, you can add a comment to a line containing a command (i.e. ECHO "Hello") by using the semicolon to concatenate multiple lines (i.e. ECHO "Hello" ; # A Comment).
Examples
In addition to the scripts in this document, there are many example scripts included with A2osX which can be found on the A2osX repository on GitHub. Besides the EXAMPLES folder, you may also want to look at the scripts in the TESTS, MAKE and ADMIN folders. The scripts in the TESTS folder are used to test the various commands of A2osX with each release. The MAKE folder contains scripts used to make the published disk images for A2osX. The ADMIN folder contains scripts that are in the development stage that one day might be used to help administer an A2osX installation. All of these are good for learning the capabilities available to the script developer.
License
A2osX is licensed under the GNU General Public License.
This program is free software; you can redistribute it and/or modify
it under the terms of the GNU General Public License as published by
the Free Software Foundation; either version 2 of the License, or
(at your option) any later version.

This program is distributed in the hope that it will be useful,
but WITHOUT ANY WARRANTY; without even the implied warranty of
MERCHANTABILITY or FITNESS FOR A PARTICULAR PURPOSE.  See the
GNU General Public License for more details.
The full A2osX license can be found Here.
Copyright
Copyright 2015 - 2020, Remy Gibert and the A2osX contributors.