
Introduction
Epple ][ is an emulator of the original APPLE ][ and APPLE ][ PLUS
computers from Apple, Inc. It
runs on Windows and Linux platforms, and is released under
GPLv3

It is written in C++ and is designed with cross-platform portability in mind. It uses the SDL graphics library.
Features
-
Cycle-accurate: emulates all MOS 6502 CPU cycles including “phantom reads”
-
Video display is synchronized with CPU
-
NTSC video signal emulation: all video quirks emulated accurately
-
Revision 0 motherboard (optional)
-
Multiple display types: monitor and TV emulation
-
Can run full-screen or in a window
-
640x480 resolution
-
Floating data bus, and video scanner
-
Cards: Disk ][, language, firmware, clock
-
Paddles (mouse emulates two paddles)
-
Cassette tape interface
-
PR#1 writes to standard output
-
Accurate keyboard emulation, including the repeat key
-
It even emulates the POWER light!
Screenshots
DOS 3.3 System Master boot
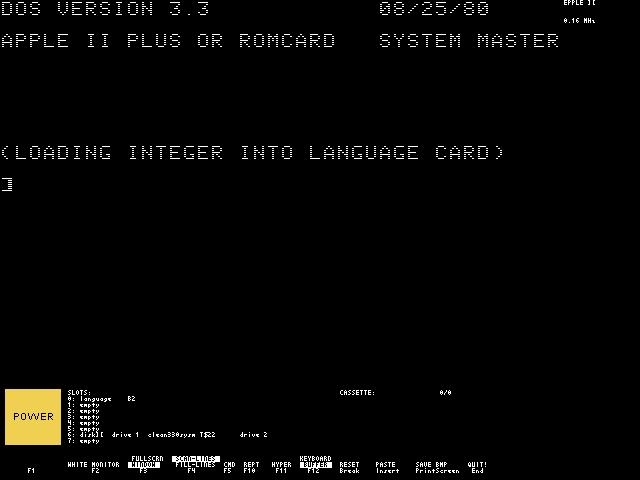
Here we’ve configured an Apple ][ plus, with a disk controller in slot 6, and a language card in slot 0. We’ve booted the DOS 3.3 System Master disk. It correctly identifies the machine as an Apple ][ plus, and then loads Integer BASIC into the language card. You can switch between Applesoft and Integer BASIC by using the FP and INT commands.
DOS 3.1 System Master on Revision 0 motherboard
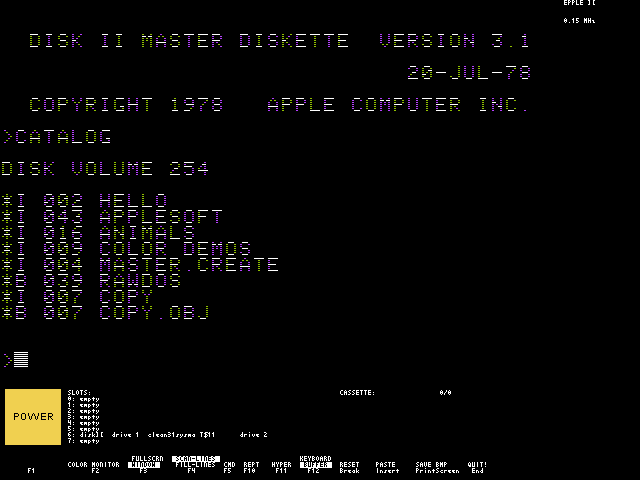
Here we’ve configured an Apple ][ (Integer BASIC ROMs), with a Revision Zero motherboard, and a disk controller (with 13-sector ROMs) in slot 6. With a revision 0 motherboard, when the machine is powered-on, the CPU doesn’t start actually running until you manually press the RESET button. Also, the old Monitor ROMs do not boot from the disk drives automatically; you need to type C600G to boot. We’ve booted the DOS 3.1 System Master disk and done a catalog of it. As you can see, with a revision 0 motherboard, the text is displayed in green and purple, which are also the only two HIRES colors. Later revisions of the motherboard added a “color burst killer” which is active during text mode, so the text would be strictly white. Two more HIRES colors, blue and orange, were also added in later revisions.
PRODOS 1.1.1 boot
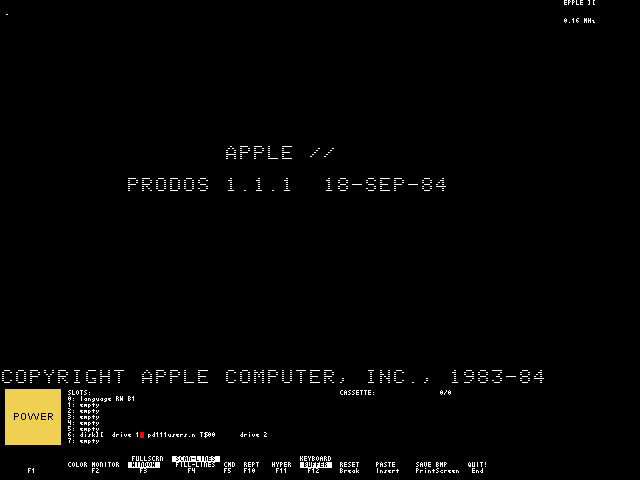
Here we’ve configured an Apple ][ plus with language card and disk drive. We’re booting a PRODOS 1.1.1 disk.
Bishop’s Apple Split
The October 1982 issue of Softalk featured an article by Bob Bishop entitled Have an Apple Split, which describes in some detail the inner workings of the Apple ]['s video processing. Listings 1 and 2 from that article show a short Applesoft program and assembly language subroutine that allow the Apple ][ to have a screen split between text and graphics display. To achieve this on the EPPLE ][, copy the following text and paste it into the emulator (at the Applesoft ] prompt). Since the EPPLE ][ accurately emulates the video scanning and timing of the original Apple ][s, this “split screen” technique works successfully. The rest of the behavior described in the article (the floating data bus) is also emulated faithfully by the EPPLE ][.
CALL -151

300:8D 52 C0 A9 E0 A2 04 CD 51 C0 D0 F9 CA D0 F8 A9
310:A0 A2 04 CD 50 C0 D0 F9 CA D0 F8 8D 51 C0 60

E000G

100 HOME

200 FOR K = 0 TO 39
210   POKE 1448+K, 14*16
220   POKE 2000+K, 10*16
230   COLOR = K+4
240   VLIN 24, 45 AT K
250 NEXT K

300 VTAB 6 : HTAB 17
310 PRINT "APPLE II"

400 CALL 768
500 GOTO 400

RUN
Mysterious Pink Line
Jim Sather’s book Understanding the Apple II, which was the primary reference for the internal design of the EPPLE ][ emulator, describes the video generation process of the Apple ][, in great detail, in Chapter 8. On page 8-21 he shows a simple Applesoft BASIC program (shown below) that shows an example of one of the hi-res idiosyncrasies on the Apple ][. The program would logically draw three orange lines, but due to the video cutoff and extension of half-dot shifted pixels, instead the right line is brown, and there is a “mysterious pink line” (actually magenta) on the far left of the screen. The EPPLE ][ faithfully emulates this behavior.
NEW

10 HGR : HCOLOR = 5 : HPLOT 5,159 TO 5,0 TO 279,0 TO 279,159

RUN
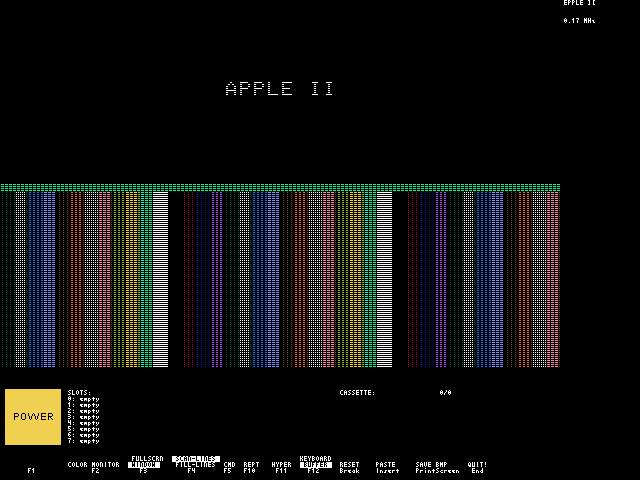
Split Screen HIRES/LORES colors
Jim Sather’s book Understanding the Apple II, shows an Applesoft BASIC program and assembly language subroutine on pages 3-16 and 3-17 (reproduced below) that produce the display shown here. The screen is split between HIRES and LORES graphics by a timed loop that manipulates the screen switches. (Press any key repeatedly to move the position of the split.)
Notice that the Apple ][ can actually produce more HIRES colors than are documented in the standard Apple reference manuals. White, black, green, purple, blue, and orange are normally documented, but by careful manipulation of the high-bit (half-dot shift indicator) of the HIRES display byte, many other colors can be produced. The additional colors match some LORES colors. Also notice that the text at the bottom of the screen is colored green and purple while in mixed text/graphics mode. This is because the “color burst killer” circuit is not active while displaying graphics on the Apple ][ machines.
CALL -151
1F00:AC 54 C0 A0 27 20 27 1F
1F08:AC 10 C0 AC 00 C0 30 F3
1F10:69 01 29 01 AA BC 56 C0
1F18:A2 08 20 31 1F A0 31 20
1F20:27 1F 18 90 E6 D0 01 88
1F28:88 EA D0 F9 60 48 68 EA
1F30:EA A0 62 20 27 1F EA CA
1F38:D0 F3 60

E000G
 30 HGR : HOME : VTAB 21 : PRINT "1  7  D  2  8  E  B  4  5  A 3 6 C 9 F 8"
 40 DIM COLR(39), X(21)
100 FOR A = 0 TO 39 : READ COLR(A) : COLOR = COLR(A) : VLIN 0, 39 AT A : NEXT A
200 FOR A = 0 TO 21 : READ COLR(A) : READ X(A) : HCOLOR = COLR(A)
210 HPLOT X(A), 0 TO X(A), 159 : NEXT A
220 FOR A = 8319 TO 16383 STEP 128 : POKE A, 64 : NEXT A
300 CALL 7936
400 REM  LORES DATA
410 DATA 1,0,7,7,0,13,13,0,2,2,0,8,8,0,14,14,0,11,11,0
420 DATA 4,4,0,0,5,0,0,10,0,3,0,6,0,12,0,9,0,15,0,8
500 REM  HIRES DATA
510 DATA 4,0,3,20,4,21,3,41,4,42,7,62,7,83,7,104,3,105,7,125,3,126,7,159,3,161
520 DATA 7,180,3,182,3,206,7,220,3,233,7,247,3,262,3,263,7,279

RUN
Download

|
Usable Apple ROMs (proprietary
[You must respect the fact that the Apple System Software and Apple Disk Operating System (DOS) Software are proprietary software; they are copyright by Apple and/or others. This web page is not providing any advice as to the legality of any copying or downloading you may perform.] ) are available at the Apple II Library. |
The following software is licensed under GPLv3.
Epple ][ Program: epple2.tar.gz
System ROM (Demo): epple2sys.tar.gz
Card ROMs (stdin/stdout/clock): epple2cards.tar.gz
See Building to build from sources.
What To Download
Epple ][ Program—The Hardware (Emulated)
The Epple ][ Program package is the emulator itself, which emulates the Apple ][ or Apple ][ plus hardware, as well as the peripheral card hardware. This is the main program, so you will certainly need to download this package. To have a full functioning emulator, you will also need System ROMs and Card ROMs, as described in the following sections.
System ROMs—The Main System Firmware (Demo or Real)
Since the Epple ][ program emulates only the hardware, you will also need to download some system software
for it to run. This is commonly called “firmware” or “ROMs,” because it is stored in the
read-only memory area of the emulated system. The original system software on the
Apple ][ machines is copyright by Apple, and is proprietary. If you own an actual
Apple ][ or Apple ][ plus machine, you can copy
[disclaimer]
the firmware
from it ($D000-$FFFF) (into a file on your PC) and use it. Alternatively, you can
download
[disclaimer]
the firmware images from the Apple II Library.
If you do not want to download the proprietary firmware, you can still use the emulator (albeit in a restricted manner) with the free (GPLv3) System ROM (Demo) package. Download the file for your platform and install as appropriate. You can choose either binary format (ready to run), or source if you want to assemble it yourself (using the xa Assembler). The Demo System ROM only provides commands to dump or set memory bytes, or run a program in memory. It is not compatible with any Apple software, nor can it read from disks. It’s just a free simple demo system to make the emulator do something reasonable.
Card ROMs—The Peripheral Card Firmware
If you are going to use the Disk ][ Controller peripheral card (which you almost certainly will, if
you want to read any floppy disk images), you will need to have to original ROMs from Apple.
No demo of the Disk ROMs are provided here; you will need to
use the original ROMs, which can be obtained from an original machine (by copying
[disclaimer]
it from $C600-$C6FF into a file on the PC), or by downloading
[disclaimer]
it
from the Apple II Library.
(And, of course, you will need the real Apple System ROM, as noted in the previous section,
not the Demo System ROM.)
If you are using any of the clock, the standard output, or the standard input peripheral cards, you will need to download their firmware as well, which are contained in the Card ROMs package. You can choose either binary format (ready to run) or source format (to assemble it yourself(using the xa Assembler). If you are not going to use the stdin, stdout, or clock cards, then you do not need to download this package.
Configuration
The Epple ][ Emulator is most useful when properly configured. After downloading and installing the Epple ][ Program, some System ROM (demo or real), and optionally the peripheral card ROMs you want to use, you will need to configure the program. Configuring is concerned primarily with telling the program what peripheral cards to use, and where the ROM files are located (and what memory addresses to load them at).
epple2.conf
The default configuration file for the Epple ][ emulator is:
/etc/epple2/epple2.conf
For Windows, the file will be:
C:\Program Files\Epple2\etc\epple2\epple2.conf
The configuration file could be in a different location depending upon how the distribution package is built.
You can specify a different configuration file for the emulator to use by specifying its name as the argument when running the epple2 program.
The format of the configuration file is just lines of commands. Comments begin with a hash # character, and continue to the end of the line.
Firmware
Firmware, commonly called ROM images or ROMs, will need to be loaded into the emulated ROM areas of the emulated Apple in order for it to be able to boot the emulated Apple machine. The firmware available is described above. Once the firmware image files are installed on your computer, you can use the import command in the configuration file to load the image files into the emulator.
Peripheral Cards
Another primary concern for configuring the Epple ][ is the insertion of peripheral cards into the Apple’s slots. The most useful card is probably the Disk ][ Controller card; you will need to insert one of these cards if you want to be able to load floppy disk images into the emulated Apple. The various types of cards available are described on the peripheral cards section. You can use the slot command in the configuration file to insert them into the Apple’s slots.
Sample Configuration Files
There are a number of configuration files provided with the distribution for your convenience. They provide various common configurations of machines. You can use one of these files directly, by specifying its path as the argument to the program, or as a starting point for you own configuration file. These sample files are in the same location as the default epple2.conf file.
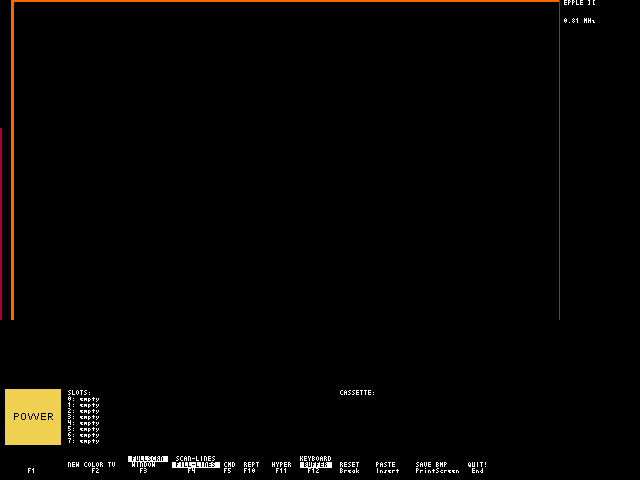
The Epple ][ Emulator can actually be run without a configuration file at all. In this case, you will be able to “power on” the Apple and see the low-resolution graphics display showing random RAM data. The system will not run, because there is no firmware loaded, but the emulator will otherwise be functional.
User Manual
Overview
Epple ][ (the Emulated Apple ][ is a free (as in GPLv3), cross-platform (Windows, Linux) emulator of the Apple ][ and Apple ][ plus computers from Apple, Inc. It strives for accurate emulation of the original machines, with a few extra features added.
Commands
slot
The slot command inserts a card into a peripheral slot of the emulated Apple.
slot <slot> <card>
<slot> Slot number, 0 through 7, to insert the card into.
<card> The type of card to insert into the slot:
-
language
-
firmware
-
disk
-
clock
-
stdout
-
stdin
-
empty
The slot command inserts a card into a peripheral slot. For example:
slot 0 language
inserts a language card into slot zero. Use empty to remove a card:
slot 0 empty

|
The emulated Apple should be powered off before inserting or removing cards. |
import
The import command imports a binary image file into the emulated Apple’s memory.
import slot <slot> { rom | rom7 | rombank } <base> <file-path>
import motherboard { rom | ram } <base> <file-path>
<slot> Slot number, 0 through 7, of peripheral card to import the binary image into.
<base> Base address in hexadecimal within the given memory area at which to start loading the binary image.
<file-path> Path of the binary image to import.
The import command reads the binary image byte-for-byte from the given file-path into an area of memory in the emulated Apple. You can load into either the motherboard or a card in one of the slots. For the motherboard, you choose the RAM or ROM area. For a card in a slot, you can choose either the normal ROM, the bank-switched ROM, or the so-called “seventh ROM” area.
You also have to specify the base address within the specific memory area at which the image file will be loaded. Note that the base address is specified as the offset within the specific memory area, and not necessarily as the actual memory address as seen by the Apple. So for motherboard ROM, for example, specifying a base as 2DED will cause the image to be loaded at offset 2DED in the ROM, which will be addressed by the Apple at memory address $FDED (because motherboard ROM “starts” at address $D000).
For peripheral cards, the ROM will be seen at locations $Cs00-$CsFF, where s is the slot number (1 through 7). The “seventh ROM” can be seen as locations $C800-$CFFF; Jim Sather describes this functionality in Understanding the Apple II, on page 6-4, section “The Seventh ROM Chip.” The EPPLE ][ emulator handles this processing correctly. A card can also have bank-switched ROM, which will show up at addresses $D000-$FFFF when switched in (stealing that address range from motherboard ROM… see Understanding the Apple II, p. 5-26 “The 16K RAM Card”).
load
The load command loads a (nibble) floppy disk image into one of the emulated disk drives.
load slot <slot> drive <drive> <file-path>
<slot> Slot number, 0 through 7, of Disk ][ controller card to load the nibble image into.
<drive> Drive number, 1 or 2, of the disk drive on the controller card to load the nibble image into.
<file-path> Path of the nibble floppy disk image to import.
The load command will load a nibble image into a disk drive. Specify the slot that contains a Disk ][ controller peripheral card, and specify which drive number (1 or 2).
|
|
The floppy disk image MUST be a NIBBLE DISK IMAGE. Other formats (for example, DOS order, .do, PRODOS order, .po, .dsk, or anything else) must first be converted to nibble format. A nibble image contains all 35 tracks, in order 0-36, each track being 6656 ($1A00) bytes long. Nibble image files will generally have a filetype of .nib. |
The best floppy disk image conversion tool I’ve found is CiderPress, for Windows (but it supposedly runs under Wine on Linux, too). Thanks to Andy McFadden.
unload
The unload command removes a floppy disk image from one of the emulated disk drives.
unload slot <slot> drive <drive>
<slot> Slot number, 0 through 7, of Disk ][ controller card to which the drive is attached.
<drive> Drive number, 1 or 2, of the disk drive on the controller card to remove the floppy disk image from.
The unload command removes the disk from the specified slot and drive.

|
If the disk has been modified but not saved, the modifications will be DISCARDED. |
save
The save command saves changes made on an emulated floppy disk back to the original image file.
save slot <slot> drive <drive> <file-path>
<slot> Slot number, 0 through 7, of Disk ][ controller card to which the drive is attached.
<drive> Drive number, 1 or 2, of the disk drive on the controller card to save.
<file-path> Path of the nibble floppy disk image to import.
The save command saves any changes that the emulated Apple ][ has made to the floppy disk image. It is important to note that the emulator operates on the image only in memory, and does not immediately write changes back to the real file. You need to issue the save command in order to write changes back to the file. Note that the emulator will display a asterisk * next to the file-name of a disk image if it has any unsaved changes.
cassette
The cassette command performs various operations of the emulated cassette tape.
cassette new <file-path>
cassette load <file-path>
cassette unload
cassette rewind
cassette save
<file-path> File path of the (special format) cassette tape image file.
The cassette command allows the user to control the emulated cassette tape player. See Cassette for more information about operating the emulated cassette player and cassette tape image files.
revision
The revision command specifies which revision of Apple ][ motherboard to use.
revision <rev>
<rev> Revision number of the motherboard. Currently, only two values make any difference in behavior: 0 or 1.
The revision command chooses which revision of the Apple ][ motherboard to use. The only revisions that make any difference (for now, at least) are 0 or 1. Zero is the original (now quite rare) version of the motherboard, that only had two hi-res colors (green and purple), and always displayed text with green and purple fringes. Revision 1 and later motherboards are the ones we are more familiar with.
Display
The orignal Apple ][s didn’t come with a display. The user needed to use either a standard television, or a monitor, to see the computer’s output. The EPPLE ][ emulates a variety of displays; you can cycle between the different types using F2. There are two major types of displays: televisions and monitors. Monitors generally have higher quality (sharper) displays. The displays show the normal visible area of the NTSC video signal generated by the emulated Apple ][ machine.
Monitors
The emulator provides a color monitor, and three monochrome monitors (white, green, and orange). These emulate standard, no-frills NTSC monitors. The most noticeable characteristic of monitors is the horizontal display of pixels. Monitors react faster than TVs, so two adjacent pixels will not merge together; both will be distinctly visible, with blackness between them. For example, type in the following Applesoft command, then cycle through the display types. The monitors will show thin, vertical, green lines; TVs will show continuous horizontal lines.
GR : COLOR=4 : HLIN 10,20 AT 10
Televisions
There are two types of television displays, referred to as “old” and “new.” Each has color and monochrome (commonly known as “black and white”) varieties. Televisions react more slowly to changes in the incoming video signal than monitors do, and as a result, horizontal pixels will merge together, forming a more uniform appearance. The “new” color TV display uses the pre-defined color pallette (described below under “Colors”), and the black and white TV uses the same pallette, but fully desaturated. The “old” color TV is the most interesting. It emulates the signal decoding circuitry of a real television. This includes separating out the “chroma” portion of the incoming NTSC video signal using a filter algorithm, and calculating the color to display. It does not use the pre-defined colors.
|
|
This mode is very CPU intensive, so your computer (that is, the one that EPPLE ][ is running on) may not be able to run fast enough to run at the speed of the original Apple ][. The Apple ][ CPU runs at about 1 MHz, but the video generator runs at 14 MHz; so the inner-most loop in the EPPLE ][ must run 14 million times per second to keep up. |
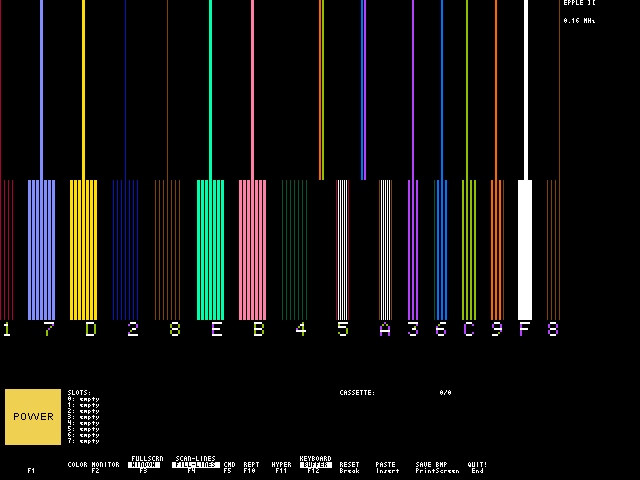
Colors
The color palatte used for the color monitor and new color TV is pre-defined, and was determined through observation of a real Apple ][ machine on a standard TV, the colors being matched by eye. The old color TV, however, uses algorithms to calculate the colors it displays.
Scan Lines
NTSC displays (TVs or monitors) usually receive signals that are interlaced. However, the Apple ][ doesn’t generate interlaced screens. This causes blank rows between each displayed row of pixels. The EPPLE ][ emulates this behavior, but also allows you to “fill in” these black rows with a copy of the row above it, for a more continuous display (vertically). Use the F4 key to toggle between these two modes.
Resolution
The Apple ][s are commonly documented as having a resolution of 280x192 pixels, and to an extent this is true. Vertically there are 192 pixels, but since there is no interlacing, it is more accurate to display them with one blank space between each. So the EPPLE ][ has two times 192, or 384, vertical pixels in its display. Horizontally there are 280 pixels, but each could also be shifted right one-half dot, allowing for two times 280, or 560, different horizontal displayable positions. To emulate this, the EPPLE ][ shows each emulated pixel as two pixels wide, and displays an emulated half-dot shift as an actual one pixel shift. So the display area of the EPPLE ][ is 560x384. There is an informational area below and to the right of the emulated display that shows various statistics of the emulator. So the total screen area used by the EPPLE ][ is a standard 640x480 pixels.
Full Screen
The EPPLE ][ can run in either full-screen mode, or within a window. Use the F3 key to toggle between the two.
Informational Area
The area at the bottom and the right of the EPPLE ][ display show various information about the emulator.
-
POWER light
-
current cards in SLOTS
-
CASSETTE tape information
-
emulated CPU speed (MHz)
-
function-keys help
Keyboard
The EPPLE ][ emulates the original Apple ][ keyboard. The original Apple ][ keyboard had symbols in different places than current common PC keyboards. For example, Shift-2 on the Apple ][ produces a double quote, but on a PC keyboard it produces an at-sign. For ease of typing, the EPPLE ][ emulator does not mimic the positions of the original keys, but rather mimics the symbols on the current PC keyboard. So, for example, if you type Shift-2 on the PC keyboard into the EPPLE ][, it produces an at-sign, as you would normally expect.
The Apple ][ keyboard didn’t produce lower-case letters; neither does the emulator. Also, the Apple couldn’t produce an opening square bracket ([), braces, vertical bar, backslash. There were no up- or down-arrow keys. You cannot type these into the emulator, either. There are other, unusual, cases that are emulated correctly, as well, such as typing Control in conjunction with a number key simply produces that number. So typing a Control-3 is the same as just typing a 3. Also, typing Shift-Control-2 produces the NUL character (ASCII $80).
The Apple ][ keyboards didn’t automatically repeat typing characters when a key was held down. Instead, the user would hold down the REPT (“repeat”) key while holding down the key that was to be repeated. On the EPPLE ][, this behavior is emulated, and the F10 key is used as the REPT key.
The Apple ][ had no keyboard buffer (actually, it had a buffer of one character). So if you typed several characters on the keyboard before the currently running program had a chance to read them, they would get lost (only the final character typed would be remembered). This behavior can be toggled on or off in the EPPLE ][. By default, the EPPLE ][ will buffer up any characters you type and deliver them to the emulated machine when it asks for them. However, the Apple program must be written properly to allow this to work. Some Apple ][ programs (like maybe some games) may not work correctly in this respect, so you may want to turn off buffering in these cases. With buffering turned off, the EPPLE ][ accurately emulates the original Apple ][. Use the F12 key to toggle the keyboard buffering. Note that pasting from the clipboard (with the Insert key) will most definitely cause keys to be lost if the keyboard buffer is turned off. So if you have a big Applesoft program in the clipboard and you want to paste it into the EPPLE ][ correctly, make sure the keyboard buffer is on.
-
F1 Emulates the POWER switch on the back of the Apple ][.
-
F2 Cycles among different display types (TV, monitor, etc.).
-
F3 Toggles between full-screen or window display.
-
F4 Toggles between showing scan lines on the display, or duplicating each scan line to the following line, to fill-in the otherwise black line.
-
F5 Go to “command entry” mode.
-
F10 Emulates the REPT key.
-
F11 Toggles between running the emulator at authentic speed (1.02 MHz CPU), or as fast as possible.
-
F12 Toggles the keyboard buffer.
-
Break Emulates the RESET key.
-
Insert Pastes characters from the clipboard into the emulated Apple (as if they had been typed on the keyboard).
-
Print Screen Save a bitmap file of the current EPPLE ][ screen. The file will be in the default directory, named ep2_YYYYMMDDHHMMSS.bmp.
-
End Quit the EPPLE ][ program, immediately!
|
|
If you have modification to any floppy images or cassette images, and you press the End key, you will LOSE all those changes, unless you save them first. See Commands for the save command. |
Peripheral Cards
Disk ][ Controller
The Disk ][ Controller card emulates the floppy disk controller card and associated disk drives in the original Apple ][ systems. In the emulator, each card has two drives attached to it, referred to as drive 1 and drive 2. The floppy disks themselves are represented by a “nibble” image of the contents. The emulator emulates the hardware, but to be of any use, you will need to provide the firmware ROM code.
To use a disk card and drives, add these lines to your epple2.conf file, for example:
slot 6 disk
import slot 6 rom 0 /usr/lib/apple2/dos3x/16sector/controller/disk2.ex65
The first line uses the slot command to insert a disk contoller card into slot 6, which is the standard slot used for disk cards. The next line uses the import command to load the card’s ROM with the disk controller firmware. This firmware is known as the “bootstrap” or “P5” ROM code. It is seen by the Apple ][ at memory addresses $Cs00-$CsFF, where s is the slot number (so in the common case of the card being in slot 6, the ROM is at $C600-$C6FF). The firmware is copyright by Apple, and is available from the Apple II Library.
You can also load a floppy disk image (nibble format) into the drive,either by putting the load command into the epple2.conf file, or by using the command prompt in the emulator (F5 key). For example, you could load the DOS 3.3 system master into slot 6, drive 1, with this command
load slot 6 drive 1 /usr/lib/apple2/dos3x/16sector/disks/dos330/clean330sysmas.nib
Language
The language card emulates an Apple 16K RAM card, commonly called a Language Card. To use a language card, add this line to your epple2.conf file:
slot 0 language
Note that DOS and ProDOS will make use of a language card only if it is in slot zero.
The language card has RAM at addresses $E000 through $FFFF, as well as two banks of RAM at addresses $D000 through $DFFF. A program switches between these RAMs and/or the motherboard ROM by using the I/O switches at $C080 through $C08F.
The information area of the Epple ][ will show the current state of the language card as follows:
-
R Read from card RAM (vs. motherboard ROM)
-
W Write to card RAM (vs. write-disabled)
-
B1 Use $D000 bank 1
-
B2 Use $D000 bank 2
An overview of the I/O switches that control the language card is provided by Jim Sather in Understanding the Apple II, p. 5-30, Table 5.4, as follows:
| BANK2 | BANK1 | ACTION | |
|---|---|---|---|
C080 |
C088 |
WRTCOUNT = 0*, WRITE DISABLE |
READ ENABLE |
C084 |
C08C |
||
RC081 |
RC089 |
WRTCOUNT = WRTCOUNT + 1* |
READ DISABLE |
RC085 |
RC08D |
||
WC081 |
WC089 |
WRTCOUNT = 0* |
READ DISABLE |
WC085 |
WC08D |
||
C082 |
C08A |
WRTCOUNT = 0*, WRITE DISABLE |
READ DISABLE |
C086 |
C08E |
||
RC083 |
RC08B |
WRTCOUNT = WRTCOUNT + 1* |
READ ENABLE |
RC087 |
RC08F |
||
WC083 |
WC08B |
WRTCOUNT = 0* |
READ ENABLE |
WC087 |
WC08F |
||
* Writing to expansion RAM is enabled when WRTCOUNT reaches 2.
Firmware
The firmware card emulates a (modified) Apple Firmware card. The firmware card is simply an alternate ROM, at addresses $D000 through $FFFF, that is switched using the I/O switches at addresses $C080 through $C08F. In order to make use of the firmware card, you will need to load the ROM with a binary image from a file on disk. For example, to insert an Integer BASIC firmware card into the emulator, add these lines to your epple2.conf file:
# Firmware card with Integer BASIC and old Monitor
slot 0 firmware
import slot 0 rombank 1000 /usr/lib/apple2/system/intbasic/intbasic.ex65
import slot 0 rombank 2425 /usr/lib/apple2/system/other/other.ex65
import slot 0 rombank 2800 /usr/lib/apple2/system/monitor/apple2/monitor.ex65
For an Applesoft BASIC firmware card, use these:
# Firmware card with Applesoft BASIC and Autostart Monitor
slot 0 firmware
import slot 0 rombank 0000 /usr/lib/apple2/system/applesoft/applesoft.ex65
import slot 0 rombank 2800 /usr/lib/apple2/system/monitor/apple2plus/monitor.ex65
Note that the addresses specified in the epple2.conf file for the rombank are based on the beginning of the bank ROM itself. For example, specifying 1000 (which is 1000 hex) represents the final memory address of $E000, because the bank ROM is always based at address $D000.
The idea is that you would load your motherboard with, for example, Applesoft BASIC and the Autostart Monitor ROM (to emulate an Apple ][ plus), and then install a firmware card with Integer BASIC and the old Monitor. Booting with DOS 3.3, then, would allow you to type FP to use Applesoft BASIC, or INT to switch to Integer BASIC.
Note that DOS and ProDOS will make use of a firmware card only if it is in slot zero.
Jim Sather, in Understanding the Apple II, on pages 6-18 through 6-21, explains how to modify a firmware card to allow independent switching of the $F800-$FFFF ROM memory. This area is occupied by the Monitor, so it is primarily intended to allow the user to switch between the old Monitor and the Autostart Monitor, independent of switching between Integer and Applesoft BASIC. The EPPLE ][ firmware card emulates this behavior.
The information area of the EPPLE ][ will show the current state of the firmware card as follows:
-
D Read from firmware card $D000-$F7FF (vs. motherboard BASIC ROM)
-
F8 Read from firmware card $F800-$FFFF (vs. motherboard Monitor ROM)
Clock
The clock card emulates a ProDOS-compatible real-time clock card for the Apple ][. To use a clock card, you will need to configure the EPPLE ][ to insert one into a slot, typically slot 4. You will also need to load the card with its ROM code, which is provided with the emulator in the clock.ex65 file. For example, add this to your epple2.conf file:
slot 4 clock
import slot 4 rom 0 /usr/lib/epple2/cards/clock.ex65
Of course you may need to adjust the path for your particular system.
To verify that the clock card is working correctly, you can run the following Applesoft program to retrieve the current time from the clock card and print it. This program assumes the card is in slot 4.
NEW

10 CALL -15360 : REM $C400 SLOT 4 ENTRY POINT
20 A = 512 : REM $0200 INPUT BUFFER
30 C = PEEK(A)
40 IF C < 160 THEN 99
50 PRINT CHR$(C);
60 A = A+1
70 GOTO 30
99 END

RUN
The card returns data (into the GETLN input buffer at $200) in the following format:
mm,ww,dd,hh,nn,ss,000,yyyy,Time Zone,v
-
mm Month, 01-12
-
ww Weekday, 00=Monday… 06=Saturday
-
dd Day, 01-31
-
hh Hour, 00-23
-
nn Minute, 00-59
-
ss Second, 00-61
-
000 Milliseconds; always zero
-
yyyy Year, e.g., 2008
-
Time Zone time zone string (could contain lower-case characters, which won’t display correctly)
-
v Daylight Saving Time in effect, 0=no, 1=yes
Note that only mm,ww,dd,hh,nn fields are used by ProDOS. The other fields, ss,000,yyyy,Time Zone,v, are an EPPLE ][ extension. Also note that ProDOS was not designed to work for years past 2007, so ProDOS will show the incorrect year, but the other fields will be accurate. I believe patches exist for ProDOS to fix this.
Standard Input
The “standard input” card doesn’t emulate a real piece of hardware; rather, it reads characters from standard input (stdin) (of the EPPLE ][ emulator).
To use a standard input card, add these lines to your epple2.conf file:
# IN#2 reads from standard input
slot 2 stdin
import slot 2 rom 0 /usr/lib/epple2/cards/stdin.ex65
That will insert a stdin card into slot 2, and then load its ROM image into the card. The stdin ROM is provided with the EPPLE ][ distribution.
For example, if you have a stdin card installed in slot 2, start the EPPLE ][ emulator from the command line, and at the Applesoft prompt, type IN#2. Then you can switch back to the command shell, and whatever you type will be fed into the emulated Apple. Use RESET or IN#0 to go back to normal.
Standard Output
The “standard output” card doesn’t emulate a real piece of hardware; rather, it acts similar to a printer card, but instead of sending characters to a printer, it sends them to standard output (stdout) (of the EPPLE ][ emulator).
To use a standard output card, add these lines to your epple2.conf file:
# PR#1 prints to standard output
slot 1 stdout
import slot 1 rom 0 /usr/lib/epple2/cards/stdout.ex65
This will insert a stdout card into slot 1 (which is the typical slot for a printer card), and then load its ROM image into the card. The stdout ROM is provided with the EPPLE ][ distribution.
For example, if you have a stdout card installed, at the Applesoft prompt, type PR#1. Whatever you type next will be echoed to standard output. Type PR#0 to stop echoing.
Cassette Tape Interface
The Apple ][ and Apple ][ plus machines had the ability to save and load binary data to and from cassette tape. The user would attach a standard cassette tape recorder to the jacks on the back of the Apple ][, and use the monitor R and W commands, or the Applesoft BASIC commands LOAD and SAVE, to read and write data on the cassette tape. The user would have to press the play and/or record buttons on the player at the right time.
The Epple ][ emulates the cassette interface, using a file to hold the recorded portion of the tape. The file will grow in length as necessary to hold data that the emulated Apple is writing to the “tape.” The emulator will not overwrite existing data on a tape image. The emulator will automatically “press” the play or record buttons that would have been necessary when using the original machine.
Commands
cassette new <file-path>
This creates a new empty file (on the host computer) that represents a cassette tape image. The file must not already exist.
cassette load <file-path>
This loads an existing file (from the host computer) containing a cassette tape image. The tape is automatically positioned at its beginning (fully rewound).
cassette unload
This removes the file from the cassette tape. Note that you must manually save the file using the cassette save command (described below).
|
|
Unloading an unsaved file will lose any changes made to the file, without warning. |
cassette rewind
This command “rewinds” the cassette tape, positioning it at the beginning of the tape (for subsequent reading). You do not need to rewind the tape before saving or unloading it, of course.
cassette save
This command saves the changed tape to the file. Note that the display will show an asterisk * next to the file name if there are unsaved changes that need to be saved. Unsaved changes will be lost without warning if the file is unloaded or if you quit the program.
Example of Saving to Tape
Start up the emulator with Applesoft ROMs for this tutorial. Enter a simple Applesoft program, just as an example, that we are going to save to a cassette tape image file.
]NEW

]10 PRINT "HELLO"

]20 END

]LIST

10  PRINT "HELLO"
20  END

]RUN
HELLO

]
We first need to load a tape image file into the cassette machine. Enter command mode by pressing F5, then make a new tape image file.
command: cassette new hello.tap
This will create a new, empty tape file image named hello.tap in the current default directory. (We could have specified a full path name for the file if we wanted to place it in a different directory.) Notice that the emulator now displays the name of the tape image file, along with the position and length of the tape image, which is now 0/0.
Next, we tell Applesoft to save the program to the cassette. For this, we just use the SAVE command. Note that this is not the DOS SAVE command; the DOS command has a file name after SAVE. We just use SAVE with no file name.
]SAVE

]
It will take 10 seconds or so for it to save. Notice that the current position of the tape is counting up as the Apple saves the program. When it is finished, you need to save the changes to the file. Press F5 and enter the emulator command to save the tape image file.
command: cassette save
We can now unload the file from the emulator (which is like ejecting the tape from the cassette player).
command: cassette unload
Example of Loading from Tape
To load the saved program (from the previous section) into the Apple again, we will need to first load the tape image file back into the cassette machine. Press F5 to enter command mode and load the image file.
command: cassette load hello.tap
This will load hello.tap (in the current default directory). Notice the emulator now displays the name of the tape image file, along with the position and length of the tape image, which in this case is 0/33481.
Next, we tell Applesoft to load the program from the cassette. For this, we just use the LOAD command. Note that this is not the DOS LOAD command; the DOS command has a file name after LOAD. We just use LOAD with no file name.
]LOAD

]
It will take 10 seconds or so for it to load. Notice that the current position of the tape is counting up as the Apple loads the program. When it is finished, the program will be loaded.
]LIST

10  PRINT "HELLO"
20  END

]RUN
HELLO

]
Tape Image File Format
The format of the tape image file is unique to the Epple ][ It is stored in a low-level format that represents the waveform that the Apple writes to the cassette tape.
The file is a binary format. Each byte in the file represents the length of one half of one cycle (of voltage level variation) written to the tape. The length is in 10-microsecond units.
For example, a tape image file might have the following binary bytes (in decimal): 65 65 65 65 65 20 25 50 50 25 25 25 25 50 50 Since each byte represents a 10-microsecond unit, these bytes represent the following half-cycle lengths in microseconds: 650 650 650 650 650 200 250 500 500 250 250 250 250 500 500 The meaning of these half-cycle lengths to the Apple is as follows:
|-------HEADER------|--sync-|-1-bit-|-0-bit-|-0-bit-|-1-bit-|
|                   |       |       |       |       |       |
|650 650 650 650 650|200 250|500 500|250 250|250 250|500 500|
where HEADER is a header section the Apple writes (to skip any unrecordable leader section on a real cassette tape); sync is a synchronization cycle; and the subsequent cycles are the actual bits of data saved on the tape. A 500-microsecond cycle (which is stored in the file as two 250 microsecond half-cycles) represents a zero bit, and a 1-millisecond cycle (which is stored in the file as two 500 microsecond half-cycles) represents a one bit.
Paddles
The Epple ][ provides two paddles to the Apple ][ machine. One paddle is controlled by moving the mouse left and right; the other paddle is controlled by moving the mouse up and down. The paddle buttons are emulated by the mouse buttons (left and right click).
In Understanding the Apple II, on page 7-33, Jim Sather describes soldering fixed resistors across a game connector to create two real-time clock references. This is emulated by the Epple ][. Paddle timers 2 and 3 are 100-microsecond and 1-millisecond references, respectively.
Speaker
The Apple ][ could generate sound via a speaker that generated square wave audio. A program could read memory location $C030 to toggle the speaker and generate a “click” sound.
The Epple ][ emulator will generate sounds from the emulated Apple and send them to the audio device. It generates 8-bit mono sound, with a 22,050 Hz sampling rate.
Building From Source
The Epple ][ Emulator is written in C++, and can be built using the standard make program.
The primary dependency is Simple DirectMedia Layer (SDL). Your linux distribution may provide a package. Or else you can download it directly from SDL’s web site. In either case, be sure to install the “Development Libraries” for your particular platform.
Debian Linux Example
sudo apt-get install build-essential libsdl1.2-dev #cd mkdir epple2 cd epple2 wget http://mosher.mine.nu/epple2/download/epple2-latest.tar.gz #
tar xzvf epple2-1.0.tar.gz mkdir build #
cd build ../epple2-1.0/configure #
make #
sudo make install #
| Install dependencies: gcc, make, SDL |
| Retrieve the latest Epple ][ source distribution |
| Use this directory for a VPATH-style build |
| Run one-time configuration script for your system. Use --help for more information. |
| Compile and link. Program will be src/epple2 |
 | Install into standard system directories |
Windows/MSYS Example
Install MinGW/MSYS
Install MSYS into C:\msys\
Install MinGW into C:\msys\mingw\
For more information on MinGW and MSYS, see http://www.mingw.org/.
Install SDL
At http://www.libsdl.org/ find the download page. Download the “Development Libraries” for Win32/mingw, for example:
SDL-devel-1.2.13-mingw32.tar.gz (Mingw32)
and save it to your MSYS home directory (for example, C:\msys\home\Administrator). Run MSYS, and at the bash prompt, go to your home directory and untar the SDL archive to your home directory:
$ cd
$ tar xzvf SDL-devel-1.2.13-mingw32.tar.gz
Then follow the instructions to install SDL, for example:
$ cd SDL-1.2.13
$ make native
Untar Epple ][ Source
Download the Epple ][ Source Distribution and save it to your MSYS home directory (for example, C:\msys\home\Administrator). Run MSYS, and at the bash prompt, go to your home directory and untar the epple2 source distribution tar file. For example:
$ cd
$ tar xzvf epple2-1.0.tar.gz
Build Epple ][
Then build as follows. I recommend doing a VPATH build, where you build into a different directory than the source directory. To accomplish this, create a new directory for building, somewhere, such as:
$ cd
$ mkdir buildepple2
$ cd buildepple2
Then run configure from there. For the MSYS build to work, you need some extra parameters to the build, and you could also add some compiler options to optimize the build. For example (from the buildepple2 directory you just created):
$ ~/epple2/configure --prefix= \
CXXFLAGS="-I/usr/include -O4 -msse3" \
CFLAGS="-I/usr/include" \
LDFLAGS="-L/usr/lib -mconsole -mthreads -mno-cygwin"
$ make
If all goes well, it will build without any errors. If you get errors about not finding SDL.h, make sure SDL is installed, and make sure the configure command is correct. (If you just run configure without the options shown above, you will get this error at build time.) The result of the build (on Windows platform) is
installer/epple2.msi
which is an installable file for Windows. To install epple2, just double-click on this file from Explorer.
Copyright © 2009,2012, by Christopher A. Mosher, Shelton CT, USA.

This web site is licensed under the Creative Commons Attribution-Noncommercial-Share Alike 3.0 USA License.