The settings are divided into four groups: Volumes, Graphics/Sound, Serial/Network and Memory/Misc.
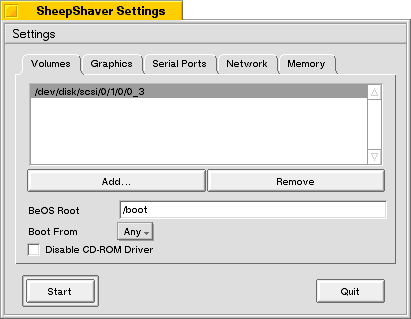
The main part of the volumes pane is a list that contains all volumes to be mounted by SheepShaver. If this list is empty, SheepShaver will try to detect and mount all HFS partitions it can find. A CD-ROM drive is always automatically detected and used.
SheepShaver can use HFS partitions, whole HFS formatted drives, and it can also emulate hard disks in single Linux files ("hardfiles").
To add a Mac volume to the list, click on "Add...", go to the "/dev" directory in the file panel, click once on the partition you want and click on "OK". The selected partition device name should then appear in the volume list. After adding volumes to the list, you should unmount them on the Linux side. To remove a Mac volume, select it in the list and click on "Remove".
You can create a new, empty hardfile by clicking on "Create...". Enter the file name and the size of the hardfile and click on "Create". The hardfile will be created (this may take some seconds) and added to the volume list. The so-created hardfile will have to be formatted under MacOS before you can store something in it. If you start up SheepShaver, the Finder will display a message about an "unreadable" volume being found and give you the option to format it.
Double-clicking on an entry in the volume list will add or remove a "*" in front of the device name. Volumes marked with a "*" are read-only for the MacOS under SheepShaver.
SheepShaver will show a "Linux" disk icon on the Mac desktop that allows access to Linux files from Mac applications. In "Linux Root" you specify which Linux directory will be at the root of this virtual "Linux" disk. The default setting of "/" means that the "Linux" icon in the MacOS Finder will correspond to your Linux root directory. The MacOS will try to create files and folders like "Desktop", "Trash", "OpenFolderListDF" etc. in the directory you specify as "Linux Root" (provided that you have access rights to that directory). If they annoy you, you can delete them.
To boot from CD-ROM, set the "Boot From" setting to "CD-ROM". The "Disable CD-ROM Driver" box is used to disable SheepShaver's built-in CD-ROM driver. This is currently of not much use and you should leave the box unselected.

With "Window Refresh Rate" you can set the refresh rate of the MacOS window. Higher rates mean faster screen updates and less "sluggish" behaviour, but also require more CPU time.
The "Enabled Video Modes" controls allow you to select which graphics modes are available for displaying the MacOS desktop. You can, for example, disable the window modes when you want to run some Mac programs in full-screen mode that would otherwise erroneously switch to a window mode. If your X server doesn't support DGA you should disable the Fullscreen mode. The actual mode to be used is selected in the "Monitors" control panel under MacOS. The color depth is always that of the X11 screen and cannot be changed.
The "Disable Sound Output" box allows you to disable all sound output by SheepShaver. This is useful if the sound takes too much CPU time on your machine or to get rid of warning messages if SheepShaver can't use your audio hardware.
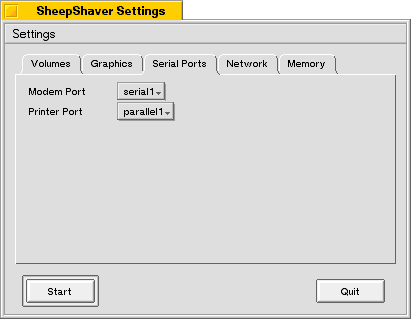
You can select to which devices the MacOS modem and printer ports are redirected. You can assign them to any serial ports you have (/dev/ttyS*), or even to parallel ports (/dev/lp*, useful for printing if you have Mac drivers for parallel printers, like the PowerPrint package from www.gdt.com).
With "Ethernet Interface" you select which Ethernet card is to be used for networking. It can either be the name of a real Ethernet card (e.g. "eth0") or of an ethertap interface (e.g. "tap0"). Using a real Ethernet card requires the "sheep_net" driver to be installed and accessible. See Using SheepShaver for more information about setting up networking.

With "MacOS RAM Size" you select how much RAM will be available to the MacOS (and all MacOS applications running under it). SheepShaver uses the Linux virtual memory system, so you can select more RAM than you physically have in your machine. The MacOS virtual memory system is not available under SheepShaver (i.e. if you have 32MB of RAM in your computer and select 64MB to be used for MacOS in the SheepShaver settings, MacOS will behave as if it's running on a computer that has 64MB of RAM but no virtual memory).
"ROM File" specifies the path name of the Mac ROM file to be used. If it is left blank, SheepShaver expects the ROM file to be called "ROM" and be in the same directory as the SheepShaver application.
The "Ignore Illegal Memory Accesses" option is there to make some broken Mac programs work that access addresses where there is no RAM or ROM. With this option unchecked, SheepShaver will in this case display an error message and quit. When the option is activated, SheepShaver will try to continue as if the illegal access never happened (writes are ignored, reads return 0). This may or may not make the program work (when a program performs an illegal access, it is most likely that something else went wrong). When a Mac program behaves strangely or hangs, you can quit SheepShaver, uncheck this option and retry. If you get an "illegal access" message, you will know that something is broken.