mirror of
https://github.com/smartykit/apple1.git
synced 2024-12-26 05:32:26 +00:00
SmartyKit 1 computer construction kit drivers and software. (Apple 1-compatible)
You could use this file for free to produce your own plate for your SmartyKit using wood laser cutter. PCB version (black one) would be available for sale soon. |
||
|---|---|---|
| Arduino/libraries | ||
| Emulator_Pom1 | ||
| ROM development | ||
| SmartyKitApple1_KeyboardDriver | ||
| SmartyKitApple1_VideoTerminal | ||
| SmartyKitApple1_VideoTerminalTemp | ||
| .gitignore | ||
| index.css | ||
| index.js | ||
| LICENSE | ||
| README.md | ||
| SmartyKit Pixel Art example.png | ||
| SmartyKit_ModulesSchematics_1.0.pdf | ||
| SmartyKit_ModulesSchematics.pdf | ||
| SmartyKit-Plate-for-breadboards(laser-cut).cdr | ||
| SmartyKit-plates.jpeg | ||
SmartyKit Apple I - apple1
SmartyKit Apple I replica drivers and software (http://www.smartykit.io/).
All needed libraries included in repository in /Arduino/libraries
Keyboard Driver
Keyboard driver uses Arduino PS2Keyboard library.
Video Driver
Video driver uses Arduino TVout library.
Software Emulator - POM 1
POM 1 cross-platform emulator by Verhille Arnaud to test SmartyKit 1 ROM with software.

SmartyKit 1 Memory Map – ROM and RAM

ROM Development – SmartyKit 1 ROM asm source and make file
Easy-to-use development tool to write your own software for SmartyKLit 1 (you need just run make in your Terminal) and learn how ROM is organized.
Here is an example:
SERGEYs-MacBook:ROM_development spanarin$ make
SmartyKit 1: 6502 assembler & C-compiler to ROM (.bin)
Assembling and linking...
ca65 -l ROM_listing.asm SmartyKit1_ROM.asm
ld65 -m ROM.map -o SmartyKit1_ROM.bin SmartyKit1_ROM.o -C apple1.cfg
ld65 -o SmartyKit1_ROM_symon.bin SmartyKit1_ROM.o -C symon.cfg
SERGEYs-MacBook:ROM_development spanarin$
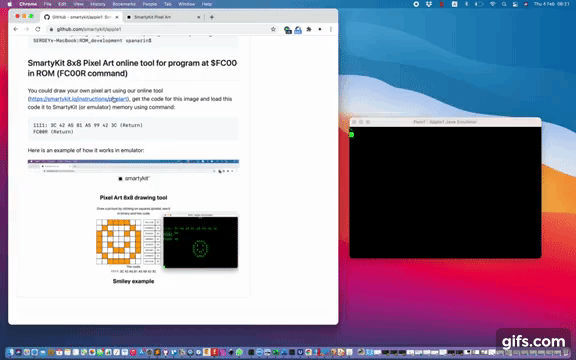
SmartyKit 8x8 Pixel Art online tool for program at $FC00 in ROM (FC00R command)
You could draw your own pixel art using our online tool (https://smartykit.io/instructions/pixelart), get the code for this image and load this code it to SmartyKit (or emulator) memory using command:
1111: 3C 42 A5 81 A5 99 42 3C (Return)
FC00R (Return)
Here is an example of how it works in emulator:
And a screenshot:
![]()