DaynaPort SCSI/Link Ethernet
PiSCSI has the ability to emulate a DaynaPort SCSI/Link device. This allows for a host to connect to a local area network through the Raspberry Pi's network connection (either wired or wireless)

| 
|
The instructions for the wired network use case assumes that you're using a DHCP server (which is typical of a home network). The wireless use case will create an isolated subnet with manual IP assignment. If you're using manual IP addresses for your wired network, you may try to tweak the wireless example.
 Raspberry Pi Setup
Depending upon which use case matches your situation, the Raspberry Pi configuration will be slightly different.
Automated Setup
-
Download and install latest version of PiSCSI by following the setup instructions.
-
Run the network bridge setup script for wired or wireless:
# Scripted network configuration:
./easyinstall.sh # Select option 5 to configure wired, and 6 to configure wireless bridge
- Let the Pi reboot, and attach a DaynaPORT adapter to your PiSCSI as instructed in the script
Manual Setup
If you're not using easyinstall.sh to configure the network bridge, you can follow the manual steps below.
Wired Raspberry Pi Setup
Only use this section if you didn't use easyinstall.sh to configure the bridge, and your Raspberry Pi is connected to a wired network that uses DHCP to assign addresses
In this section, we're going to reconfigure the network so that eth0 is just an interface to the outside world, but does not have any "Layer 3" functions.
| Before | After |
|---|---|
 |
 |
-
Set up linux networking: In this step we will be re-configuring the network to use a bridge device named
piscsi_bridge- Copy the bridge configuration to
/etc/network/interfaces.d/
sudo cp ~/PiSCSI/os_integration/piscsi_bridge /etc/network/interfaces.d/- Modify the
/etc/dhcpcd.conffile to add the following line at the bottom
denyinterfaces eth0 - Copy the bridge configuration to
-
Reboot the Pi
NOTE: Your IP address may change after the reboot!
- After the reboot, run
ip addr show. You should see that eth0 does NOT have an IP address, and that piscsi_bridge DOES have an IP address assigned.

- When you run
brctl show, you should also see that there is a piscsi_bridge created with eth0 connected to it.
pi@piscsi:~ $ brctl show
bridge name     bridge id          STP enabled   interfaces
piscsi_bridge   8000.869bacd8de6f  no		         eth0
- After you create/attach the daynaport in PiSCSI, you should be able to see a "piscsi0" interface attached to the bridge. Run 'brctl show' on Linux to validate this. (Note the formatting may be garbled on your terminal)
pi@piscsi:~ $ brctl show
bridge name     bridge id          STP enabled   interfaces
piscsi_bridge   8000.869bacd8de6f  no		         eth0
                                                 piscsi0
Wireless Raspberry Pi Setup
Only use this section if you didn't use easyinstall.sh to configure the network bridge, and your Raspberry Pi is connected to a wireless network or you want to use Network Address Translation (NAT)
The goal of this section is to create the network bridge with a static IP address, and then configure NAT using iptables rules to share the connection with the DaynaPORT interface.
-
Set up your network on the Raspberry Pi. Make sure you can connect to the internet with a web browser, etc.
-
Decide on network interface, IP addresses and netmask to use for your setup. This example assumes wlan0, base address 10.10.20.X and netmask 255.255.255.0 (24)
-
Edit /etc/sysctl.conf and uncomment
net.ipv4.ip_forward=1
- Set up iptables by first clearing any existing rules, then configure masquerading on wlan0
sudo iptables --flush
sudo iptables -t nat -F
sudo iptables -X
sudo iptables -Z
sudo iptables -P INPUT ACCEPT
sudo iptables -P OUTPUT ACCEPT
sudo iptables -P FORWARD ACCEPT
sudo iptables -t nat -A POSTROUTING -o wlan0 -s 10.10.20.0/24 -j MASQUERADE
- Make iptables rules permanent (answer yes to the first question; second and (when IPV6 is enabled) thired question doesn’t matter)
sudo apt-get install iptables-persistent
Reboot the Pi
Note that unlike the wired configuration above, PiSCSI will stand up the piscsi_bridge interface automatically when you attach the DaynaPORT device, so there is no need to copy over the interface config file to interfaces.d .
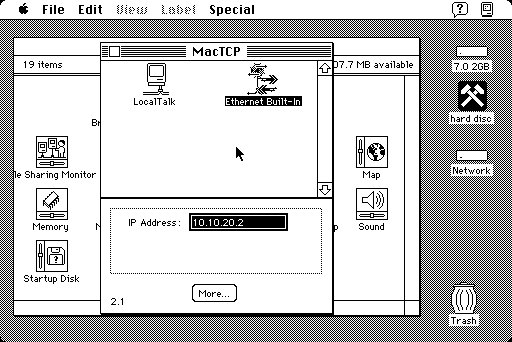
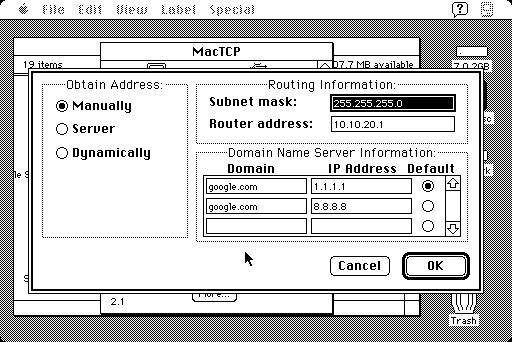
On the Mac side, in the TCP/IP or MacTCP control panel choose Manual and input:
- IP address 10.10.20.2
- Network mask 255.255.255.0
- Router 10.10.20.1
- Name server can be any DNS server; Google's Public DNS servers work well for this purpose
Note: It’s recommended to specify at least two DNS addresses
Note: AppleTalk/DDP won't work to communicate with other devices on the network with this configuration, but TCP will work fine.
Attach a DaynaPORT adapter to your PiSCSI configuration
There are four ways to accomplish this:
- Launch 'piscsi' with parameters on the command line (when not running as a service)
- Edit the piscsi.service configuration to attach devices on launch (when running as a service)
- Use 'scsictl' to dynamically attach the device on a running piscsi instance
- Use the web interface to attach the device
Note that by default, the DaynaPORT device will launch with parameters 'eth0,wlan0' meaning it will attempt to use eth0 first, and if unavailable then wlan0. Also, note that the default IP address / netmask is 10.10.20.1/24. So for most usecases, if you follow the automated process and use the default values, you don't have to specify any parameters when attaching the DaynaPORT device and it should work out of the box.
NOTE: If using custom subnets it is very likely that MacTCP will have problems with subnets larger than a
/24for handling INBOUND connections (eg, when the Macintosh is serving a BBS). It has been observed that when using a/16connections to the BBS running on a MacTCP setup in one/24range of the broader/16(192.168.3.10) that responses back to a client in a different/24subset of the same broader network (192.168.1.20) would fail. Switching the client to be in the same/24range (192.168.3.20) resolved the communications issues. While this isn't conclusively known to be the problem, it is nevertheless worth keeping in mind if you're experiencing connection issues.
Ex. with piscsi / wired / DHCP, PiSCSI not running as a service
sudo piscsi -ID 6 -t scdp interfac=eth0
Ex. with scsictl / wired / DHCP, PiSCSI already running
scsictl -i 6 -c attach -t scdp interface=eth0
Ex. with piscsi / wireless / static IP, PiSCSI not running as a service
sudo piscsi -ID 6 -t scdp interface=wlan0:inet=10.10.20.1/24
Ex. with scsictl / wireless / static IP, PiSCSI already running
scsictl -i 6 -c attach -t scdp -f wlan0:10.10.20.1/24
(Optional) Configure PiSCSI to start up with your DaynaPORT configuration
Here you have two options. Either have the PiSCSI Web UI read your default configuration file on startup, or hard code the launch parameters in the piscsi.service ExecStart argument. The latter is more permanent, while the former can be managed more easily through the Web UI. Also note that the Web UI configuration will override whatever is defined in piscsi.service.
-
Web UI configuration option: Once you've attached your DaynaPORT device with just the right parameters, you can save that as a PiSCSI Web UI configuration file. If you name it default (~/.config/piscsi/default.json) that configuration will be loaded when the Web UI starts up for ultimate convenience!
-
piscsi.service ExecStart option: Modify your service startup script to automatically add the DaynaPort at startup. To do this, open
/etc/systemd/system/piscsi.servicewith a text editor. Modify the ExecStart line to add the ID and device. For example:
ExecStart=/usr/local/bin/piscsi -ID 6 -t scdp interface=eth0
- If you modified the piscsi.service file, you will need to run
sudo systemctl daemon-reloadandsudo service piscsi restart
 Macintosh Setup Instructions
The ultimate classic Mac networking guide is available on AppleFool.com
There are two primary methods to configure TCP/IP on vintage Macs:
- "Classic Networking" (MacTCP) (68020 or older)
- Open Transport (68030 or newer)
Open transport is recommended if you're not sure which one you want to use.
Classic Networking (MacTCP)
Note: MacTCP does NOT officially support DHCP, so if you use stock MacTCP you will have to assign a static IP address on your Mac. Make sure that you assign an IP address that falls inside the address range of your router, and be careful not to reuse an address used by other interface on the LAN.
MacTCP is your only option if you want to get your Mac with a 68000 or 68020 CPU online, or if you're running System Software 7.0.1 or earlier.
*The following instructions have been tested on System Software 6.0.7 and 7.1.1 Pro.
- Download and install Network Software Installer. For System 7 use v1.5.1, System 6 use v1.4.4.
- Download MacTCP 2.0.6 and apply the unofficial 2.1 patch, then move it into the "Control Panels" folder under the System Folder (SSW 7.0+) or in the root of the System Folder (SSW 6.0.x or earlier)
- Download and install the DaynaPort 7.5.3 Drivers
- Reboot your Macintosh
- Open up the MacTCP control panel and configure it with a static IP address matching the piscsi_bridge configuration on your PiSCSI
- Example below for the when the NATed piscsi_bridge uses 10.10.20.1, with Google Public DNS servers
- Reboot your Macintosh again
- Test your network connection with MacTCP Ping by f.e. pinging a Google DNS server (8.8.8.8)
Open Transport
(Note the following instructions were written for MacOS 7.1 and 7.5. There may be slight differences on other versions)
- Download and install Open Transport 1.3
- Download and install the DaynaPort 7.5.3 Drivers
- Mirrors: Github, VintageApple.org
- Alternative DaynaPort 7.7.1 Drivers
| Step | Screenshot |
|---|---|
| When you run the DaynaPort installer, it should auto-detect the SCSI/Link device. If not, your installation may not work correctly. |  |
| It is recommended to pick the Custom Install or Customize option, and then choose to install DaynaPORT SCSI/Link only from the list. This avoids a situation where the Installer tries to overwrite newer versions of f.e. AppleTalk and fails with an error. |  |
| You may get a warning about a later version of a file with a corrupted name. You can ignore this. |  |
| Once the install is complete, reboot the Macintosh. |  |
Tip: A bootstrap .HDA image with all of the needed drivers is available Macintosh Garden
Optional Its recommended to also install the diagnostics utilities. These can help in troubleshooting. To install these, run the diagnostics.sea file included with the driver installer.
Software Diagnostics
This application will verify that you have the drivers correctly installed and that you are communicating with the virtual DaynaPort SCSI/Link. When you launch the software diagnostics tool, you should see something resembling this output:

Hardware Diagnostics
The Hardware Diagnostics tool will disable the DaynaPort interface. You MUST reboot your Mac after running this utility. Any ongoing network communication will be interrupted.
When you first launch the application, it will warn you that you MUST reboot after running it.

After you click Continue, it may take a few seconds for the diagnostics to run. When they complete, you should see something resembling this:

OTTool
Another excellent troubleshooting tool it Apple's OTTool 1.2.1. It requires Open Transport 1.3 to be installed, provides detailed information about the network interface, and has several built-in features for domain name resolution, ping, traceroute, etc.
One way to know that your DaynaPort interface is set up correctly locally, is that OTTool shows that the interface has been assigned an IP address. That helps you eliminate other problems such as bridge or NAT configuration on the PiSCSI host.
Atari ST/TT/Falcon Setup Instructions
The DaynaPort SCSI/Link emulation works with plain TOS and STiNG, and also with the MiNT drivers for the Atari ST. Some instructions for setting this up are available on the archived Anodyne Software web page.
See also this thread on atari-forum.com with steps to a successful setup on an Atari TT system.
For using the emulation with TOS and STiNG this configuration in STING.PRT can be used:
# Pi, eth0, 192.168.0.110
#Port : Ethernet0
# ACTIVE=1 IP=c0a8006e SUBMASK=ffffff00 MTU=1500 TYPE=1 MAC=00:80:19:10:98:e3

# Pi, wlan0, 10.10.20.2
Port : Ethernet0
 ACTIVE=1 IP=0a0a1402 SUBMASK=ffffff00 MTU=1500 TYPE=1 MAC=00:80:19:10:98:e3
Uncomment the setup block that matches the network interface you have configured piscsi with, e.g. eth0 or wlan0. Without any configuration pisci uses the first interface that is up, in alphabetical order. This means that by default eth0 (if available) is preferred to wlan0.
This is a matching ROUTE.TAB:
# Pi, eth0
#192.168.0.0    255.255.255.0   Ethernet0       0.0.0.0
#0.0.0.0                0.0.0.0         Ethernet0               192.168.0.1

# Pi, wlan0
10.10.20.0      255.255.255.0   Ethernet0       0.0.0.0
0.0.0.0         0.0.0.0         Ethernet0               10.10.20.1
Note that STiNG does not support DHCP and thus requires a hard-coded IP address.
Also be aware that the DaynaPort drivers for STiNG and MiNT do not support LUNs > 0. This in particular affects the internal host adapter of the MegaSTE, which only supports a single SCSI ID. On the one hand TOS can only boot from LUN 0, on the other hand the DaynaPort drivers require the DaynaPort to be LUN 0. You either attach the one or the other device. The authors of the respective drivers, who are still active in the Atari developer community, are aware of this problem. It is not clear, though, whether they will address it. It should not be a big deal to extend the DaynaPort driver with LUN support. On GitHub there is suitable code for the SCSI Driver, which automatically detects a particular device independent of its SCSI ID or LUN. As long as there are no DaynaPort drivers supporting LUNs > 0, as a work around there is a program for the AUTO folder, which maps ACSI IDs to LUNs on the Atari. Note that this tool requires release 12 of the HDDRIVER driver.
Troubleshooting and limitations
- On the Mac, if the DaynaPort installer complains about a Network file in control panels you will need to use ResEdit to make that file visible, then move it out of the Control Panels folder and try the install again.
- Right now, the DaynaPort SCSI/Link simulation is hard coded to use a specific MAC address. Only use one of these on any network at a time (for now)
- SCSIProbe can see that something is there, but only returns it as a dot. SCSIProbe doesn't understand the Inquiry response. (The real Daynaport is the same way)

- Most wifi routers will prevent multiple MAC addresses from using the same wifi radio. You will likely need to set up NAT on your Raspberry Pi to get this work.
- For debugging on a Mac, AG Net Tools will be your best friend. It includes utilities that report the current network configuration, ping, trace route, etc.

Other background Info
The current working copy of the DaynaPort SCSI Link command set is available here: DaynaPort Command Set.
Dyanaport Pictures


The Farallon EtherMac is probably identical to the DaynaPort SCSI/Link-T
Links:
- Tiny SCSI Hackaday project - https://hackaday.io/project/18974/logs?sort=oldest
- Tiny SCSI source code - https://bitbucket.org/tinyscsi/tinyscsiemulator/src/master/
- Dayna Port Pictures, software & docs - http://www.bitsavers.org/pdf/apple/scsi/dayna/daynaPORT/
- Users guide: https://www.apple.asimov.net/documentation/macintosh/DaynaPORT_Pocket_SCSI_Link_Users_Guide_Sep95.pdf
- Drivers: https://vintageapple.org/macdrivers/network.shtml
- Pictures of the inside of the device: https://goughlui.com/2013/07/28/tech-flashback-daynaport-scsilink-t/
- Archive.org Drivers: https://web.archive.org/web/19961102041429/http://www.dayna.com/Dayna/techsup/drivers.html
Atari Links:
- "FreeMint" Driver Implementation: https://github.com/freemint/freemint/tree/master/sys/sockets/xif/daynaport
- Setup instructions: https://sites.google.com/site/probehouse/networking-the-atari/networking-the-atari-st